Working on texture when dyeing
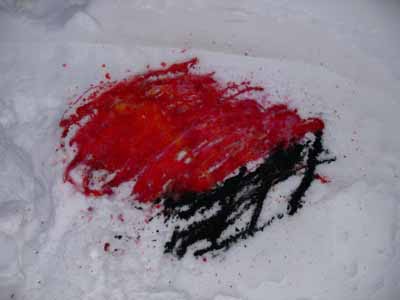
Happy Valentine’s day everyone… in celebration of the day, I bring you reds and roses….and to find out why there is dye in the snow, keep reading!
One of the things that has frustrated me is getting the visual texture I want in my dyed cloth. I know how to get intense scrunch and markings, but a lot of the time, fabric like that is too visually busy for the way I work and make quilts. I want a softer, more subtle color shift. So, over Christmas (yes, that long ago), I did an experiment using four different red dyes and one yellow on a 12×21 inch piece of fabric. Where the fabric is striped, the dyes were painted on in the same sequence across the cloth (even the vertical piece…the stripes are just skinnier)
Here is the whole bunch:

The techniques I used are as follows….. in the next photo,
–top sample is dry cloth, set flat, with dye painted on, left for 30 minutes, then soda ash solution painted on
–lower sample is dry cloth, set flat, using activated print paste mix (in other words, mix up print paste, add soda-ash-solution and dye) painted on with a sponge brush
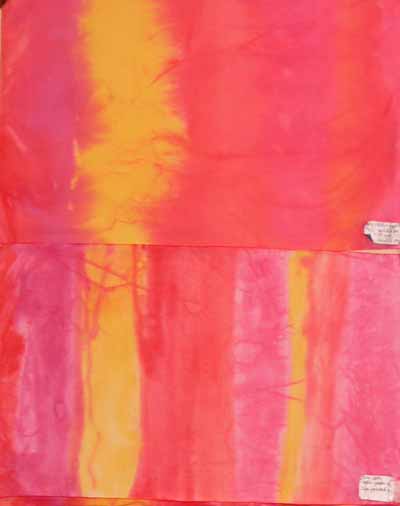
In the next pair,
–the top sample is fabric soaked in soda ash solution, placed flat on the table, and dye painted on; note the sharper patterning than in the painted-on version above
–the lower sample is “snow dyed.” Good thing I did this in December as it has been warmer in January than in December! Anyway, you are supposed to pour dye on snow, let it freeze, pick up the chunks of dyed snow and place them on your cloth. Bleach. This is a candidate for the rag bag… an interesting concept but boring results I think…
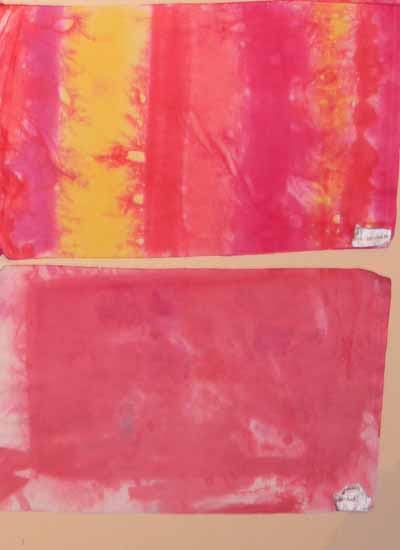
In the next photo,
–top sample is dry cloth placed (sorta bunched) in tub, dye poured on, set about 30 minutes, soda ash solution added
–lower sample is cloth soaked in soda ash solution, scrunched, and dye dribbled on (note a sharper pattern of crystals)
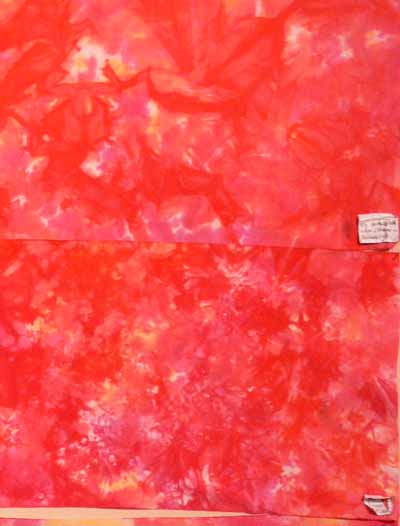
Saving the best for last…..
–the upper photo is fabric that was soaked in soda ash solution, then allowed to dry completely. Then it was laid flat on the table and dye was painted on.
–the lower photo uses Robbi Eklow‘s drip-dye method, featured in her book Free Expression (available here at Quilting Arts) in one of the most useful appendices to a quilt book in a long time (and great stuff on my favorite, quilting, in the rest of the book!).
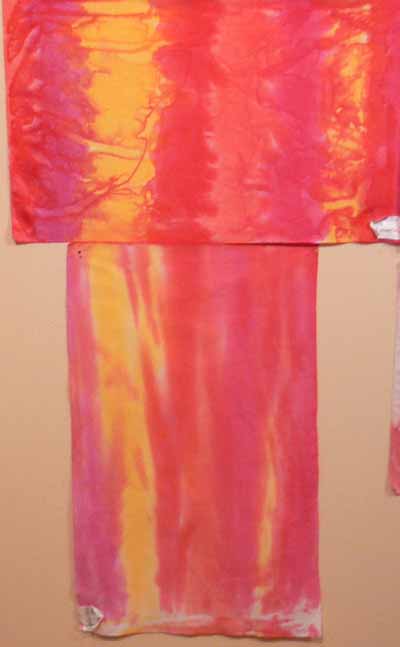
I really like smooth transitions and soft color, so it is no surprise that the first piece and the last are my favorites (in the overall photo at the top of this LONG post, the top and bottom pieces on the left side). I also rather liked the texturing from painting on soda-soaked-and-dryed.
February 14th, 2008 at 7:54 pm
Lots of nice samples- I’ve learned in my experiments in dyeing that I get softer results if I don’t soak the fabric in soda ash, but add it after the dye solution. Ann Johnston’s books have been my bibles on that journey.
And thanks for sparing me from playing with snow dyeing. It has not been warmer here than it was in December, we got another six or so inches last night. I probably have two feet in my little north-facing, enclosed patio/backyard! Spring can’t come soon enough for me.
February 16th, 2008 at 1:06 pm
My favorites are your favorites as well. I also like my results better when I add the soda ash later, although your next to last sample is intriguing. I have not tried painting on dye but I will add that to my list. I cannot wait for June to take Carol Soderlund’s class! I have been salivating over your colors.
February 16th, 2008 at 6:27 pm
Sarah, thanks so much for posting all this great information, and especially for the eye candy! (Not just this post, but the earlier ones too.) YUMMM!
February 25th, 2008 at 11:49 pm
I did a different variation of “snow dyeing” with some friends. We soaked fabric in soda ash, scrunched it, and froze each piece in a plastic bag or container. One could put it out in the snow to freeze, but Washington was having a warm spell at the time, so we all used our freezers. We then poured dye solution over the frozen fabric and batched it for 24 hours. We got wonderful patterning on our fabric, presumably because the dye took in areas that had defrosted and was exhausted before some of the areas thawed. All four of us agree we’d do it again.
March 27th, 2008 at 1:59 pm
Try adding a very thin solution of sodium alginate and see what happens.
July 22nd, 2009 at 8:28 am
Very nice! I recently watched a you-tube about using shaving cream in a way I’d not tried before that gave nice soft texture!
GM