Clothed in Color: how I did it….
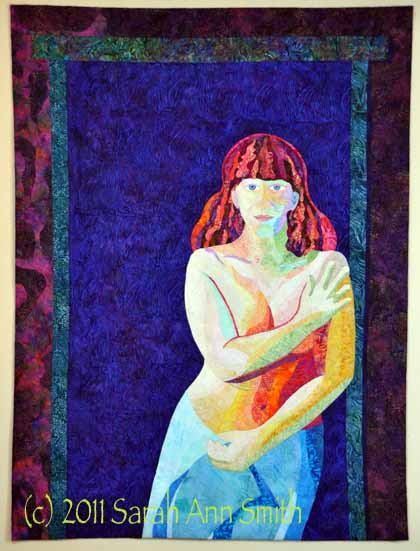
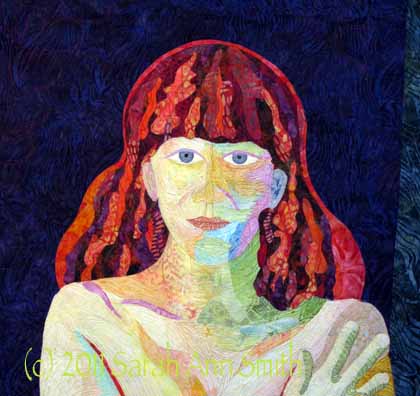
I’m always fascinated by the creative process, especially seeing how someone else did something. So I figure I’m not the only one with these voyeuristic traits and thought I’d share a bit of “how I did that.” That, in this case, is my quilt Clothed in Color, which is an entry for “The Space Between” juried exhibit. I wrote about it here.
Over the past few years I’ve been teaching myself about and playing with color, both in the dyepots and commercial cloth. When I decided to do a portrait of our older son, I wanted to work with value only, the relative lightness or darkness of color, ignoring the actual hue (color). As I mentioned before, though, I wasn’t too sure he would appreciate his skin being green, blue, pink, whatever. As a test-run, I tried the process in the portrait of our pug, and it worked, so I set to work on the Joshua quilt (put Joshua quilt in the search box and it will take you to posts from mid 2010 with the process on that one) except that I used realistic skin tones. Not so for this quilt!
For this quilt, I began by selecting pale batiks and dark batiks in anything other than a tan-brown-skin tone. OK, an honesty moment. I began by depositing a large sum of money (with glee, abandon and NO regrets) at Batiks Etcetera last summer. As I drove to my teaching job at the AQS Knoxville show, I made certain to stop at Batiks, Etc. in Wytheville, Virginia. The shop is even more wonderful than their booths at shows and the service just as wonderful. It is hard to find the light-light and dark-dark fabrics, so I went hog wild. True confession: I have never, EVER spent this much for fabric in one place at one time in my life. It pretty much used up my fabric budget for the last 7 months of the year. And it was worth every penny! (PS…I blogged about it earlier, too, here.) And I’m planning on doing it again this coming June when I drive past that shop on the way to teaching this year (WHEEEE! Get ready Carol, make the bag a big one!). Now here’s the photo of lights and darks:
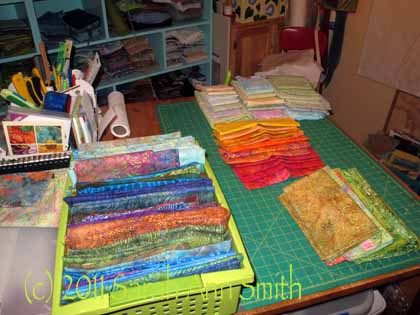
Sorting fabrics by value...light to medium on the table, darker ones and some extra lights in the green bin.
To get the correct pose, I set up my camera on the tripod and used the timer to trip the shutter (and cover myself strategically before anything too revealing got on digital memory card!). I took a lot of photos until I had the right tilt of the head, expression, curve to my side, placement of arms and hands. Then I set up the digital projector (which I bought to use in lectures and classes, and now have this use for it, too!) to project the photo onto paper folded/cut to 36×48.
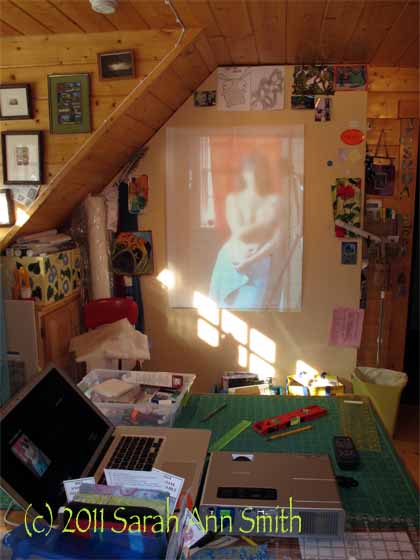
Me, in blurry living color, on the design wall in the old house; you can see the laptop and projector on the work table. PS--notice in the photo I am in our bathroom with a cloth covering the window behind me, not in a doorway at all. That's the camera and tripod on the right reflected in the mirror (which I was using to see how things looked).
Somehow, a photo is much more “revealing” than the same thing in batiks, so while I’m not too uncomfortable with a semi-nude quilt of myself, I decided I had best blur the photo. Ahem. And I’m glad I lost that 25 pounds a couple summers ago! Having carted the weight around since my last pregnancy (the kid is now 13) it was time for it to go!
Anyway, back to quilting. Or drawing. Rather than use photoshop to define shapes, contours, etc. I prefer to take a drawing pencil and outline the edges and make my own decisions about where I want shapes and colors to merge and blend and overlap. I will draw these “interior” lines, too, and often add notes like “medium-dark” on the drawing.
I decided to tackle the hardest part first: my face. In the end, the eyes ended up about 1/4″ too close together, and I may be able to adjust that, and they are a smidge too large. Other than that, things turned out OK. Once the face was done, I could move to the torso (using larger chunks of fabric), the towel, and the hair.
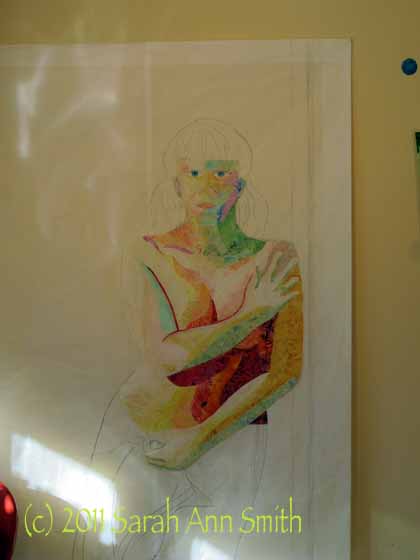
I began with the most difficult parts (face and torso). I ended up removing much of the dark fabric for the strong shadow under my arm..tho the photo was that dark, it just looked weird in cloth, so I reduced the fabric and later added lots of dark thread to create the shadow.
Thelma Smith made some awesome quilts of the Sonoran Desert, and in them used a technique she learned from a painter and then shared with me. The painter used Cadmium Red Light paint to outline / highlight some figures. It really makes them pop out from the background, especially when values are similar. It doesn’t shriek at you like black would, and despite being a color totally not there in real life, the technique works. I’ve wanted to try it for quite some time, so I did for the hair, and used a deeper red for the shadows to the right and top of my right arm. I decided since I selected a deep-dark fabric for the background, there was plenty of “pop” on the body, and didn’t continue the “red halo”, but think I’ll have to do another portrait of someone and give it a try on the entire figure.
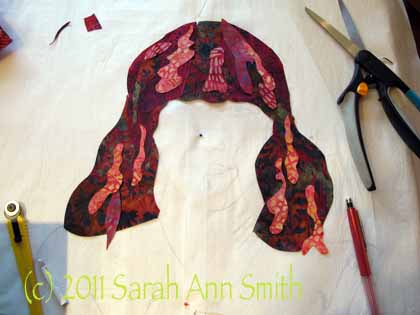
Anyway, here is the hair in progress:
In this photo, I decided to work on the table, not the wall. I placed my sketch UNDER some parchment paper; I can still see the lines, and can cut and MistyFuse directly onto the parchment. As with Joshua’s hair, I cut large, darker chunks to create the overall shape of the hair. Then I cut highlights (magenta, orange, rust, green!) in wobbles and waves and wiggles, adding until it was “just right.” Here’s a closer view of the hair when done:
When I first envisioned the quilt, I thought I would fuse assorted bits of dark fabrics to make the background, as I really liked how the stark, dark contrast worked in the quilt of Joshua. To get an idea of how it would look, I took one large chunk of blue batik and put it up on the wall, then pinned the fused “me” to it. I liked it…a lot! And decided that if I made the background into “boards” like our walls in that house, it would actually detract from the quilt. So I made my life easier and used one single dark blue batik for the “wall behind the doorway,” a doorway that doesn’t actually exist. Then I used other bits to create the door frame and wall around it, preserving the angle of the light / shadows—the light was strongly coming in from windows on the left (and lamps set up to cast strong shadows to make getting the planes and shapes of my body easier in the drawing phase).
I’ll add that the entire quilt is done ONLY with thread, cloth and MistyFuse (my totally favorite fusible web). There is no paint. No pens or pencils. Just cloth and thread.
So that’s how I did it! Hope you’ve enjoyed the view,
Cheers, Sarah

March 24th, 2011 at 6:22 am
Thank you so much for sharing the creative process behind this piece. I really helps us beginners have an idea of how to approach similar projects…
:-D)
March 24th, 2011 at 7:39 am
Sarah – you are quite an artist! Your process is quite fascinating. It is great to see the detail on how you created your self-portrait. Love the skin tones on the face.
Judy
March 24th, 2011 at 11:37 am
Beautiful! Thanks for sharing your process.
March 24th, 2011 at 6:39 pm
Sarah, I swear you are the most interesting,helpful and generous fiber art professional on the web. Having said that, of course I want to ask for something. Frequently when I am looking at pics of your work I wish you had posted one more shot — a super closeup that shows the stitching. As close as the stitching sampler photos in your book. Your self portrait is marvelous; warm and serious,with a big dash of good humor. Thanks for sharing.
March 24th, 2011 at 7:19 pm
Love, love, love what you have made Sarah! You are so talented. I loved seeing the process, too. We are ready for you at Batiks Etcetera in June! Can’t wait to see you!
March 24th, 2011 at 10:35 pm
Yes, you are quite an artist. Thanks for sharing your process. It’s always so nice to see how you do things–and do them so beautifully!
March 26th, 2011 at 10:28 pm
Another perfect rendition!
Wonderful work- as always!
March 27th, 2011 at 8:35 am
Amazing and so inspiring! I always learn something from your posts!
March 31st, 2011 at 5:18 pm
Loved how you went about this! I have never thought about my own body as a model but have called my sister to come over and stand or sit is a position to draw from (in clothes though!) 🙂