Facings as an Edge Finish
The following tutorial builds on the article published in the August/September 2007 issue of Quilting Arts Magazine. The Pillowcase (or bagged back, or escape hatch) finish for a small art quilt is simply a one-piece facing that covers the entire back of an art quilt. This method is useful if you have lots of knots or carried threads that you wish to cover, for example after extensively beading a piece. For larger quilts (or even small ones) you may not wish to cover the entire back. Instead, you can use facings. On a quilt with straight edges, like Koi, you can use a straight strip of cloth as I did here on the back / under / second side of this quilt. However, just like a dress neckline, facings work well on curved and irregular shapes. From the front, you can’t tell if this quilt is a Pillowcase backing or a faced edge: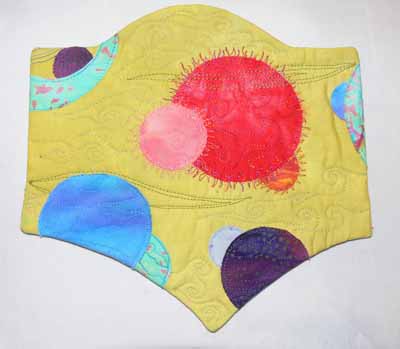
Facings:
Borrowed from dressmaking, a facing is simply a piece of fabric that echoes the outside edges that is turned completely to the back side of a quilt. Large and small quilts with irregular edges are great candidates for facings!
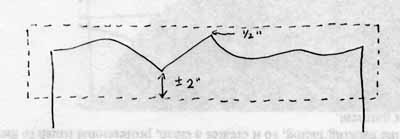
1. Cut a strip of fabric that extends ½ inch beyond the outside outermost edge and 2-plus inches towards the center of the quilt from the innermost “innie”.
2. Pin the facing to the quilt top, right sides together, on the back side of the quilt.
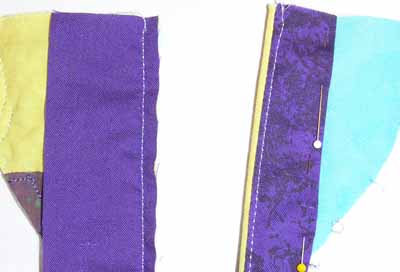
3. Sew a ¼ seam (photo below, left)
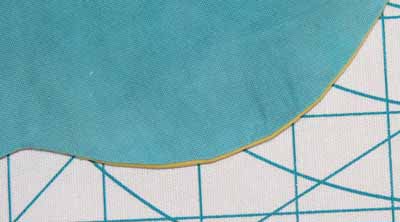
4. Trim excess fabric from the seam allowance.
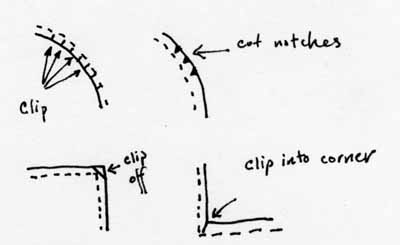
5. Clip /notch curves, clip inside corners and trim outside corners.
6. Press the seam as stitched. Fold facing over the seam allowance and press again.
7. Edgestitch facing to seam allowance a scant 1/8” from seam line; this will encourage the seam allowance to stay put and not try to roll back to the front. (photo above right)
8. Fold facing to the back, “favoring” the edge. The little bit of green that you see in the photo below is the “favored” edge, which is a bit of the front rolled to the back.
9. Iron the seam allowance and facings towards the center of the quilt. (See Step 9, above)
10. Turn under the edge of the facing and stitch in place. See the photo about edgestitching to see the turned, pinned edge.
11. Repeat on the other sides, turning under the short ends of the facing and stitch down to create a completely finished facing.