Foolproof miters on any width binding–Binding Tutorials (1)
The double-fold bias binding with a mitered corner is probably the most familiar edge finish for contemporary quilts. In the set of mini-quilts I made for my forthcoming article on bindings in Quilting Arts magazine (August 2008), I created an outside edge that includes corners, a point, and inside and outside curved edges which covers most of the challenges you will face.
I hope you’ll check the forthcoming issue (due on stands and in mailboxes near you at the very end of July and early August) for more details. Because there is only so much space available, they didn’t have room to include instructions for “any-width” bias binding, only 1/4″ bias binding. I actually prefer this technique to the one described in the article, so you have my permission to make ONE copy of this blogpost, for you personal use ONLY (since I make a living, albeit modest, teaching and selling quilts, thank you in advance for respecting my copyright!).
As soon as the article is out, I’ll insert a picture of the mini-quilt here. In the meantime, the close-up above of a good mitered binding will have to do! Thanks for understanding!Cut your binding strips SIX times the width of the desired binding,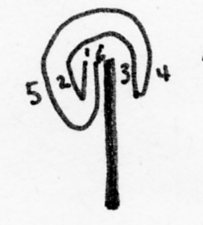 plus ¼” (or up to ½” extra if you’d like a little more wiggle room). For a binding that finishes at 3/8” that is [(6 x 3/8) + 3/8 = 18/8 + 2/8 = 20/8 or] 2 ½ inch wide strips. Sew your binding strips together with a ¼” seam allowance until you have the length of your quilt perimeter plus several inches. The seams are on the straight grain, so when folded they run at an angle to the side of the quilt (making them less noticeable). Fold the strip in half lengthwise, finger-pressing or lightly pressing with an iron.
Think Boomerang: first the binding goes away, then it comes back:
1. Sew binding strip to the quilt edge, beginning at least four to six inches from a corner, and leaving a tail of about four to six inches (on large quilts, 12 inches or more is better), figure 1. In North and South America, Europe, and Africa, since we read from left to right and top to bottom, I like to start the binding on the lower left side, where the join is relatively unnoticed as the eye travels in its accustomed path across a quilt. Loosely run the binding strip around the quilt to make sure a seam doesn’t land on a corner (too much bulk); if it does, adjust your starting point slighly.
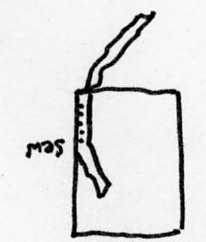
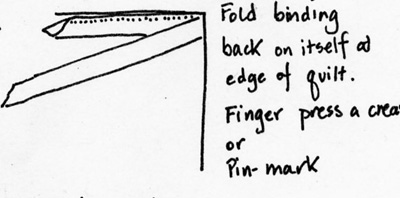
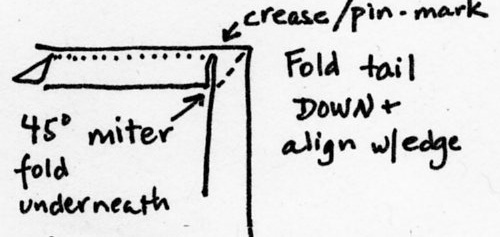
2. When stitching is about 2 inches from corner, fold the binding strip back on itself exactly on the edge of the quilt and finger press. You may wish to mark with a pin or chalk to see the line better. Diagrams 2
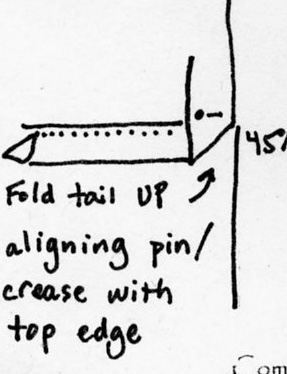
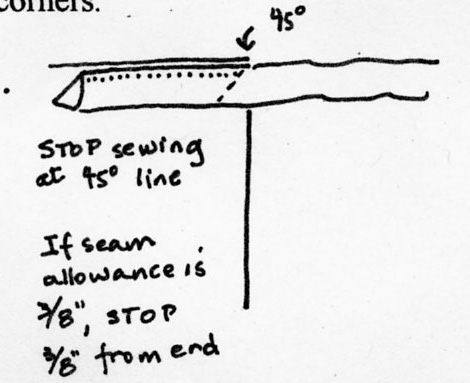
3. Fold the binding strip UP so that the marked line is now exactly even with the top edge of the quilt; finger press a crease at the 45 degree line. Mark with chalk on the inside of the binding if you need to improve visibility. Diagram 3
4. Continue to sew the seam until you reach the 45 degree chalk line. Backstitch 3 or four stitches. Diagram 4.
5. Pull the quilt out from under presser foot and (this is the boomerang part) : first fold the binding away on the marked lines, then back down so that the binding turns the corner and goes down the next side. Diagram 5.
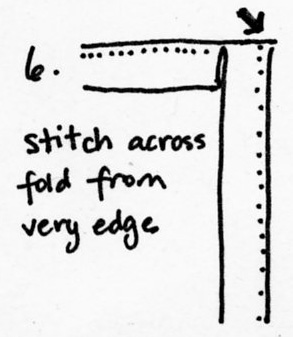
6. Stitch from the very outside edge of the quilt down the next side. Diagram 6.
7. Repeat at the other corners.
8. Stop stitching about 4-6 inches from where you began.
After you have used this method enough, you will be able to fingerpress and eyeball the corner turns instead of marking.

August 11th, 2010 at 8:57 am
I have challenges with the backside of the bindings. How to line up the edge of the binding so that when sewn it is within the binding lines on the front and then dealing with the corners so that they are “finished.” When you are using a 1/4″ binding, how do you choose to finish the corners? I appreciate your input. If this has been addressed in another blog, please advise. Thank you.