Photoshop–Finding the Stamp Tool, Thermofax screens
WAHOOOO! I’ve discovered something almost as cool as the holy grail! At least if you want to make thermofax screens…..and yes, you may liberally share the link to this blogpost so that others may learn and play with paint.
So I was on a quest for my next project: creating thermofax screens using my new (to me) thermofax machine. I remembered a tool I loved in Photoshop Elements (PSE), but it wasn’t in Photoshop (PS–full thing). How could that be? So I opened up my 2010 PSE software and discovered the tools I liked were called Stamp and Photocopy, in Sketches under Filters. So I googled around to find out how to create actions in full PS to do what those tools did. Turned out I didn’t need to–Adobe included those tools but then HID THEM. So here is how to find and use these awesome tools.
Note: I realize this will sound like gibberish unless you are into PSE or PS….if you aren’t, just skip! But this is SO AWESOMELY COOL AND USEFUL for those of us who want to make Thermofax screens and use Photoshop! So if you are interested, read on!
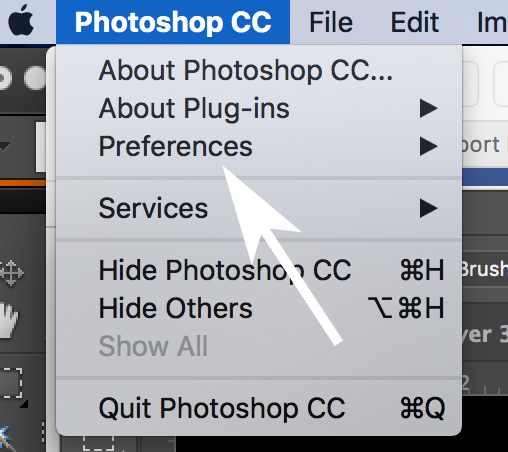
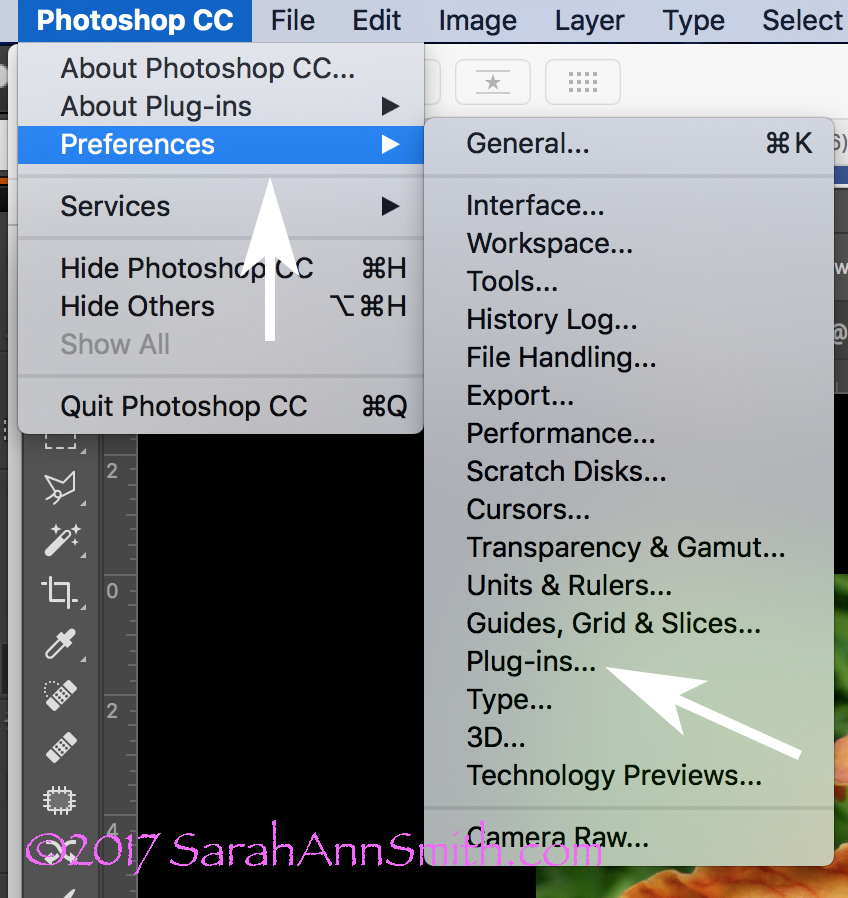
First, you need to install all of the Filters in the Filter Gallery. Yeah right. Not as hard as it sounds. Under Photoshop, find and click on Preferences.
That will cause a pop-out to appear; look for and click on Plug-Ins:
When you click on Plug Ins this window opens up. Check the box to show ALL Filter Gallery Groups and names. Sheesh….why was this not the default?????
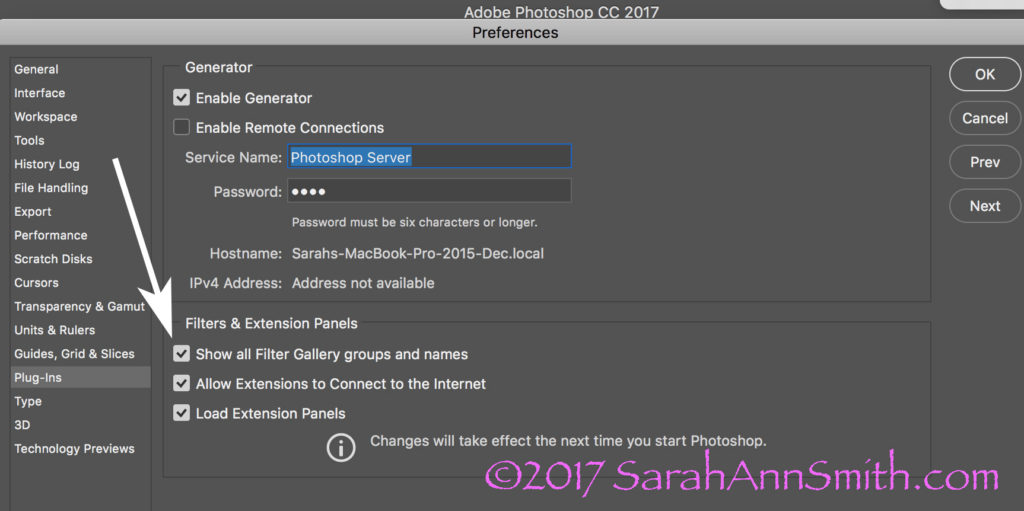
This window will pop up. The box at the bottom of the arrow will be blank. WHY Adobe? WHY? Check it and the wonder and joy of more filters will appear in your PS workspace.
Here’s a colorful photo I use in my Quilting the Garden workshops. NOTICE the COLORS in the Foreground and Background boxes on the bottom left corner.
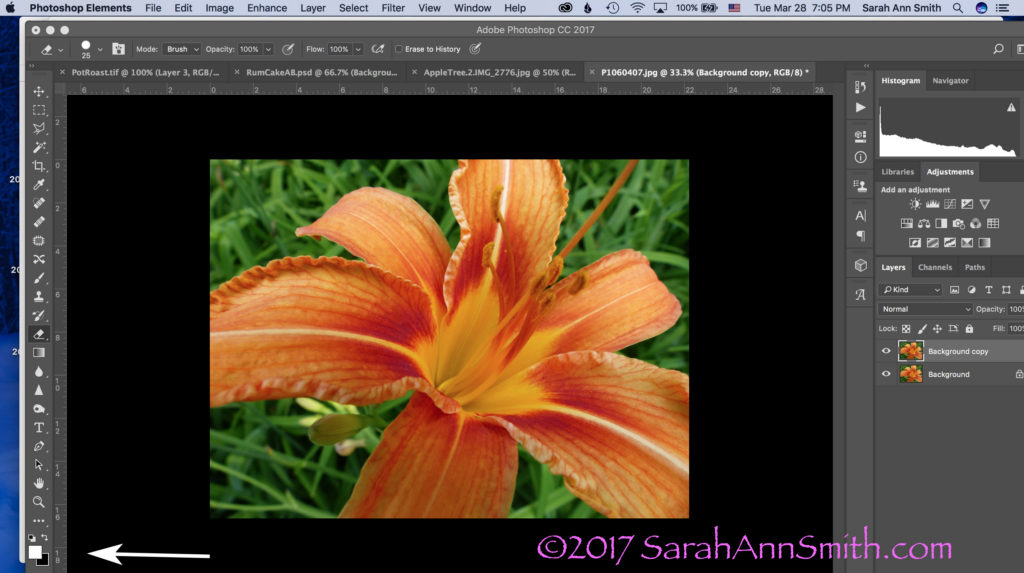
Let’s pretend I want to convert this image to black and white to create a Thermofax screen. Take note of the little Foreground/Background boxes at the bottom left. They are important.
Boxes are important! The next step is to USE the Stamp tool. Look across the top of your PS window. Click on Filter, then Sketch, then Stamp.
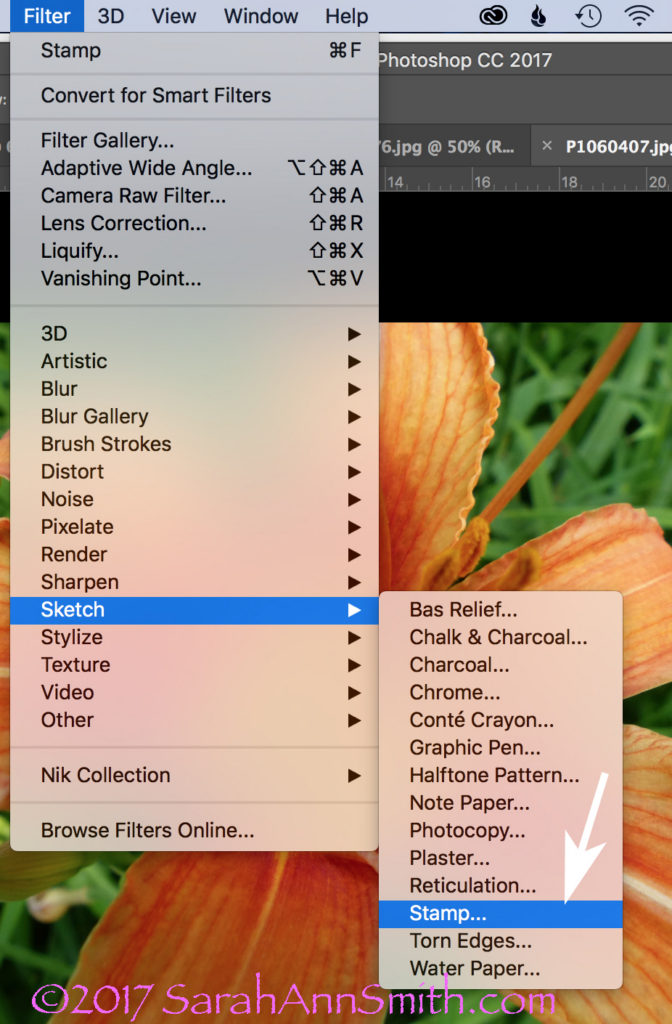
To use the Stamp tool, go to Filters (on the menu across the top), select Sketch, Then Stamp (see arrow).
When you click on Stamp, the following window opens. But I ended up with Grey and Black. WHY? It used to be black and WHITE, right? So what was I messing up?
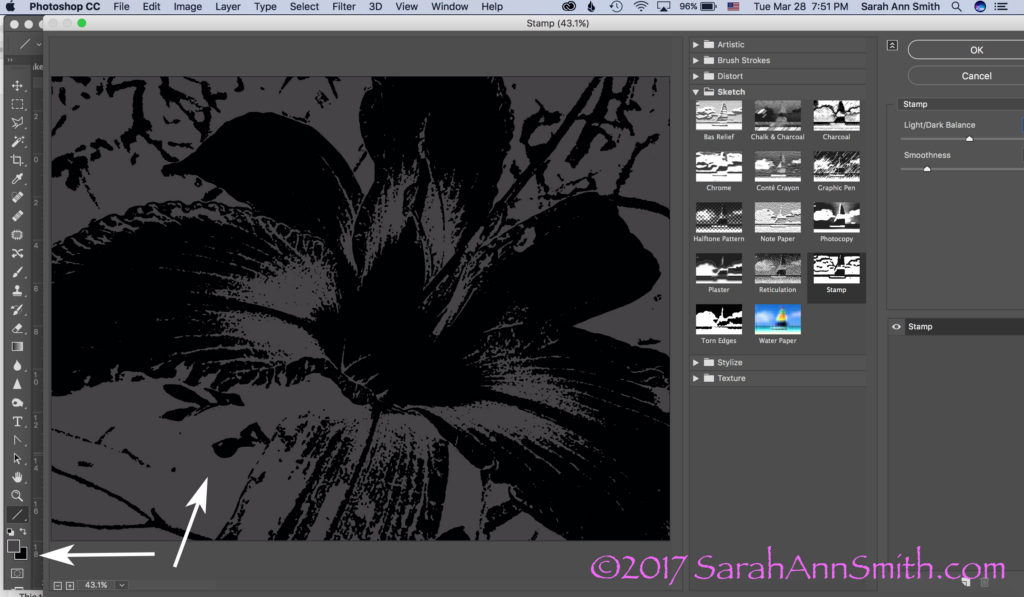
This was not what I had in mind. Then I had a lightbulb moment (who me? I know, rare, but it does happen sometimes). Remember those BOXES?
YEP…..the Foreground color, due to something I’d done not so long ago, was dark grey, not white. Aha! A glimmer of light (pun totally intended). Groan. Remember, Boxes are Important! I switched the foreground color from dark gray (above) to WHITE. And lookit what I got!
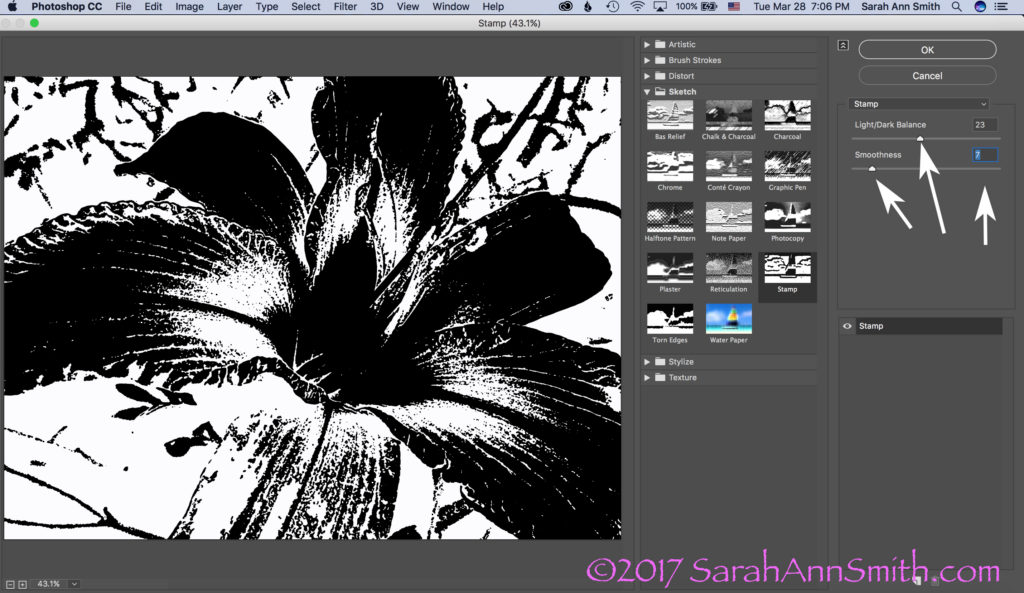
Drum roll……stamp is once again black and white! Notice the arrows on the right: use the sliders or the number boxes to adjust the level of black/white and the degree of detail. Now isn’t it a whole lot easier to get to this point in a hurry, THEN fine tune with the eraser tool to clear out extraneous yuck?
Those arrows on the right point to fun things to play with to adjust the amount of black, white, detail, etc. But the realization that the foreground/background colors could make a mess make me think….hmmmm……COLOR! What would happen if….
BUT, one more tidbit about what you see in the window. The one below looks like a lot of nothin’, right? That’s because is it at 100 percent, which doesn’t fit.
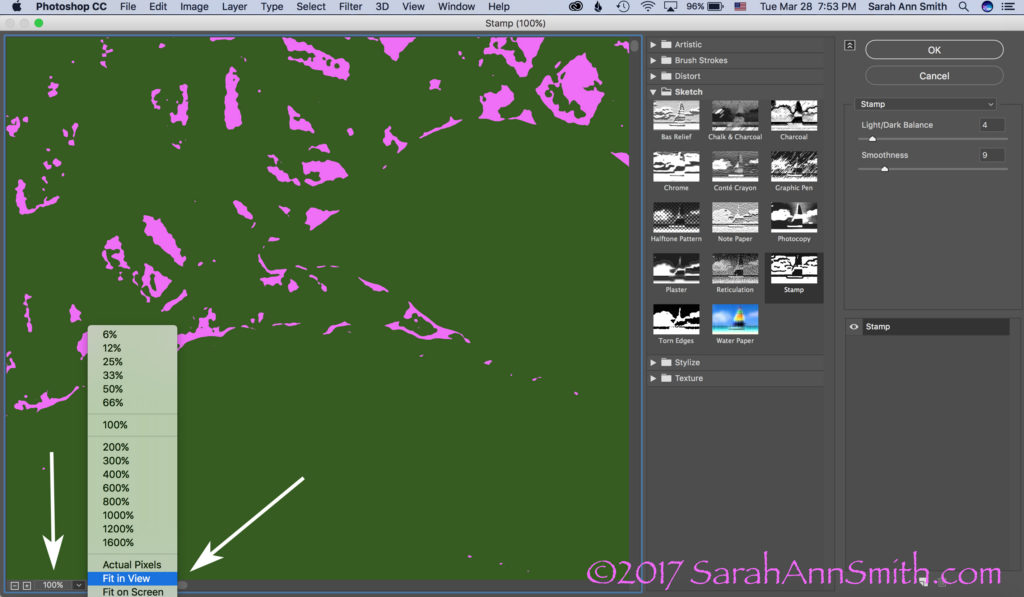
Then I realized I could play with COLOR. When you open this window, however, it opens at 100 percent. I prefer the “Fit In View” option, so check out the arrow once again.
If you click on the little down arrow to the right of 100%, you can switch it to Fit In View or whatever you like to use. For my pea-brain, it’s a whole lot easier to figure out what I’m doing when I can see the entire picture, like this:
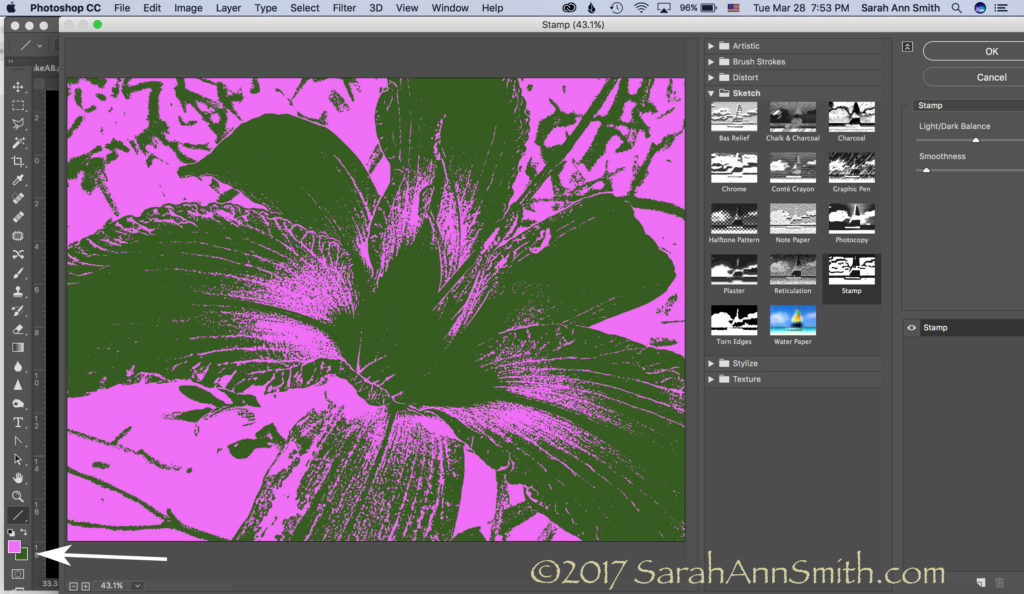
Then you can create a really bizarre two-tone hot pink and green image. Just what you always wanted, right? Not! But you can see the potential, right?
Let’s just say I am ridiculously happy. I asked for help on FB today and got it…THANK YOU Lynn Krawczyk, Lyric Kinard and Leslie Tucker Jenison among others. Then I — having learned this lesson before — googled around for online information, including the forum at Adobe, which is where I found the clue that the Sketch filters WERE in full PS. But I didn’t know the terminology (like where to find the Line tool to create an arrow to illustrate these screen shots), so YouTube search box to the rescue.
SQUEEEEE! I don’t need to use my antique PSE, I can use full PS and not have to move between the two, AND (best of all) I have my easy-peasy Stamp tool back! Time to CELEBRATE! Lynn, I may just have to fling some paint! And now that I have written this up to share ASAP in thanks, I am going to celebrate, perhaps with chocolate! Or maybe Talenti. Or some culinary Venn diagram that involves the intersection of Talenti, banana and chocolate. SQUEEE!
And a PS, thanks Whiskers for asking the questions: Hi Whiskers! Yes, I will do a blogpost eventually on thermofax screens. Not sure when, so the quick response is the Thermofax machine is the predecessor to today’s photocopier. They were used in the 50s/60s in the office to copy stuff. They are no longer made (consequently they cost a fortune, it has taken me a decade to save up and make the purchase, $1350! If you buy one be sure you get one that works with the mesh, not just the purple ditto masters!)…but folks have figured out if you use an image with carbon in the ink (laser printer, some inkjet printers, carbon ink, lead pencil) and you run it through the machine with a plastic-backed mesh, the plastic melts where there is carbon. When you separate the two sheets (paper and plastic mesh) you end up with a screen. Tape up the edges, then push the paint through. I actually just taped a segment for Quilting Arts TV on this!

March 28th, 2017 at 8:48 pm
Neat! Interesting – very!
March 28th, 2017 at 9:35 pm
I.am.impressed. I worked with PS in 2000. I can only –no, I can’t, imagine what it does now.
And, for those inquiring minds, would you explain how a themofax stencil(?) is made, please? I’ve never figured out the process, and I have never made a silk screen, much less used one.
Thank you.
March 28th, 2017 at 11:47 pm
Great tutorial! And for anyone who wants to get the basic intro to Thermofax screens, please visit my website and also my Youtube channel – where we show ten ways to use a Thermofax screen, in addition to showing you the basics. Not to say there aren’t loads of good tutorials out there. THERE are. But we also make screens and offer a PS service for anyone who can’ easily navigate these design waters. So be inspired by Lisa and check us out.
March 29th, 2017 at 9:36 am
Hi Whiskers! Yes, I will do a bit on thermofax screens. Not sure when, so the quick response is the Thermofax machine is the predecessor to today’s photocopier. They were used in the 50s/60s in the office to copy stuff. They are no longer made…but folks have figured out if you use an image with carbon in the ink (laser printer, some inkjet printers, carbon ink, lead pencil) and you run it through the machine with a plastic-backed mesh, the plastic melts where there is carbon. When you separate the two sheets (paper and plastic mesh) you end up with a screen. Tape up the edges, then push the paint through. I actually just taped a segment for Quilting Arts TV on this! Stay tuned (literally)–it will be on in Fall 2017!
March 29th, 2017 at 10:04 am
THANK YOU Jane! And I can heartily recommend Jane’s site, tutorials, books and screen-making service at janedunnewold.com . Find Jane’s tutorials here: janedunnewold.com/tutorials/ . I used Fiber on a Whim (fiberonawhim.com) to make my screens for years and they sell some of my thermofax designs, and Jane has an AWESOME selection of her designs for sale on her site. Lyric Kinard also has tutorials and info at lyrickinard.com . Check out everything you can folks and learn…it’s all wonderful. Jane has generously shared her talents for a couple decades and we are all the better for that sharing. Thanks again and Cheers, Sarah
April 3rd, 2017 at 3:32 pm
Thanks for the tutorial! You know, this is going to be handy for things other than thermofax screens. Having just read Wen Redmond’s book Digital Fiber Art, I’m looking at my photos with an eye to reducing some of them to essential lines in black that can be layered over an interestingly colored background. This looks to be a lot quicker than anything I’ve done before.