I was absolutely delighted when Create Whimsy wrote to ask if I’d like to do a Spotlight interview with them–so many people I admire have interviews that you can still see and read. It was even more fun when the Editor, Chardel Blaine, realized that I had taught at a shop she worked at–Quiltworks Northwest in Bellevue, Washington–and we had met about 15 YEARS ago!
Here’s the link to my interview… I hope you enjoy reading the flotsam and jetsam of my life and mind. I opened up a half dozen interviews to review and prepare which led me to a new artist I admire, and I’m planning on opening another half dozen for lunchtime reading. Thank you Chardel and Create Whimsy!
Over the past week to two weeks, I have been working on ….sit down and prepare yourselves for this… a **pieced** quilt. Yes, me. A very simple pieced quilt, but nonetheless.
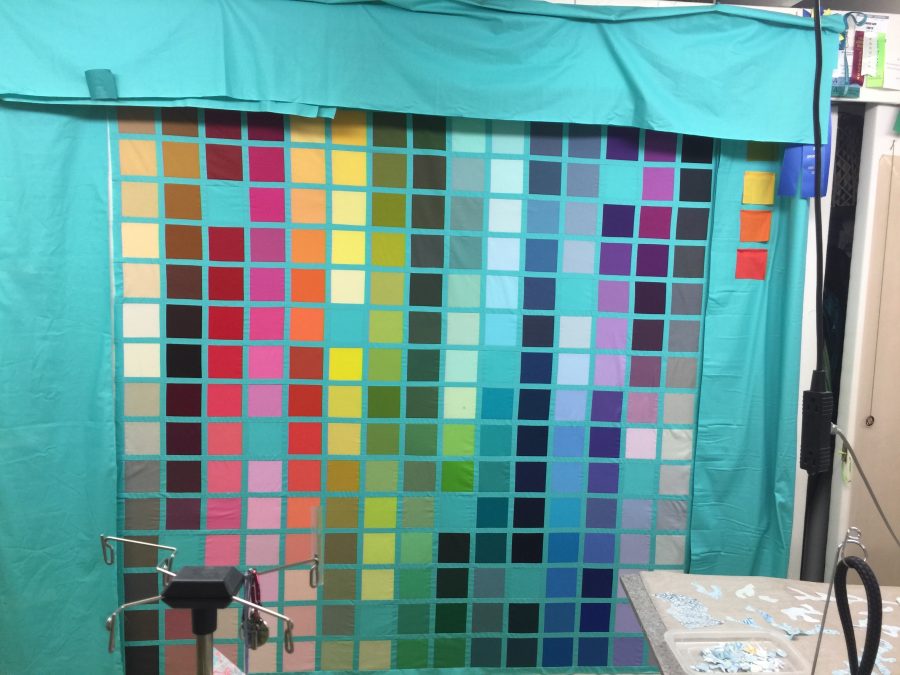
Eye-candy…my 214 colors, test-driving super wide borders with possible squares or rectangles. I’m going with nothing to distract from that glorious grid of color. Hopefully the quilting will make the wide borders look good. Want them that big so they will fit on a king size bed–we’ve got a queen but the pug takes up a ridiculous amount of room for such a small dog! The center is 72″ and overall I’m hoping for about 100″ square.
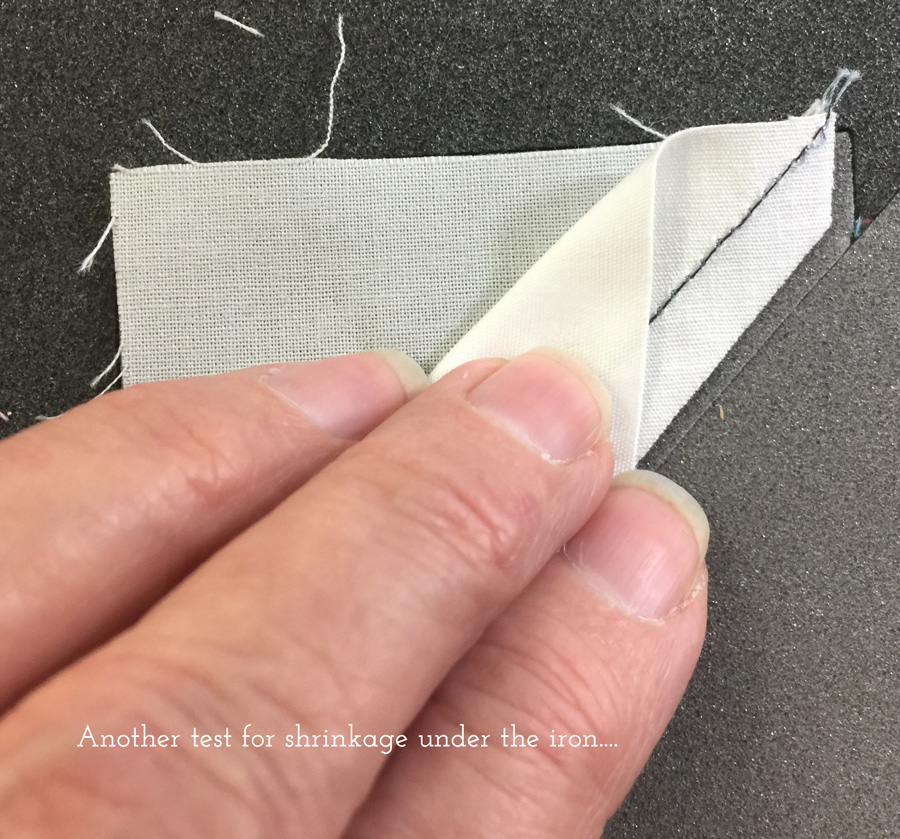
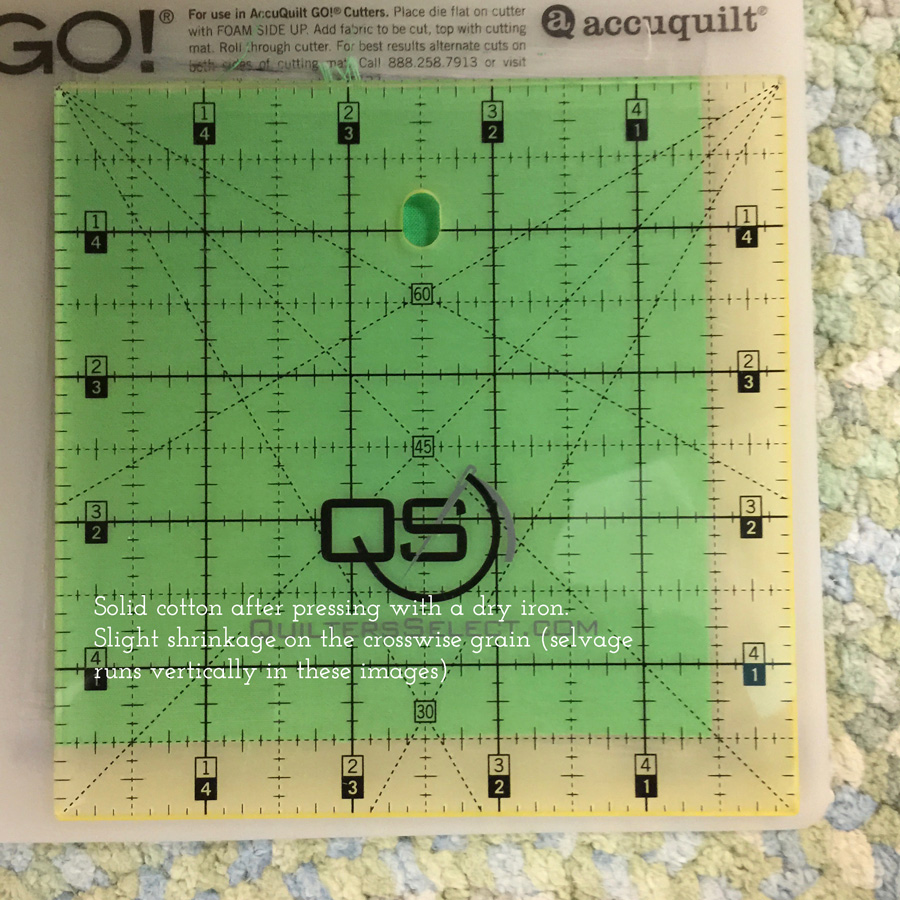
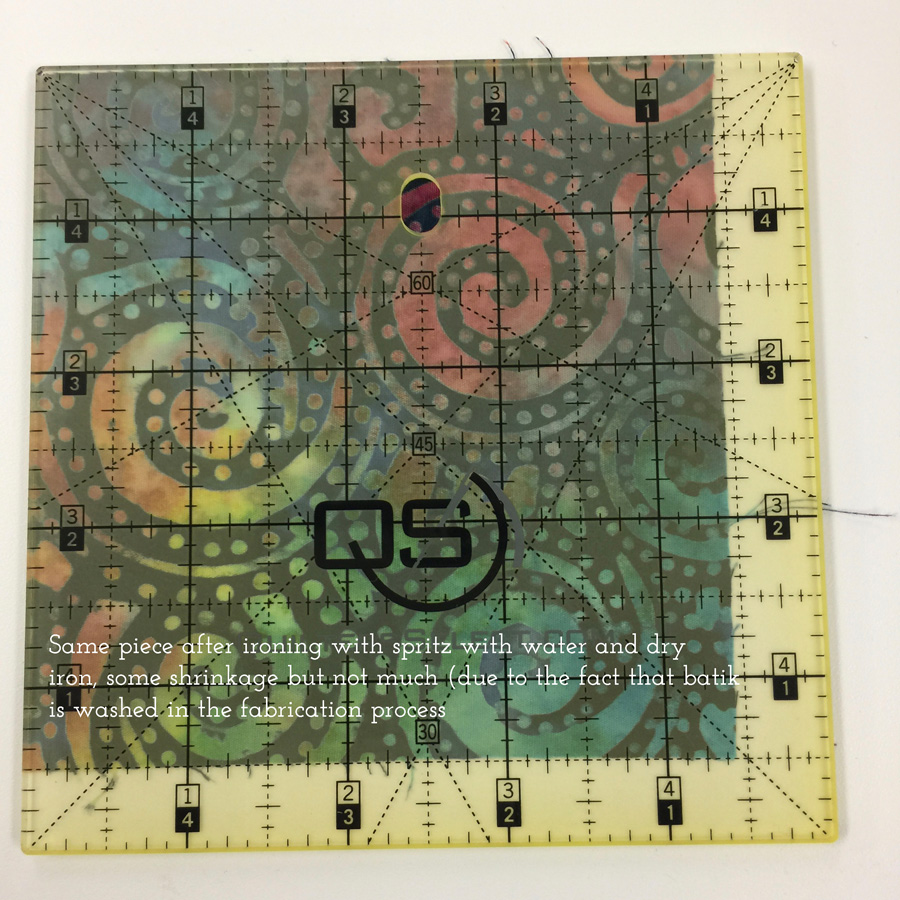
I’ve also been experimenting with the AccuQuiltGO! that was given to this year’s crop of Michael Miller Fabrics Brand Ambassadors. To my distress my block was not perfect–too small! I KNEW it had to be something on my end (it was), so I triple checked my seams (perfect to scant). I checked the size of the fabric cut on the dies: perfect. I checked that I used the correct dies: I did. Then I noticed something. After ironing, the block seemed off. Look at what I discovered:
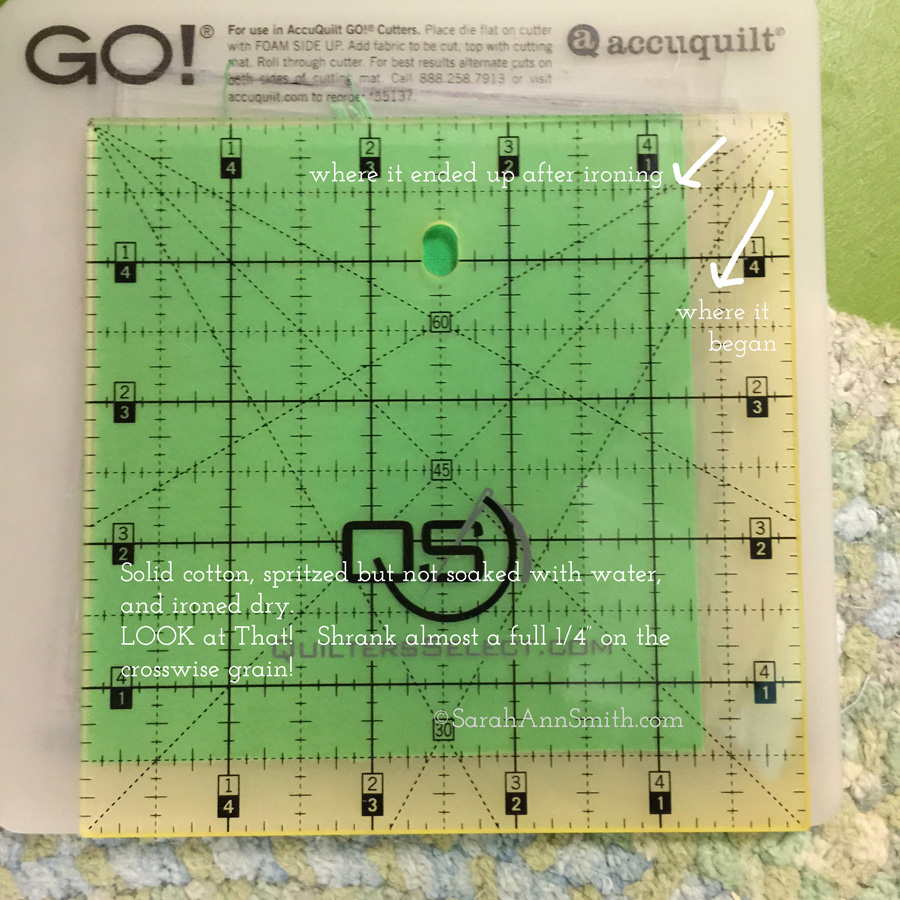
First I placed my half square triangles on the dies, and look how much smaller the pieces are after sewing and ironing! So then I checked the start of the square-in-a-square center of the block. Same thing: after steam ironing/pressing, a unit that finishes at 2″ and one that finishes at 3 1/4″ are each 1/16-1/8″ smaller!
I decided to get a bit more scientific about it: Cut, measure, dry iron, measure, steam iron, measure. Here is what happened with the Cotton Couture, a delightful solid with a glorious feel in the hand:
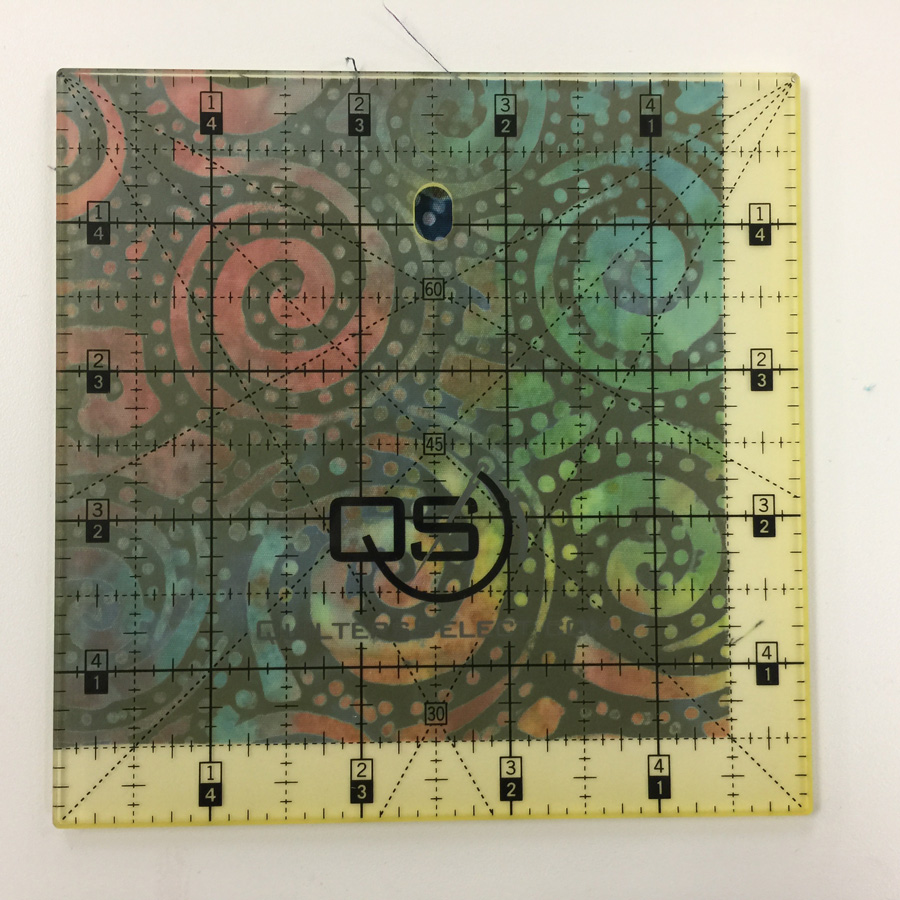
Batiks are made using hand-dyeing processes that include a resist being applied (usually wax of some sort), then the wax is washed out, more dye applied, and so on. This means some of the shrinkage should already have happened.
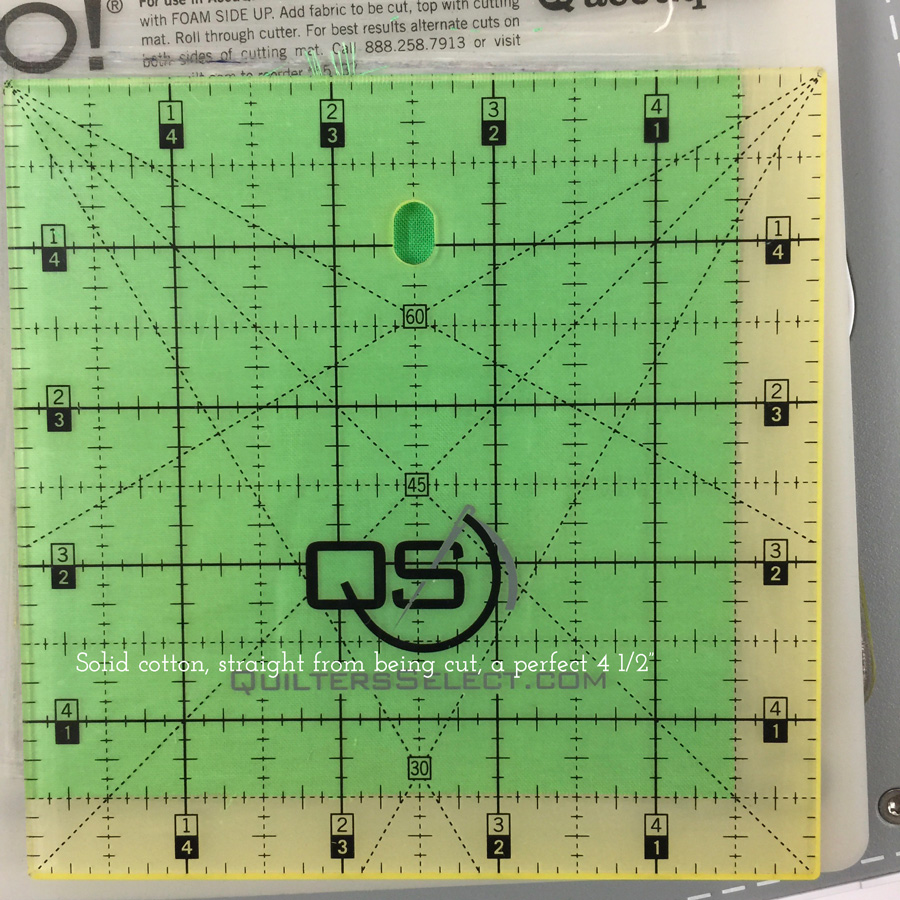
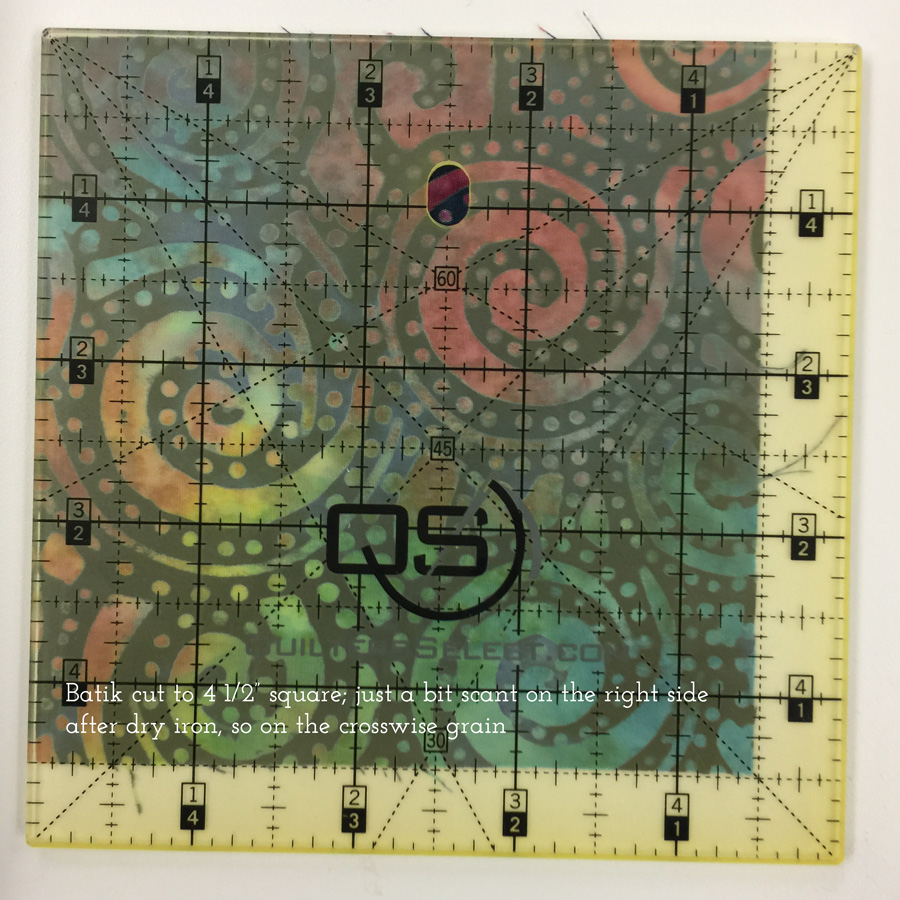
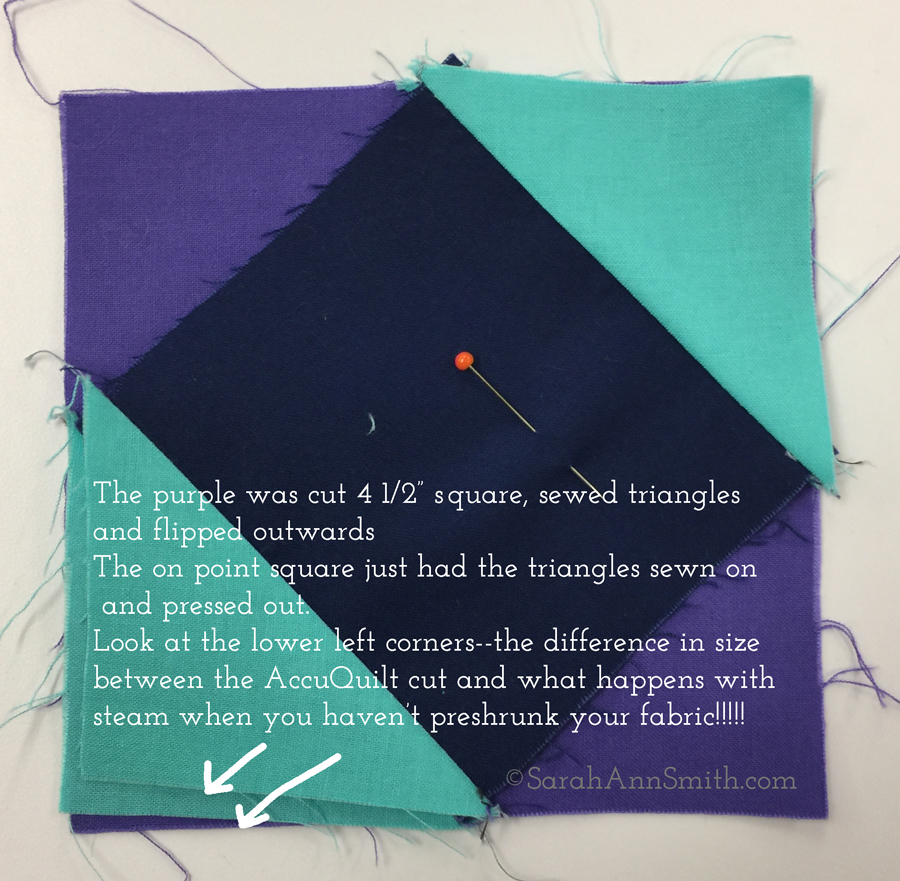
As cut with the AccuQuiltGO! Perfect 4 1/2″One last image: Here I created the center square-in-a-square for a pieced block. I cut the purple fabric to 4 1/2″ thinking that might help my accuracy, and sewed on two half square triangles. I then used navy for the central square and piled on identical half square triangles. All are cut with the lengthwise grain as suggested by Accuquilt for accuracy. LOOK at how much smaller due to more pressing and moisture from the iron. ERK!
So my lesson is, when I am not fusing things up, I really need to either pre-steam-iron everything, or prewash and mostly-dry it and then iron dry and smooth. I can now use the perfection of the AccuquiltGO and actually achieve as close to perfect as I will ever get! Now, off to order backing fabric for my BIG quilt.
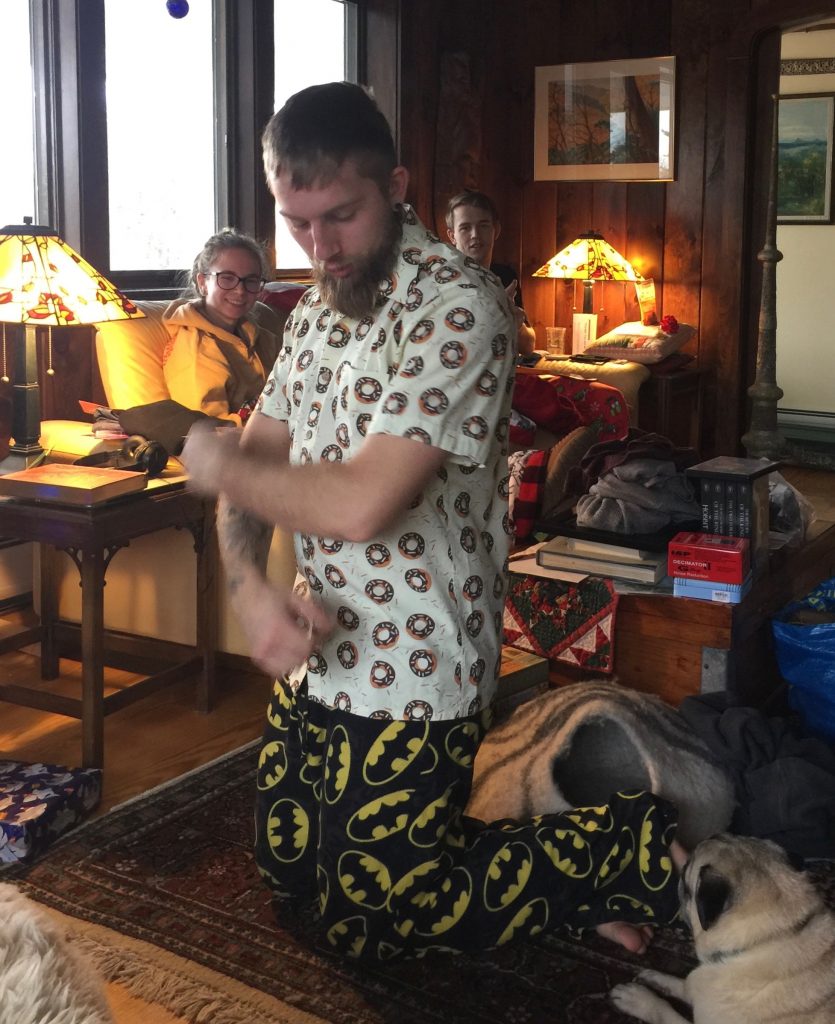
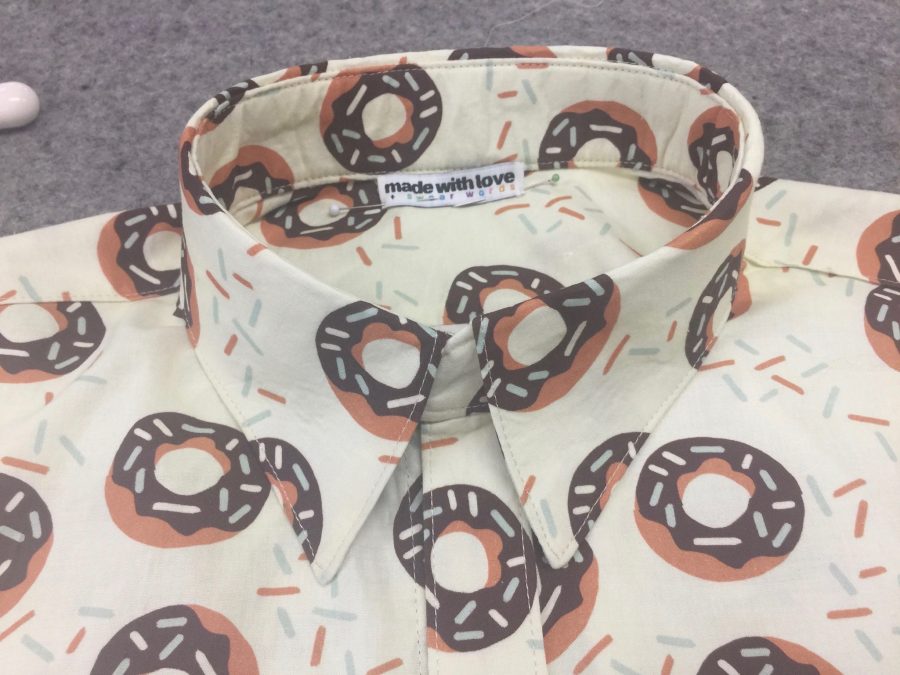
As soon as it came out of the box it went on…fit perfectly (thanks to borrowing one of his existing shirts!)
The first thing I made on the splendid new M7 Continental from Janome was something I haven’t made in decades: a button down tailored shirt! Anyone who knows Joshua knows that he is all about good food, perhaps starting with donuts. In fact, Joshua and Ashley’s wedding cake was a tower Joshua made of donut holes from Willow Bakery in Rockport! He also loves shirts with a sense of humor: sushi rolls, watermelon, lobsters. So I decided I wanted to make him a shirt for Christmas. And I succeeded beyond my wildest expectations in part due to the excellent sewing of the M7. There’s even a video below of making a buttonhole!
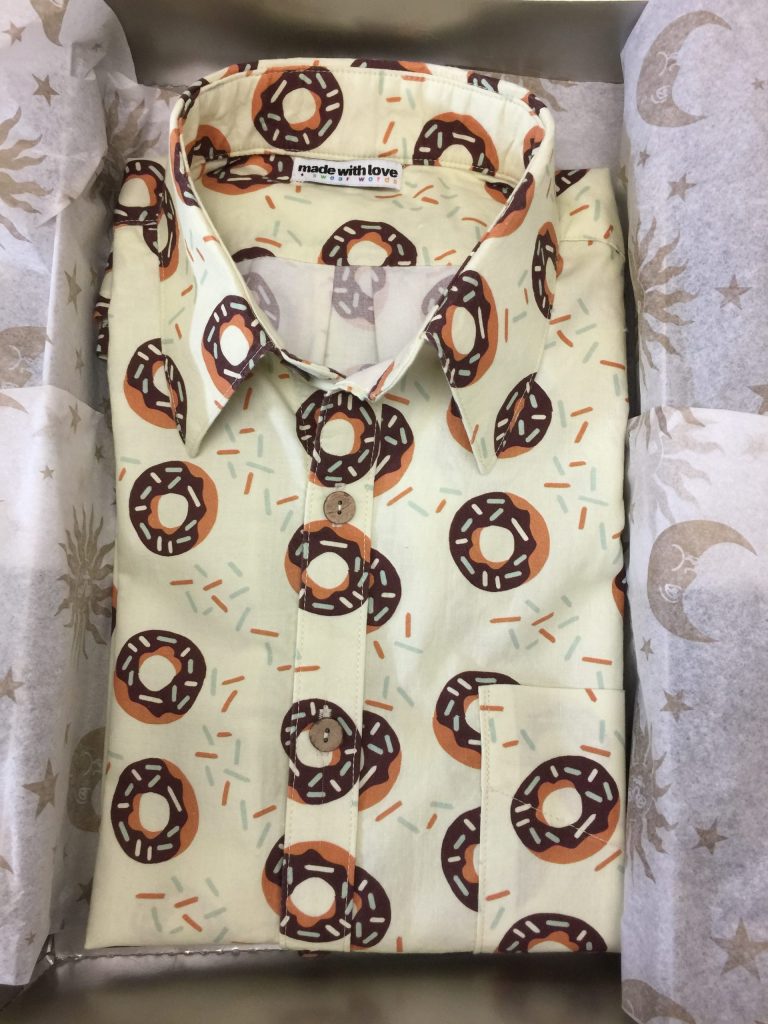
In the box ready for going under the tree, and looking professionally made if I do say so myself! The label was purchased at Fancy Tiger Crafts in Denver–when I was taping for The Quilt Show I had a day to play and met friend Sandra Wheeler (hullo SandyAngel!) who took me out and about. The label reads “made with love {and swear words},” which I figured correctly would make Joshua laugh.
I used the Men’s All Day Shirt Pattern from Liesl + Co patterns. It was my first time using a downloadable pattern where you print and then tape together the pieces. If you download the free Adobe Acrobat software (not just your built in PDF reader) you can turn off the “all sizes” so it prints ONLY the size or sizes you want so you don’t have to navigate all those lines that end up nearly on top of each other. By measuring Joshua’s existing shirt, I was able to figure out which size would be best (Medium) but with the Large collar/neck stand. My only issue was when I combined the sizes. I should have printed the neck line of both patterns SEPARATELY (instead of on the same sheet), then traced the size large and lined it up properly. It took a while, with astounding and much appreciated personal replies from both Liesl and her husband Todd with troubleshooting suggestions, before I figured out what I was doing wrong. Kudos for the service as well as the pattern!
Sewing down the underneath side of the front, where the buttons will go
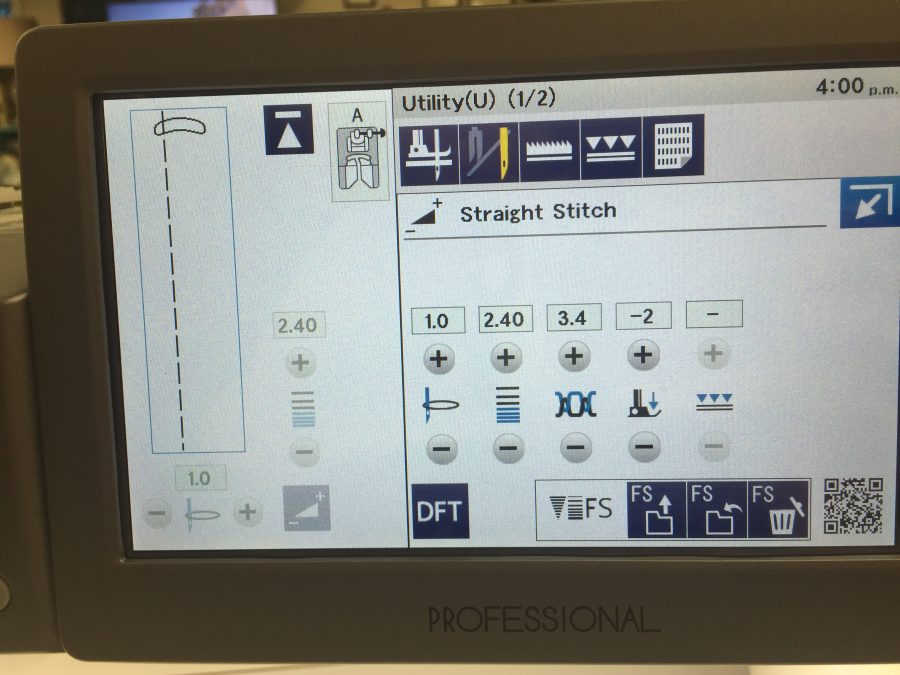
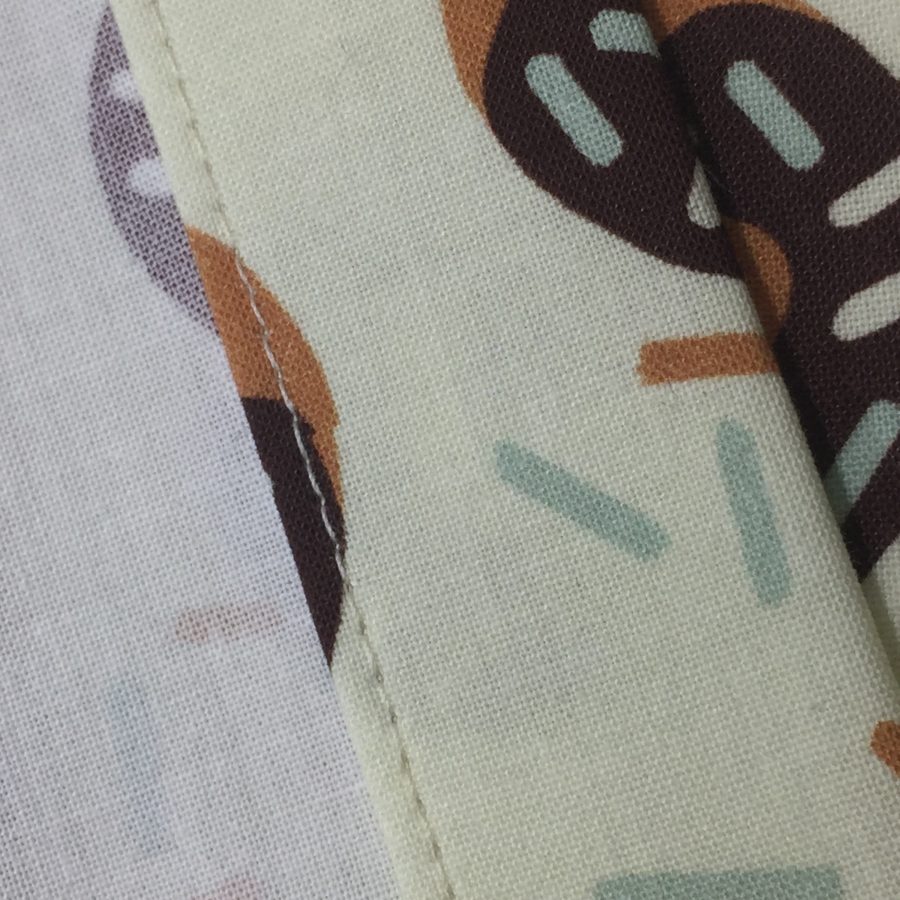
Needle moved to the far left.the stitched fold-back, the buttons will go on the other side.Look at how perfect that stitching is! It sure helps to have a machine that is so precise.
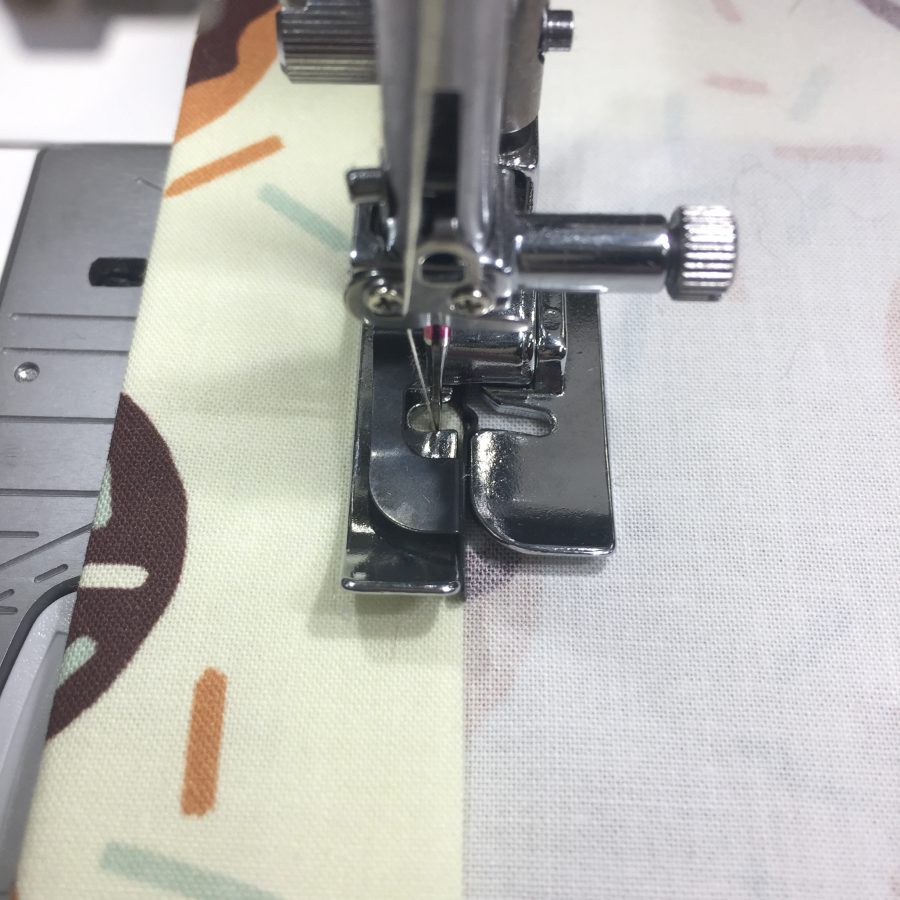
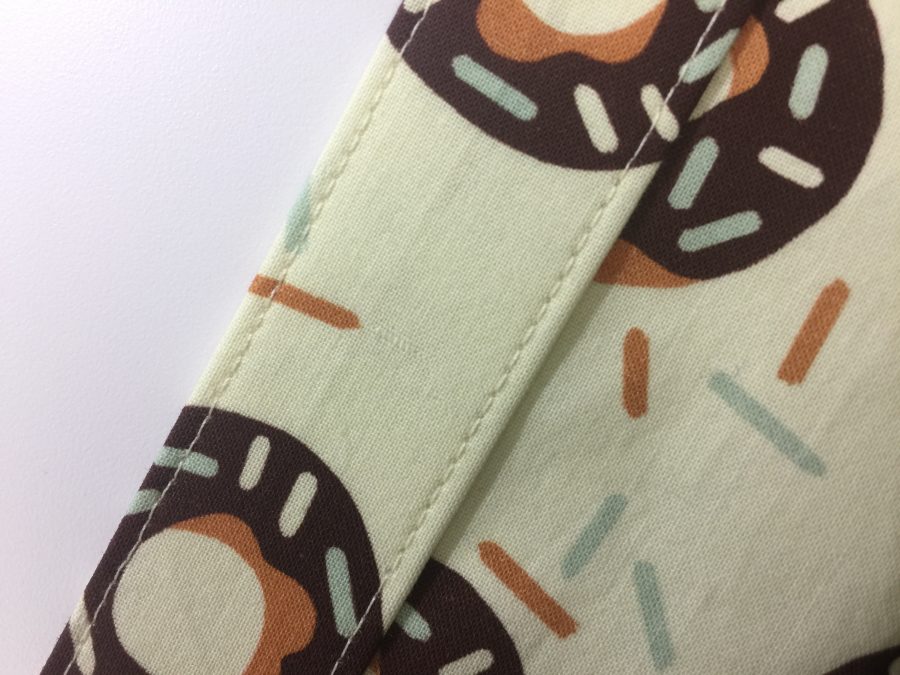
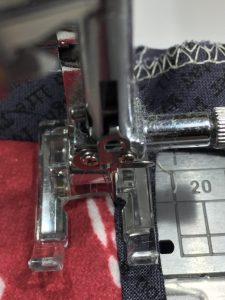
Using the included edge stitch foot, I was able to get absopositively perfect stitching. The first of the four photos above shows the underneath side of the shirt opening, using the edge stitch foot to sew down the turn-under. The second image shows the Janome M7 Continental screen (other Janome machines work similarly) with the needle set to the left. Because of the tiny increments in needle placement, I could get the stitches to form the exact distance I wanted from the edge. Third photo (top right) is a detail of that stitching. And the large image is the button band, stitched. I can’t believe it looks so good! There’s a video just below these still photos.
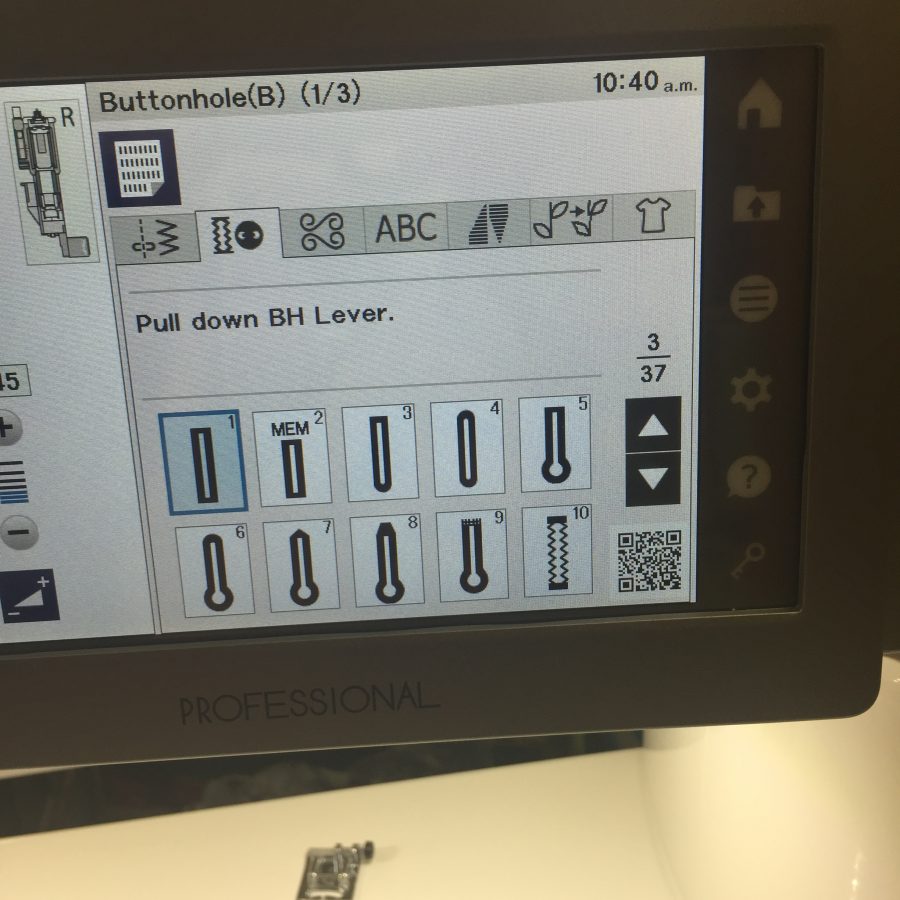
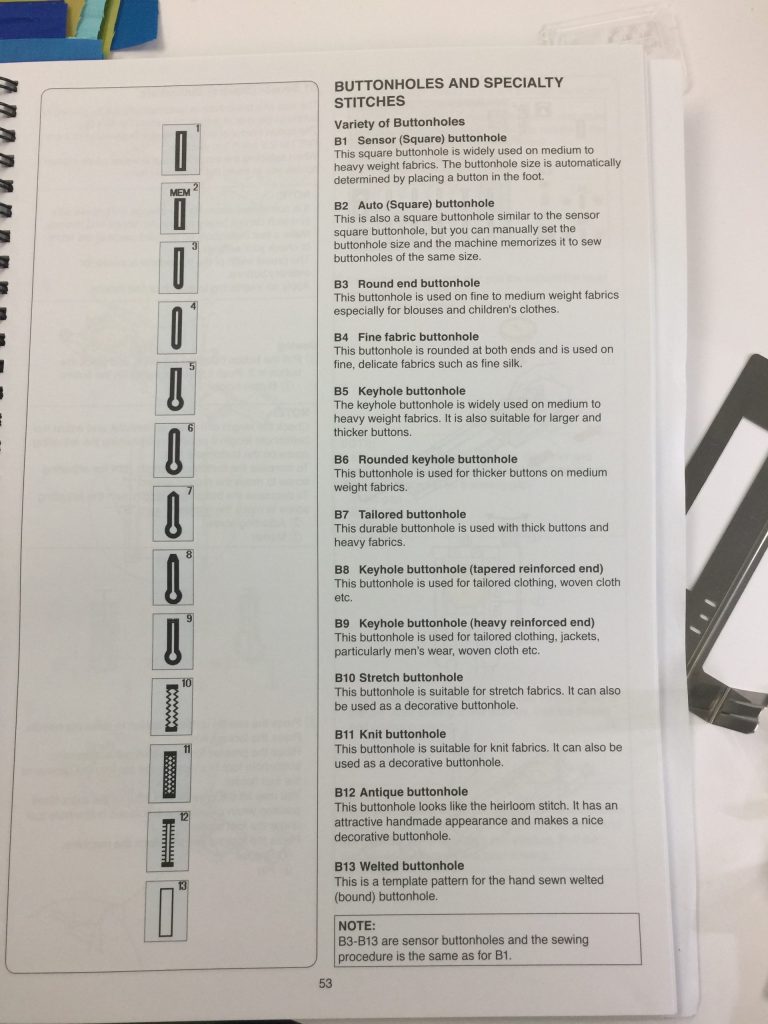
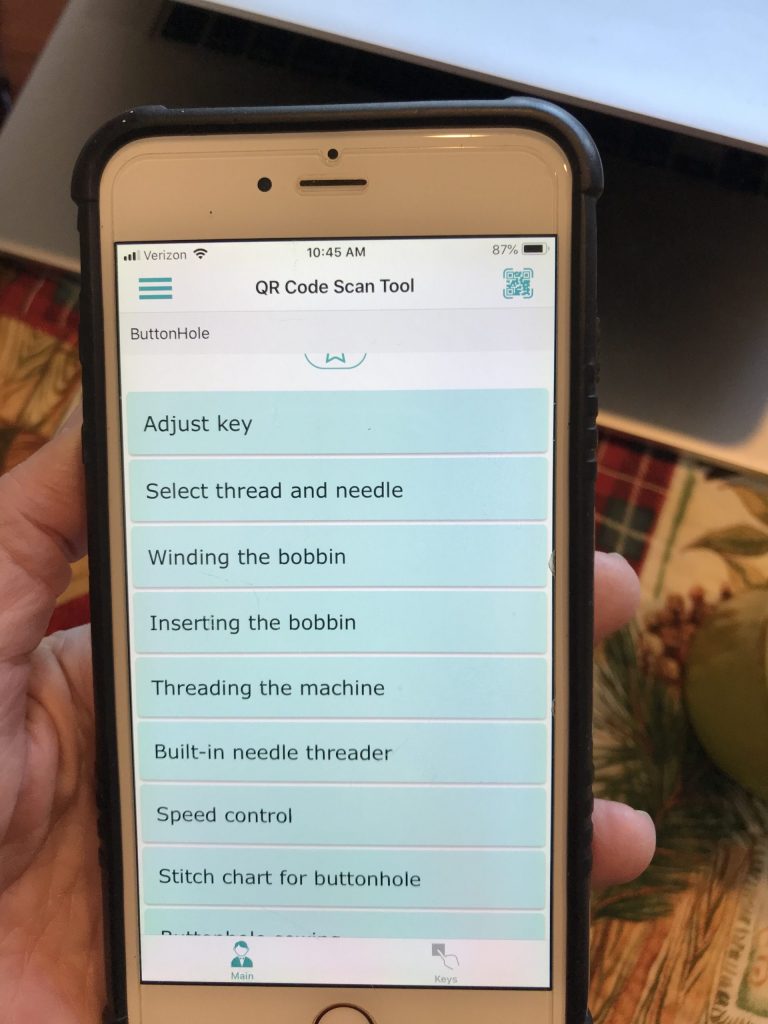
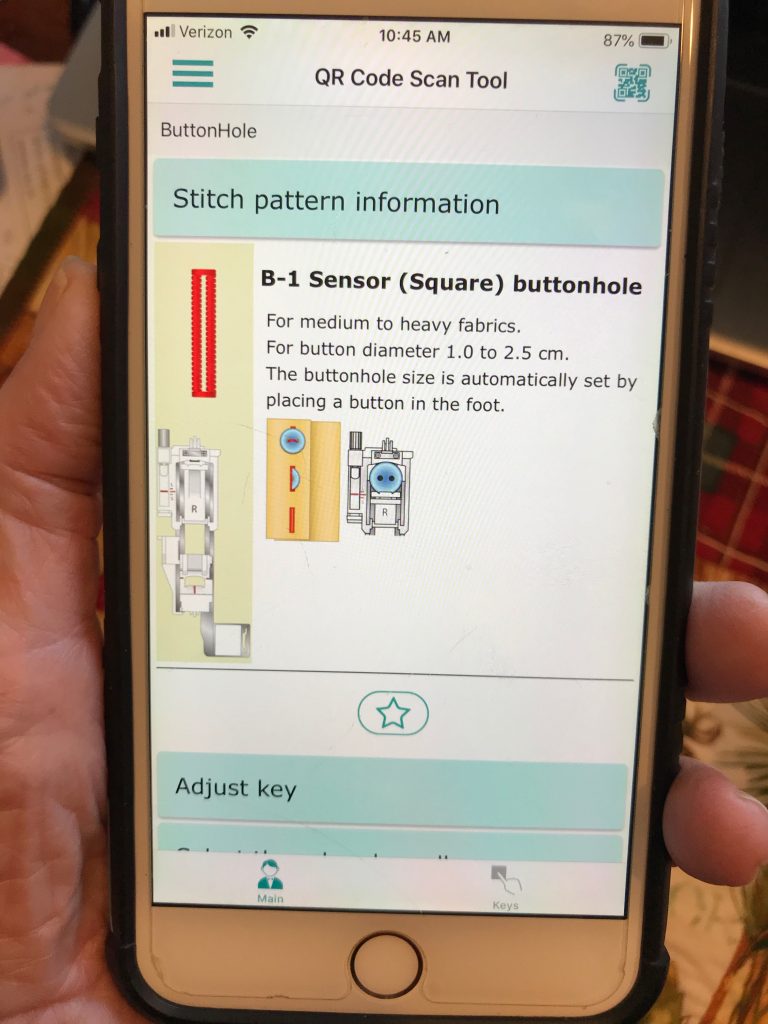
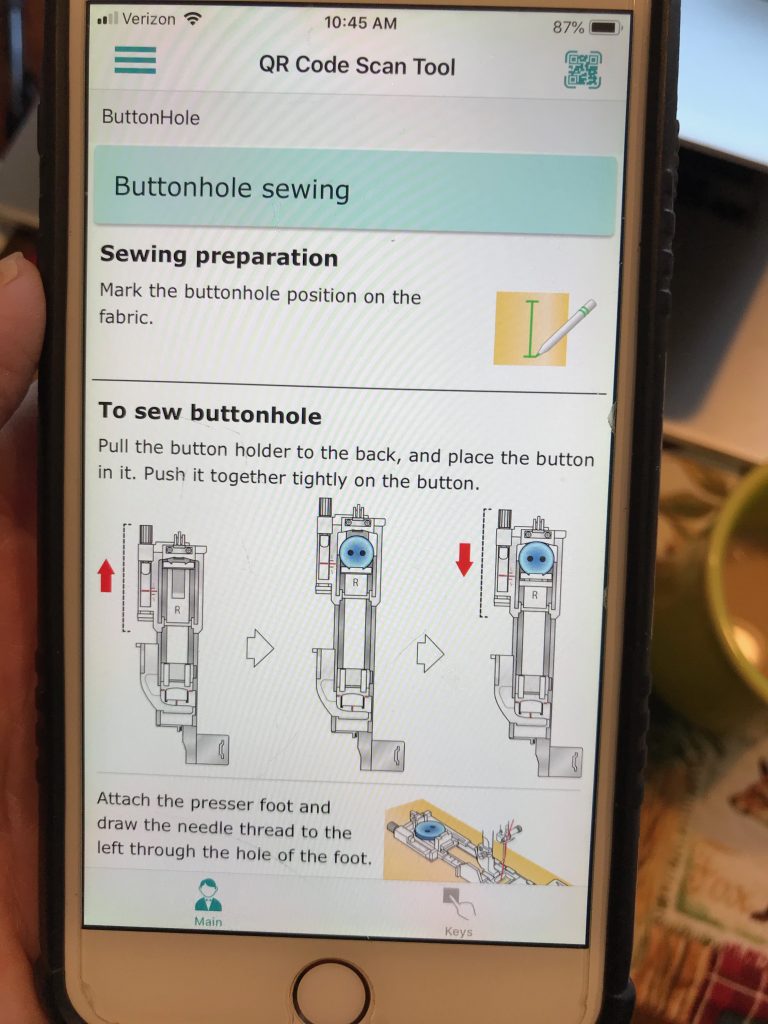
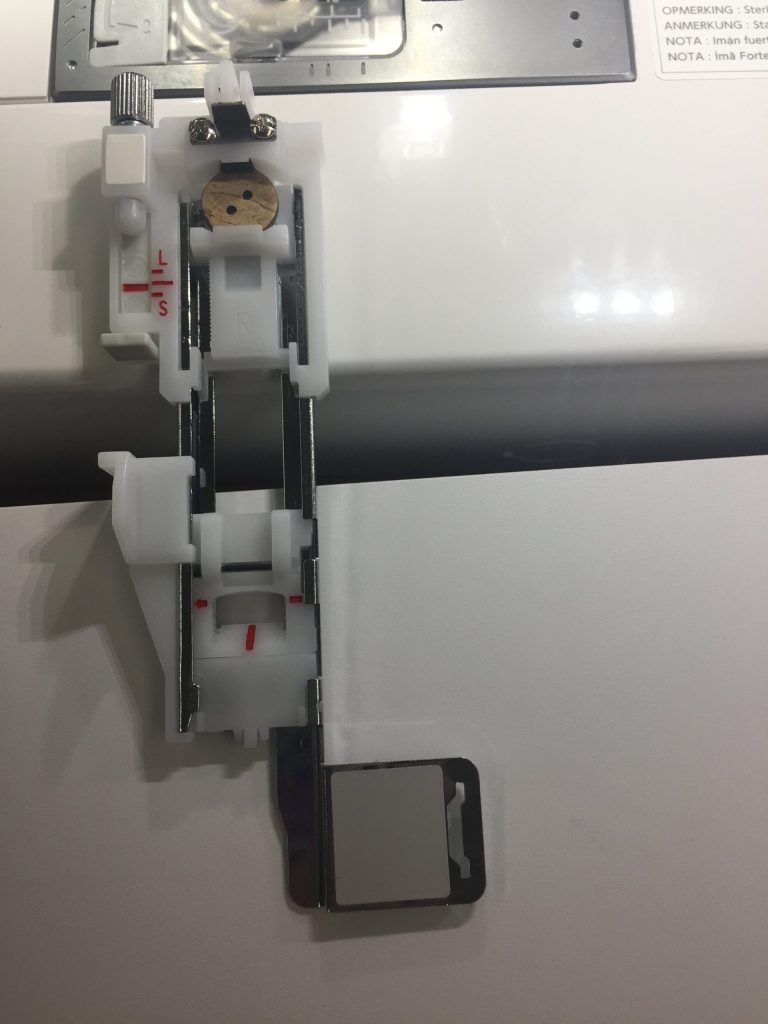
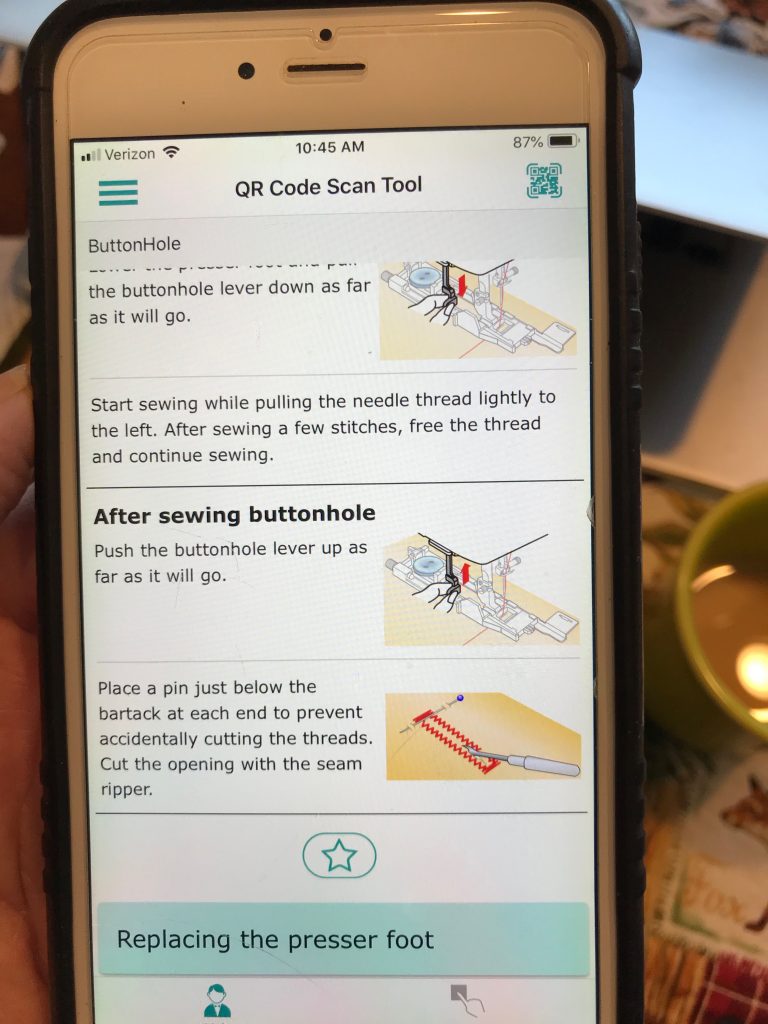
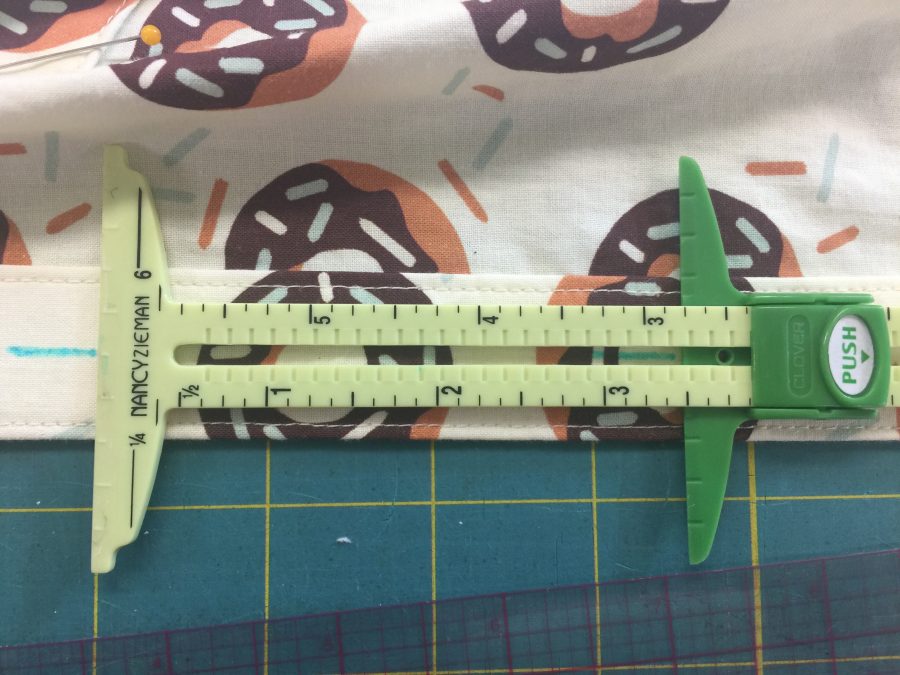
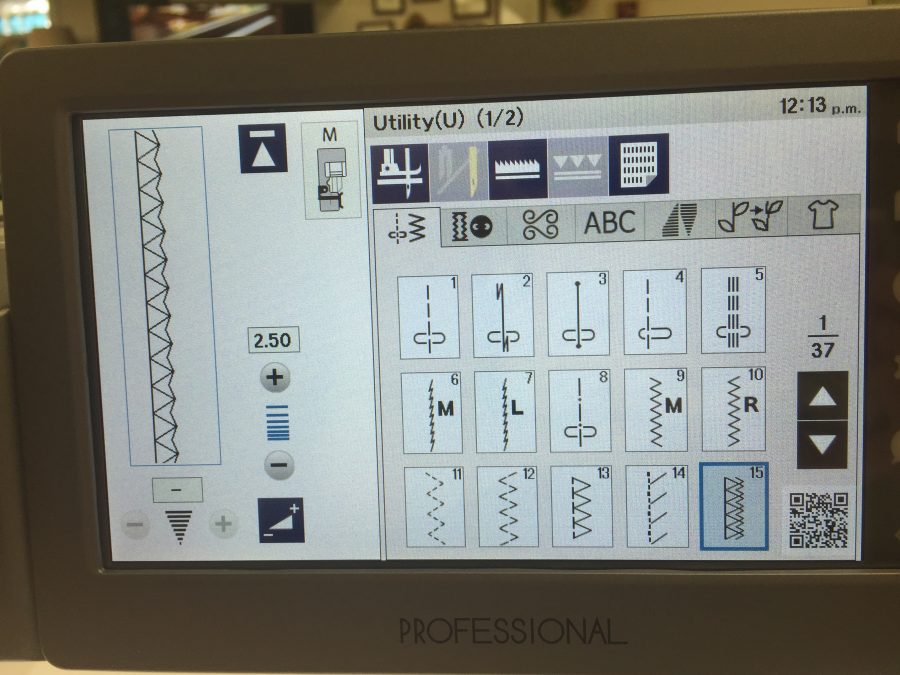
There are a couple screens of buttonhole options, but I used the basic one. Note the QR code in the bottom left corner (more info below).The manual explains the different purposes of the many buttonholes.First, you can select from a wide variety of buttonholes. I went for the standard (after all, I hadn’t sewn a buttonhole in over two decades!). Using the AcuSpark app (free on the App store, works with the M7 and a few other Janome’s), you open the app on your phone/device, scan the QR code in the bottom right of the machine’s screen (photo on left). This takes you to a tutorial within the app.As you can see from the screen shots, the tutorial walks you through the process step by step. Easy peasy…my kind of sewing!Here’s the app telling you how to make a buttonhole!This is what that buttonhole foot looks like in real life. You slide the button into the back, attach the foot to the machine, and it makes the perfect sized hole every time. I kid you not, I make SEVEN buttonholes, perfectly, in seven minutes, and most of that was repositioning to the next spot!More instructions on attaching and using the special buttonholer foot.And how to finish the buttonhole.This Nancy Zieman (oh how I miss her!) tool from Clover is an improvement over the old-school metal one. Although I have a fondness for the metal one, this version allows you to center the ruler exactly on the button band and mark your buttonholes. The darker green slider notches into the grooves so it doesn’t slide up and down the center as you work. I wondered when I bought it why I thought I needed a newer (plastic, yuck) version. Now I know. Once again, smarter sewing.
(Alert: even geekier pattern and garment sewing paragraph!) From the pattern, I also learned a new process for sequence of sewing and attaching the collar and collar stand. Instead of sewing the stand to the neckline, inserting the collar, and closing it up where the collar meets the neck band, the pattern has you sew collar and stand together, then sew the inside of the stand to the inside of the shirt and topstitch the collar to the shirt body. Ended up with absolute precision and perfection!!!!!!
LOOKIT how perfect that turned out! The only thing I would change on the next one (and yes there will be more for both sons) is to use a slightly less crisp interfacing so the collar stand holds up but isn’t quite so stiff.
So, with 50 years of sewing experience (albeit minimal garment making in the past three decades), an excellent pattern that taught this greying sew-ist a couple new things, and the incredible precision of the Janome M7 Continental machine, I am a seriously happy camper. Even better, Joshua loves his shirt!
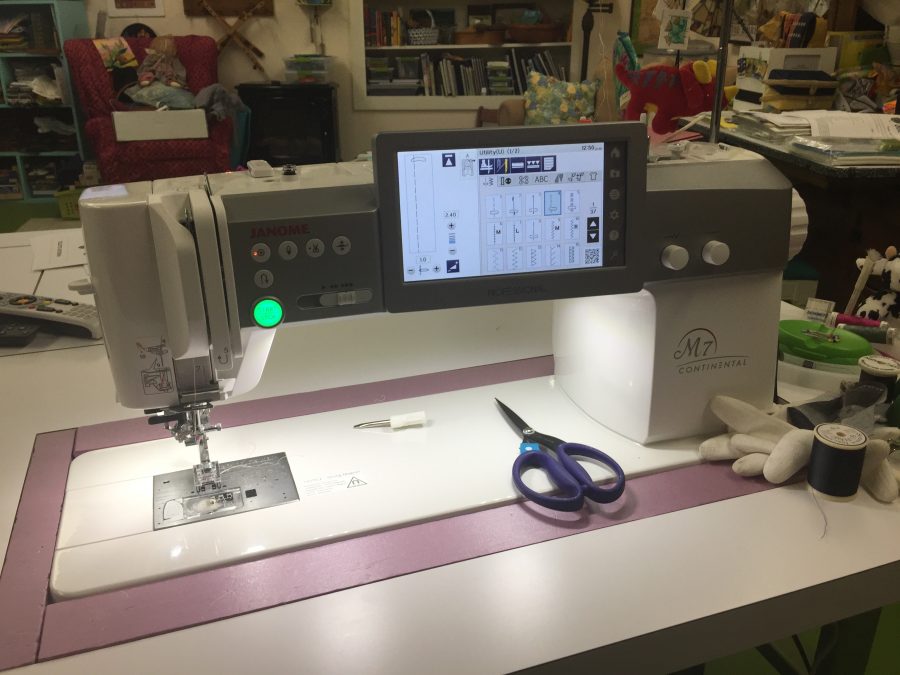
Sewing machine companies are always coming out with new models, most of which are incrementally different from before. But every 10-15 years, Janome re-thinks the machine from all angles and comes up with something that is a major leap–and worth considering adding to your studio. The Janome 6600 was such a machine (circa 2004/5), and the new M7 Continental may well go down as one of The Best Sewing Machines Ever (in any brand!), and given the quality of Janome’s machines that is a high standard.
The Janome M7 Continental is a quantum leap in a sewing machine. Even if you aren’t in a market for a new machine, it is worth taking a look at this model. You might have something new on your wish list!
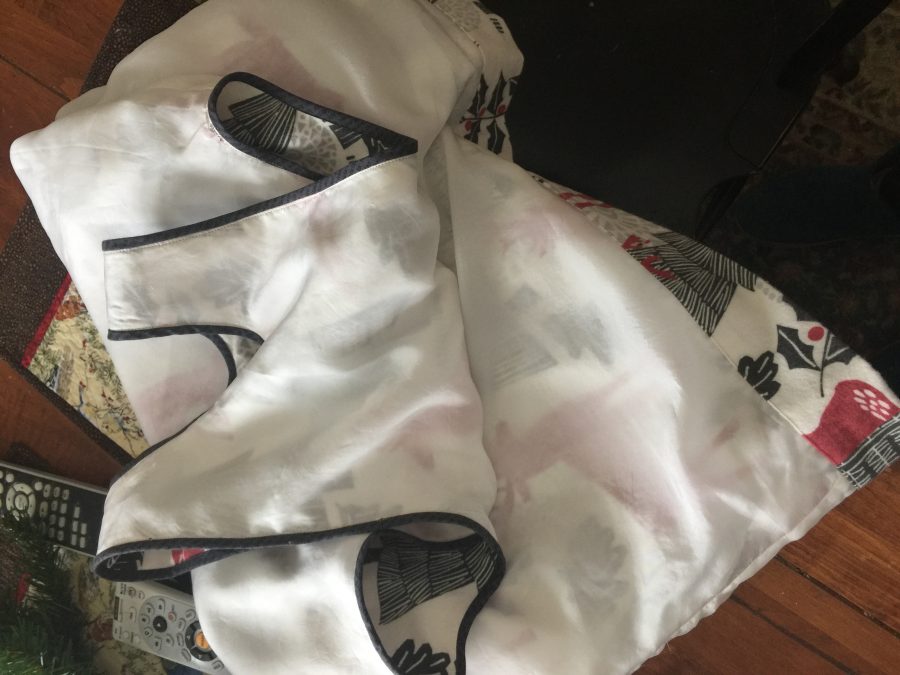
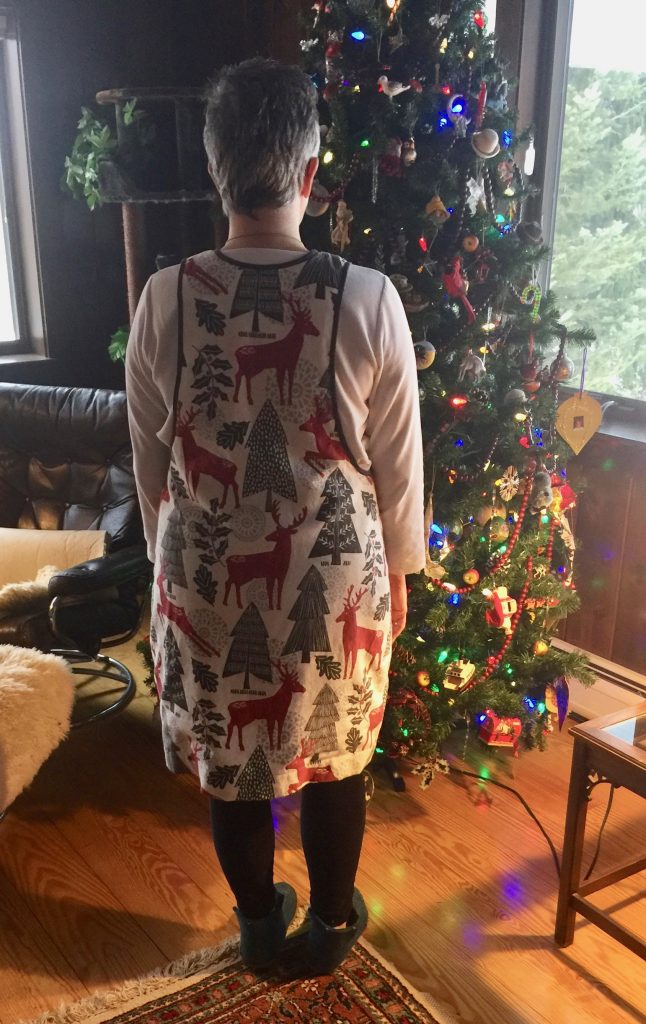
I have been dying to share with you the things I’ve been making, but most of them are Christmas gifts, so I can’t yet. But I made myself the York Pinafore from Helen’s Closet Patterns, so now I can finally tell you about this wonder with the dress as my example.
In my new “Pinafore” (which I would have called a jumper when I was a kid) in front of the Christmas tree. I’m particularly chuffed about how well the M7 and I worked as a team to get those pockets PERFECTLY placed to have the design flow.
When Janome comes out with a new machine, every single time I think “oh, I can’t give up the loaner I have” (I’m beyond fortunate to be a Janome Artisan so I get to try out their brilliant machines year after year), nothing can be better than this one. And then the new one is even better. Every single time they add new features that make me wonder “oh gosh why didn’t I realize that would be so wonderful.” The M7 is even MORE SO….read on!
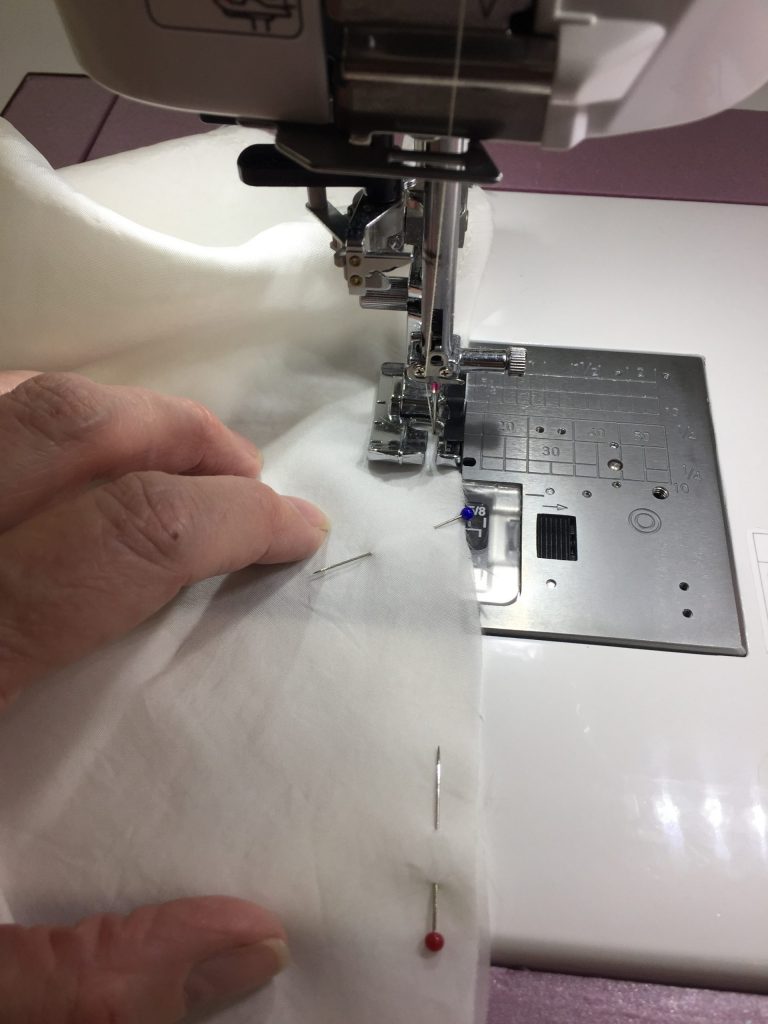
The first thing I did, after cutting out the pattern, was to make a lining. I knew that using flannel that I intended to wear over leggings meant that the dress would stick like velcro. Fiddlehead Artisan Supply had a fabric I’ve not used before, Bemberg Rayon, for linings. The bolt end says dry clean, but we all know that can be ignored sometimes. I just bought an extra quarter yard to accommodate shrinkage and tossed it in a wash with hot water wash, cold water rinse, and hot dryer so it would do whatever shrinking it planned to do.
Then I cut, pinned, and started sewing. I probably should have used a thinner needle and the walking foot. I didn’t need to! The feed on this machine is so good that I had no issues going from thick flannel to silky thin rayon! Because rayon ravels, I used the quarter inch piecing foot to create a narrow seam that I turned into a French Seam.
A French seam is really a seam inside of another seam that completely encloses the raw edges. It is typically found in high end garments and used on fabrics that ravel.
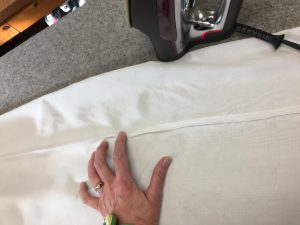
Once you have sewn the first seam, you press it as stitched to set the seams. It helps the thread sink into the cloth. Then you press the seam *open* which facilitates turning.
Then you fold the seam right along the stitching to create a “knife edge.” The best way to get the line perfectly on the edge is by pressing open (photo above) and then pressing flat. You can see how crisp and clean the edge is.
I used the quarter-inch foot with the edge guide but moved the needle to the left to 3/8″ from the edge to achieve this perfect seam. In this photo you can see the quarter inch encased and perfect stitching. The rayon won’t ravel ever!
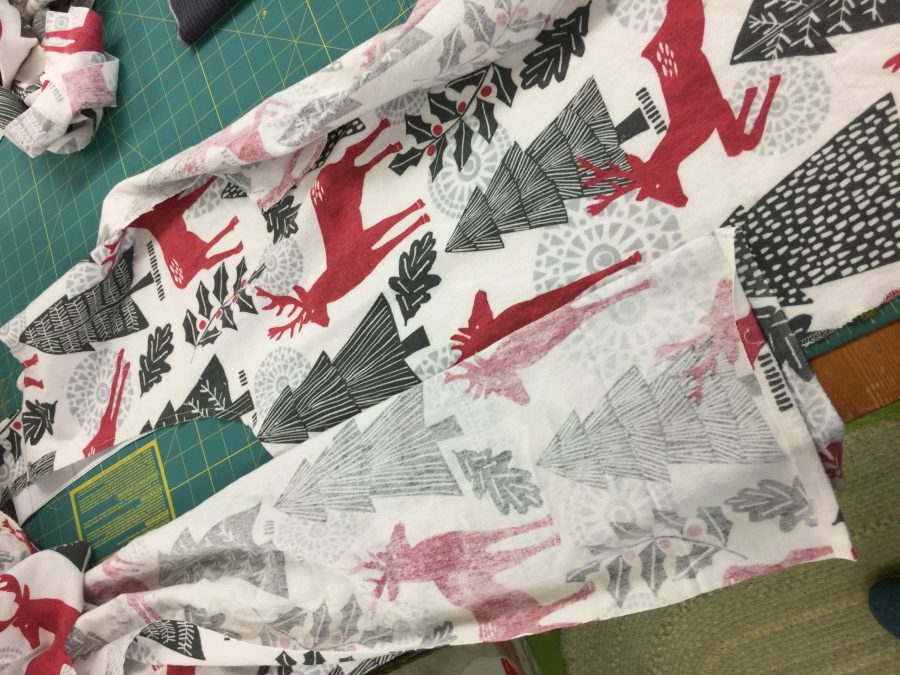
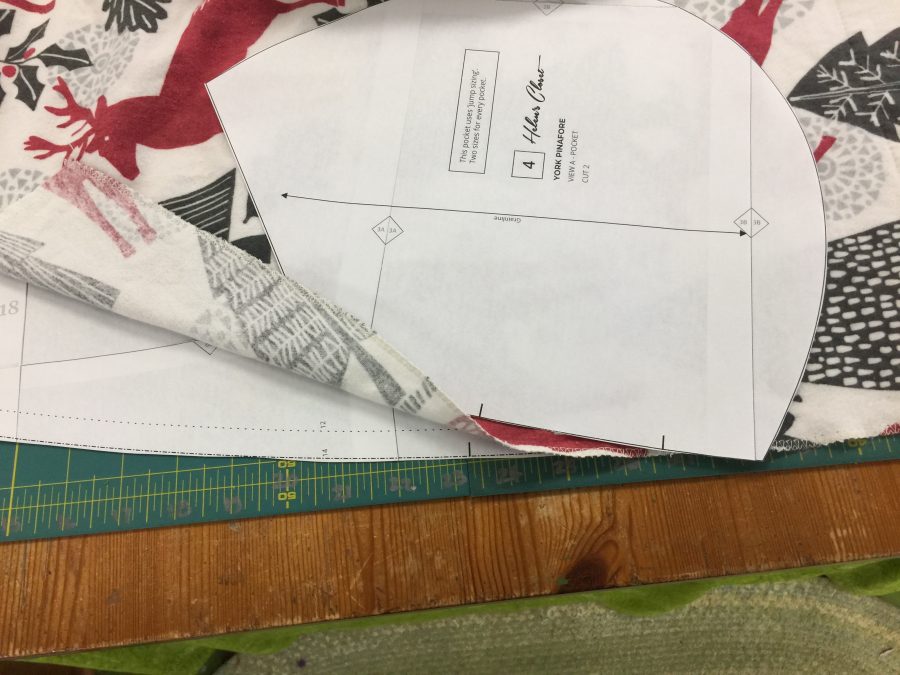
Here I’m matching the scraps and the front of the pinafore so I can cut the pocket pieces to exactly match!
Getting the design lined up perfectly to cut a matching piece for the pocket.
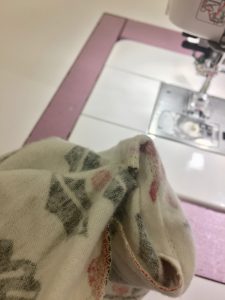
Here I’m stitching in the ditch for the opening of the pocket. I decided to outline the entire pocket with binding. I used the M foot and stitch 15 to overcast the edges as I did the gift bag in yesterday’s post. There are many ways to stitch in the ditch, including an edge-stitch foot that is included with most Janome machines, but personally I find I get my best results using the open-toe F-2 which offers the best visibility. I move the needle to the far right, set the right edge of the foot on the bias, and can get absolutely snug up next to the bias trim.
Now THAT is “stitching in the ditch.”
Throughout the process the M7 handled flawlessly–I mean FLAWLESSLY!
I can’t wait to show you more of what it can do.
Janome’s new slogan is Reliability by Design….I stopped to think about it: I have been sewing on Janome machines since 2003 and not once–let me repeat that, NOT ONCE– have I had an issue that was due to the machine. Once or twice due to operator error, but really, the machines have been utterly, totally and completely reliable. And each one gets better.
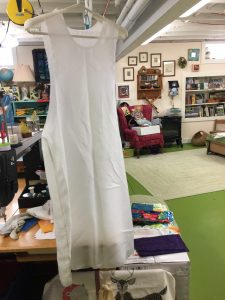
Lining done and waiting for the dress to be made.
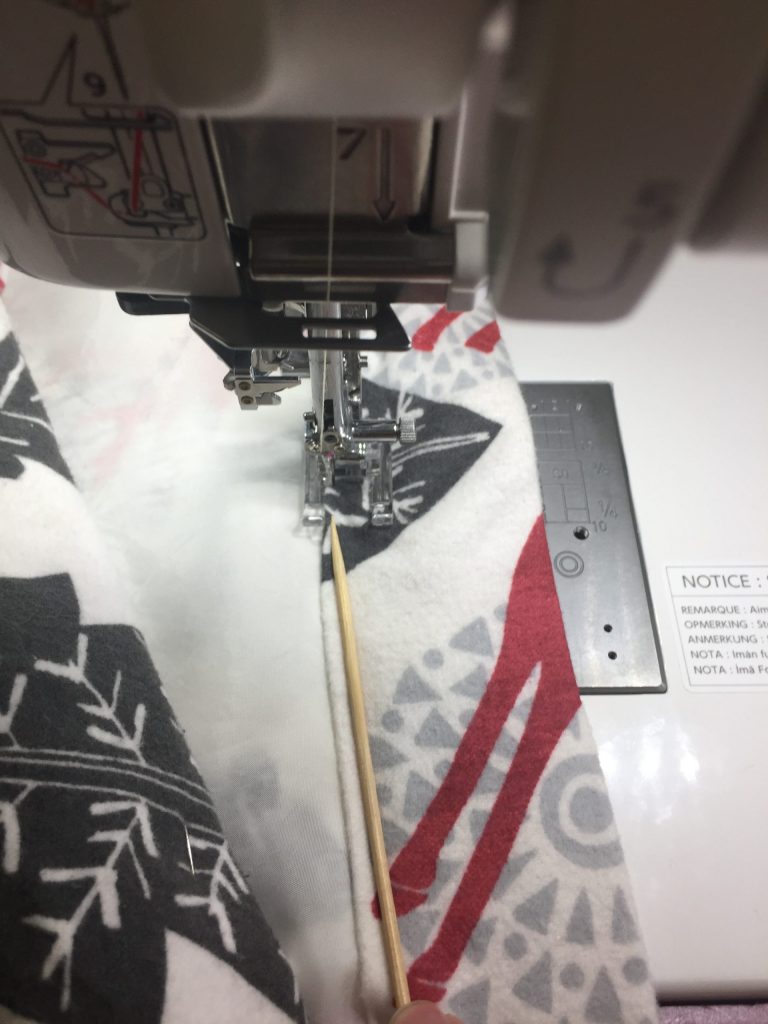
For hemming, I use the same foot and process, just move the stitch to the far left and adjust the needle drop (the Janome’s have so many needle positions you can get it perfect!). Because I have the rayon lining tucked inside the hem of the flannel outside, and because flannel is loosely woven and really quite stretchy, I use a bamboo skewer to press down on the hem. This compresses the hem, keeps it from rolling up, and controls the stretch. I hold the skewer in place and let the fabric feed underneath it–the tip of the skewer never gets up near the needle. The outstanding feed mechanism on the M7 meant I didn’t need to put on the AcuFeed at all… I couldn’t believe how easy it was!Here’s the inside: all seams contained between the lining and fashion (!) fabric/flannel. I tucked the lining dress inside the flannel dress and basted at the neckline and sleeves. The pattern calls for using bias a narrow facing, but I chose to go quilty and have the grey accent the edges. Then, very carefully because lining is so slippery, I measured the hem and tucked the lining inside (instead of having it hang loose as is more common) and hemmed the dress.Dress from the back. If you are curious, put York Pinafore in the search box and Pinterest…SO many cute ideas, fabulous on a wide range of body types, and fast to make. I can see using a quilting cotton for a fun summer dress with tank or T underneath, and corduroy for winter.
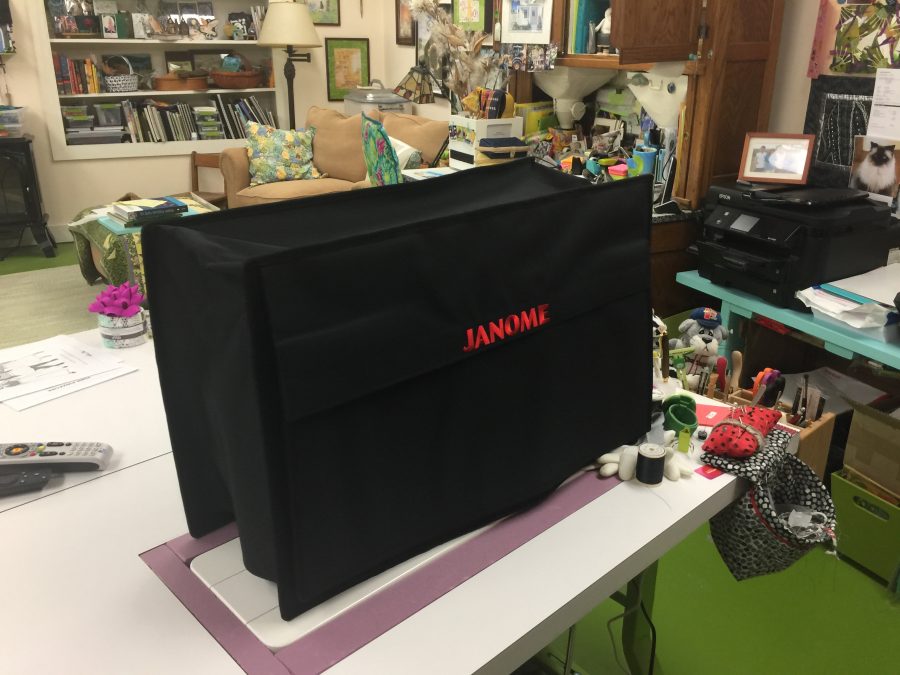
This new M7 Continental Janome is really something else, and although I am a Janome Artisan and affiliated, I would say all this if I had bought this machine at full retail. I’ll take you through some of the other marvelous things it can do in January and February. In the meantime, another small but marvelous detail: the thread stand has a COLLAPSING antenna.
Here’s the machine again…it’s hard to see in the clutter of my room, but there is a thread antenna on the right rear of the machine.
The thread antenna is telescoping, meaning you can push it down and then cover up your machine with the very good quality included cover! WOOT! PS: It also comes with a great extension table with a drawer in it, but even with its vast size (more on that later), I wanted to set it into my table. I cut rigid foam core to fill in the gaps. The mother of invention!
A quick Gift Bag Tutorial–took about half an hour even *with* being fussy! Used leftover flannel, and a trimmed off bit of fabric from a quilt back or edge as the ribbon! Read on….
Sometimes it is possible to whip up a quick something just before Christmas…I’ll have to back-to-back posts (I hope) about sewing for the holidays that include this tutorial on zipping up a quick gift bag and, next, the wonderful York Pinafore pattern from Helen’s Closet patterns.
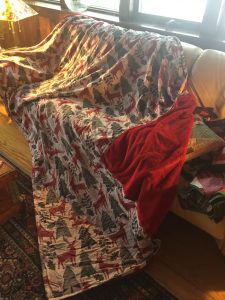
Last year Shannon Fabrics sent me a number of different fabrics including Cuddle and Luxe, fleece and faux fur type of fabrics. They sent a vast amount of this soft and silky red (available at Fabrics.com). I’m not positive which color way it was, but it was similar to this one. I finally purchased a flannel sheet, queen size, to make a throw that is big enough for two to snuggle or to use as a cover on a twin bed! It is more than a tad wrinkled here because it has been in recent use…it’s winter in Maine! Thank you Shannon Fabrics!
I needed the Queen Sized sheet so it would be long enough for the red Luxe that is so silky soft. That meant I had quite a bit leftover…so I thought I’d make a garment (next post). Once that was made, I still had leftovers so I whipped up two gift bags and thought I’d share it as a tutorial.
Tutorial:
Cut two rectangles of fabric or one very wide rectangle. Place right sides together.
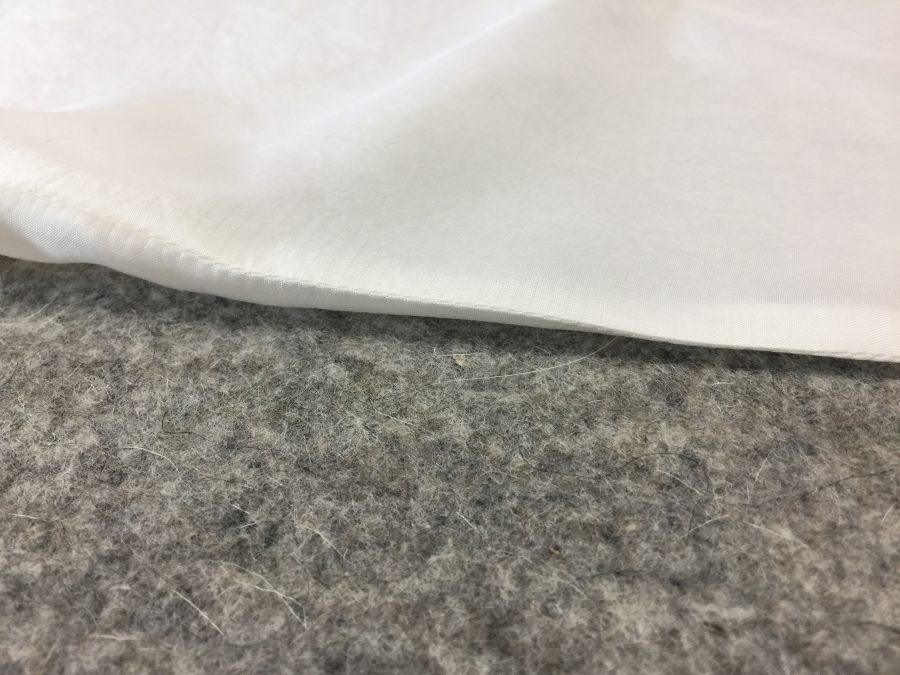
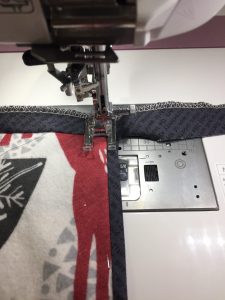
Clean finish edges. You can use an overcast stitch as I did (photo below) or use a french seam (google it, or I’ll do a tutorial eventually of some basic things every sewist should know). Using the Janome’s “M” overcast foot gave results as good as a serger.
Janome America sent me the amazing new M7 Continental sewing machine (several blogposts in the new year…phenomenal machine!). I used the zigzag overcast stitch and the M foot which comes with the machine to clean finish the edges of the bag.
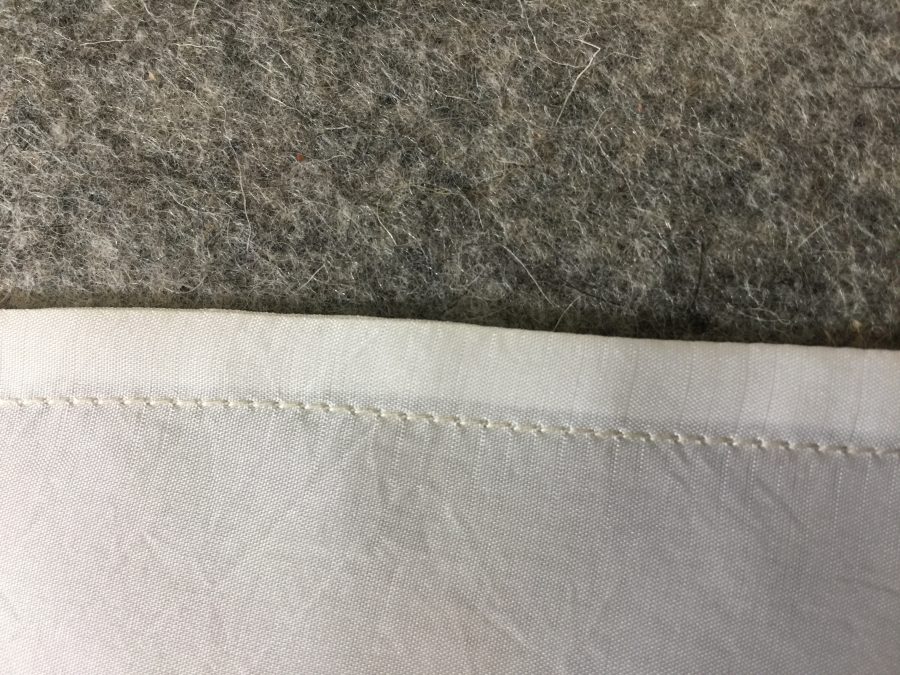
3. Sew a simple straight seam just inside the overcast edges. Sometimes the contents of gift bags can be heavy, and especially with soft and stretchy flannel, I felt a little extra stitching was a Good Thing.
I’d never used the Lock-a-Matic stitch before because I learned to sew when we were lucky to have a simple zigzag on a machine and not all the bells and whistles. Janome has designed the AcuSpark software. In the previous photo that QR code I pointed out: use your phone to scan and it will pull up a screen with helpful information. Here, I’ve got the one for the Lock-a-Matic Stitch!
Having started sewing when dinosaurs roamed the earth and you were lucky if your machine did anything besides a straight stitch forward and back, I am so used to just doing the lockstitch or backstitch myself that I likely will keep doing that, but this stitch automatically does a securing backstitch at the start of a seam and, when you press the back arrow, at the end. I had been concerned that it might sew a lockstitch when you pause in the middle of a long seam to re-position your hands, but it doesn’t, which is good!
4. Turn your bag right side out.
Once your seams are finished, turn the bag right side out. I like to fold the corners so that both seam allowances are to one side. My hand is inside and I’m pinching the corner together. Then keeping hold of the seam allowances, turn.
Pretty good corner, and I haven’t even eased it out yet!
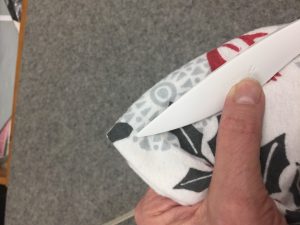
5. At the ironing board, use a point turner to coax the corners out to perfect.
I have several point turners. This is one I bought just this year. Make by Clover, it is beautifully smooth, and has a Hera Marker (sharp edge for marking lines on cloth) on the other end. It is longer than most point turners, curved to fit the hand nicely, and I like it better than any others I have tried.
Lookit how perfect that corner is! Square as can be! I created this method for corners when doing custom home dec work for an interior designer. Some of the upholstery fabrics were so thick that I was afraid if I clipped the corner, the old school way to deal with bulk, the fabric would unravel and ruin the project, and the fabric was crazy expensive. This is secure and gets even better results.
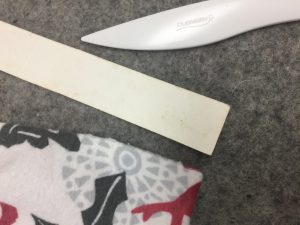
6. Hem the open end. The interior designer I worked for taught me about using poster board (or tag board or an old manila folder) to make templates for turning hems. When making curtains, the extra weight of a doubled hem helped them hang well. I called it the turn-turn hem, since you turn up two full hem-depths.
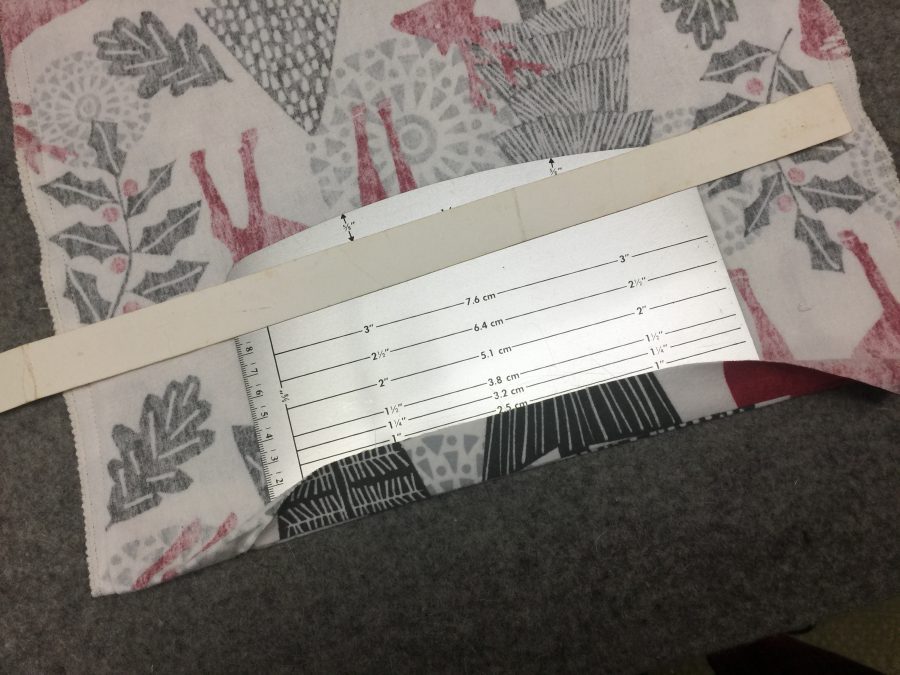
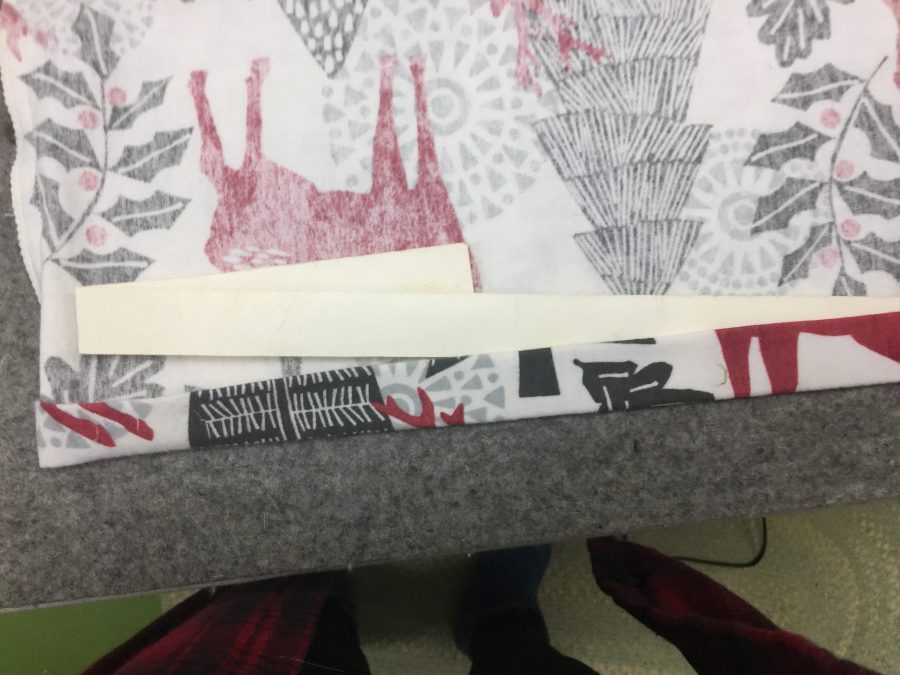
This is the first turn. I’m showing the poster board 1″ wide strip I have used –I am not exaggerating same piece of paper– for over 17 years. Place your fabric right side down on the ironing surface. Fold the hem up over the poster board, lightly snugging the board into the fold with your fingers. Press. Steam is fine–use it all the time and the poster board is still in great shape.
You can also use the Dritz EzyHem tool, available everywhere. The metal is nice because it gets hot which helps set the crease, but it is short, maybe 6-7 inches. The poster board is fabulous for things like curtains and custom sheets because you can get a really long run done all at once without wobbles.Then you turn the hem up again. Usually I keep the poster board inside the first turn and just roll it up, but for photo purposes I wanted to show you that it is the same idea.
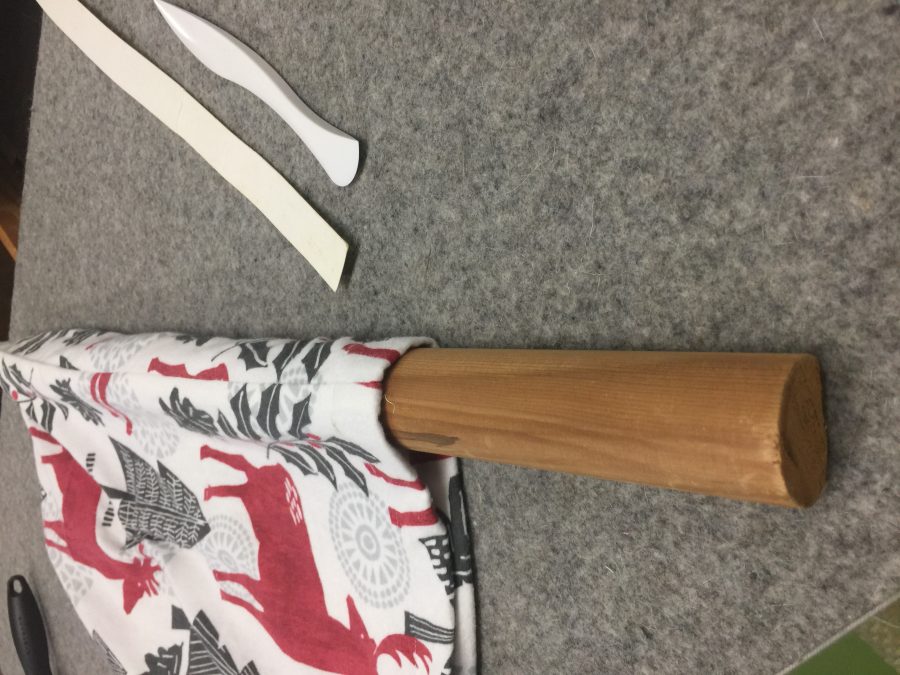
7. Press your seams to one side. Using a seam roll –in this case a piece of cheap stair handle from the big box DIY store. Dressmaking suppliers sell beautiful hardwood (maple usually) seam rolls for Lotsa Bucks. This pine stair rail handle was a few dollars for 24 inches. Sits flat on the ironing surface and does the trick.
You can see the flat end of the stair-rail-as-pressing-dowel. I’ve got the seam centered on the top and have pressed the first part of it. This set up is perfect when you don’t want the edges of the seam allowance to show through to the front of your fabric.
8. Give your bag a final press, tuck the goodies inside, and tie shut. I think, having found that strip of green, that instead of buying ribbon I might “make” some from leftover bias bindings (unfinished on the edges) or making some straps (turn seam allowances under, sew folded edges together) to use as ties for future years. Here’s that original photo again: