email Youtube

Home
Galleries
Blog
Workshops & Calendar
Store
Resources
About
Contact

Archive for the ‘Favorite Products’ Category

Teaching at IQF Houston 2018: Collage the Garden

Friday, August 3rd, 2018

Interested in trying your hand at art quilts? Not sure where to start? This class has proved a perennial favorite at IQF Houston (and elsewhere)–sign up soon!

Yes, registration is OPEN for classes for International Quilt Festival Houston 2018, including my four classes.  I’ll recap my four classes (well, three full day classes and the Machine Quilting Forum). My first class, Birch Pond Season,  is already covered here.  Today, I’ll share about Collage the Garden, one of my newest classes and proving to be one of the most popular.  I hope to see some of you in it!

This workshop is all about how I –and now YOU– can create imagery from a photograph to create your own fused, collaged art quilt.  In Houston, this workshop is offered as a one-day class.  I’ll provide photos to teach you how to use a photo to map out your shapes and values, then you will start (and maybe finish?) creating the pink water lily or the orange tiger lily.  For this outing in Houston, you will be bringing and fusing up your own fabrics (or bring them pre-fused–I prefer Mistyfuse and will have it available in class–it has the lightest weight and softest hand of any of the fusibles).  This is a no-sewing class, but we will talk about how to quilt your fused artwork when you get home.

Collage the Garden: I’ll teach you “how did she do that” so that you can create your own art from your own photos

Detail of the Pink Water Lily

Here’s the Tiger Lily option fused in batiks

And the tiger lily done in hand-dyes….it’s the same but different. What fabrics will you choose?

You can see the supply list here.

Click on this link to sign up for Class 339 and spend Wednesday playing with me!   Class ends at five–just in time for IQA member preview opening at 5 (and general public preview at 7).

In other venues, a guild can book this workshop over to two or three days to allow students to bring in their own photographs and begin work on their own artwork with Sarah to help guide them.  The workshop can be booked in conjunction with Quilting the Garden:  Thread-Coloring the Flower to create a three-to-five day workshop.

SaveSave

SaveSave

SaveSave

SaveSave

Lupines: the quilting begins!

Sunday, July 22nd, 2018

Ever so slightly ahead of schedule, I have begun quilting on the Lupines. Luckily (and one reason I chose this imagery) this will be easy quilting.  And yes, once again, I LOVE MY BERNINA Q20.  Crazy expensive and worth Every. Single. Penny.   Lots and LOTS of pennies.

This morning I finished basting the Lupines quilt.  I decided to try something I haven’t done before:  a double batt.   I definitely wanted to use wool, but I haven’t been able to find a source for my favorite Matilda’s Own Wool-poly blend batt in the US recently, and I’m hoarding my last batt.   So I used  Quilters’ Dream Wool which is much fluffier; I fused my top to that.

BUT I was concerned about distortion because of the fluffiness–it just didn’t feel like it would hang well and be stable.  Dreamy (pun intended) in a bed, lap or snuggle quilt, but by itself on a densely quilted wall quilt?  Not so much.  So I took the only cotton batting I had, Quilters Dream Select, and layered that underneath the wool.  If I had had Request, the thinnest, I would have used that instead.  Finally, spray basted the backing and safety pinned intermittently.  I am using up long lengths of print fabric in my stash when they suit the quilt–time to move them along.  Will have to dye something to match for facings and hanging sleeve.

I also selected thread yesterday afternoon and this morning.

When I choose thread for a quilt, I “test drive” it by drizzling on the surface. If it works, it goes in the shallow box. I probably won’t use all of these, but will use most of them–about half the solid greens and almost all of the rest. And I added a medium purple this morning and will likely not use the dark purple in the box at all.

Things I have learned so far:

  • Painting a nonwoven is a good thing.  But if that nonwoven is Pellon 65 heavyweight interfacing, it is somewhat like using construction paper.  Will do the non woven thing again, but will look for something softer yet still dense (so no shadow through).
  • Mistyfuse is by far my fusible of choice.  But it behaves differently on the interfacing than it does on cloth.  If I fuse this particular interfacing again, I will use TWO layers of Mistyfuse–it is plenty fine and easy to stitch, and it will help this painted interfacing stick better–see photo.

Because of the difference (in porosity maybe?) between fabric and interfacing, my fusible isn’t sticking quite as well as usual. So I have re-fused various spots, and in a couple of cases tucked snippets of Mistyfuse under the stubborn lifting petals. I found, luckily, that if I am careful I can still quilt those lifting petals because the interfacing doesn’t wobble around like fabric.

And to my astonishment, I quilted almost five of the six purple lupines today.  I have a couple of the tops where I will use pale lilac or cream unstitched as of this evening, but I am definitely farther along than I thought I would be.

Quilting in progress…done on the right, not done on the left. Using just one purple thread to stitch down the petals/quilt down the petals is working out OK despite the value changes from petal to petal.

That means the “after Eli goes back to college” period may be less frantic than I had feared. YIPPEE!  Barring catastrophe, I will be one and able to take photos and submit then ON TIME.  Stay tuned!


SaveSave

SaveSaveSaveSave

Knits, Sergers, Cover Stitch machines, and more at Janome Education Summit 2018 Post #7

Thursday, July 12th, 2018

Thursday was a whirlwind as we finished up at lunch time.

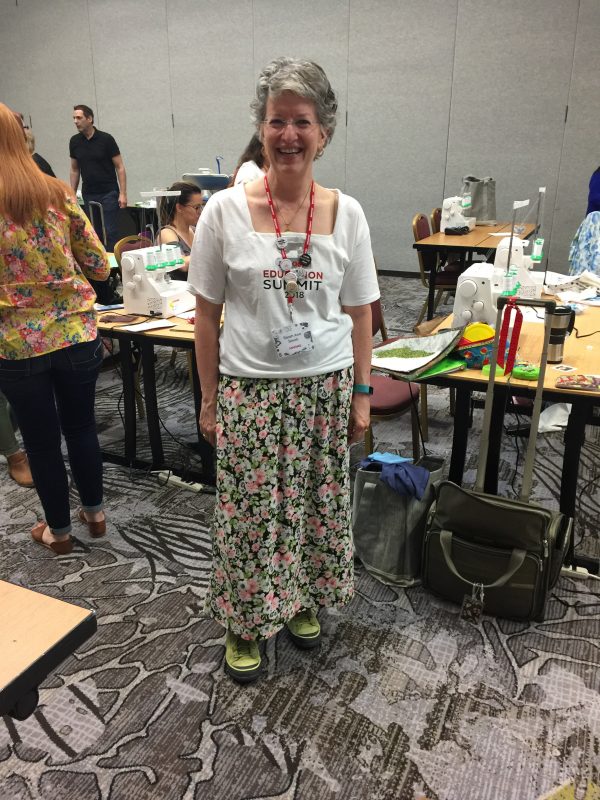
Me with my Summit t-shirt (we also did some iron-press decals…this was a basic shirt with an altered neckline also done at breakneck pace) with my skirt tucked underneath. Even my lime suede sneakers go with it!

In that morning we had a presentation on My Fabric Designer Software by Eileen Roche and made a knit skirt using sergers and cover-stitch machines thanks to Girl Charlee.  The amount of machines and work Janome America put into having them onsite for us all to test-drive and learn was amazing–huge kudos to Janome America for such a great Summit!  And of course major thanks to the sponsors and presenters for all the goodies and best of all the learning!

Today I am actually wearing the skirt I made (photo above)…the project was to make a pencil skirt.  I’m afraid that pencil skirts and my body and lifestyle are not a match made in heaven, so once again I was the disobedient child and made a gathered skirt.

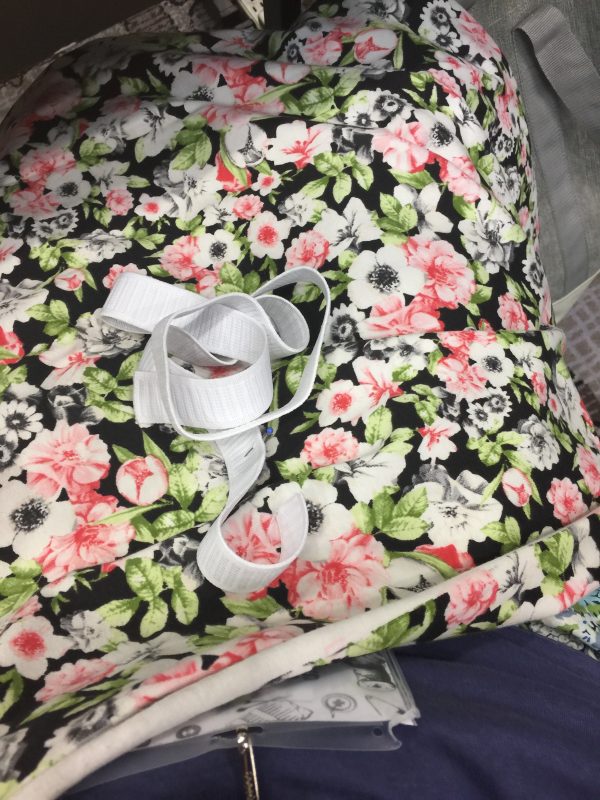
The fabric I chose…other choices were a solid denim look and a blue floral print. Heather Peterson’s Girl Charlee site is here, with a wide range of VERY reasonably priced knits. This particular fabric is still available as of early July 2018, here, and is only $8.50 a yard! It’s a lighter t-shirt weight skirt (so not too heavy for a full skirt) and is soft and comfy.

Owner Heather Peterson showed some of the fun projects she has made and gave us tips for sewing on knits.  For those who don’t have a serger, even the most basic sewing machines have an overlock stitch that you can use to whip up these fun things on your domestic machine.  What I learned:  don’t be afraid of knits!  You can do it!

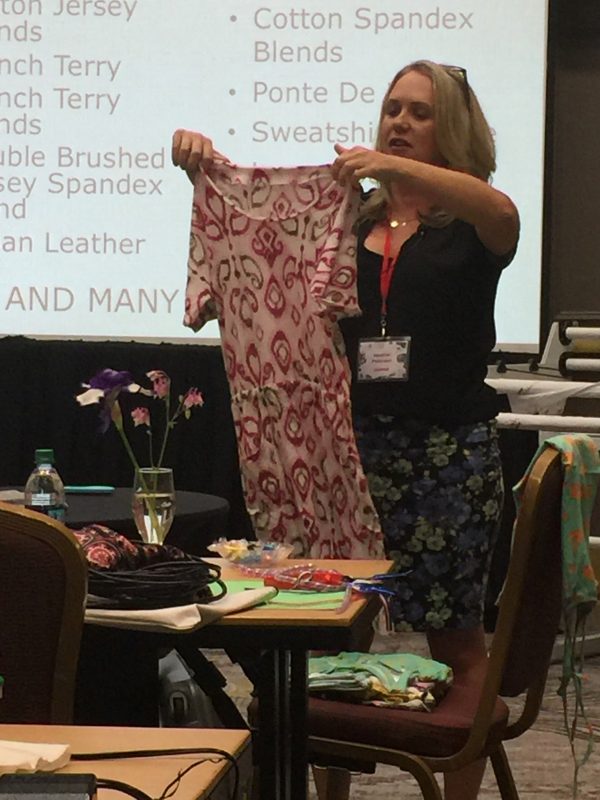
Heather holding up a comfy knit dress

And on the screen behind her, tips:

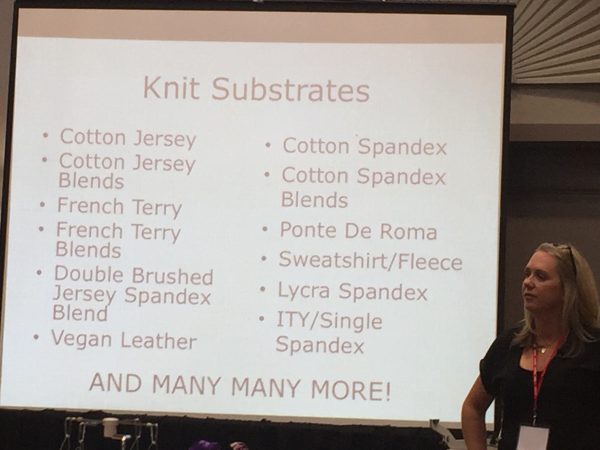
Different types of knits….I had never heard of Vegan Leather….but it looks leather-ish and it actually stretches! I don’t think leather leggings are in my future, but maybe this might work on a quilt….hmmm…….

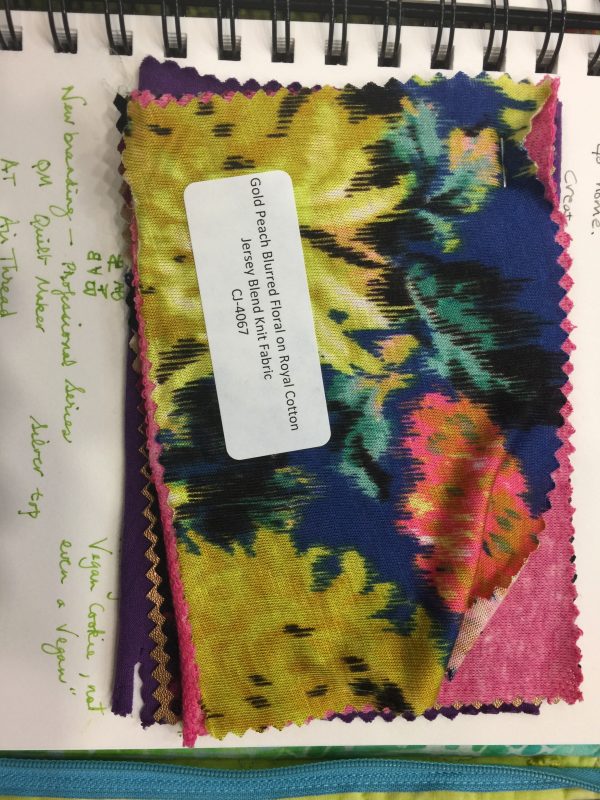
Some of the delectable fabrics at Girl Charlee

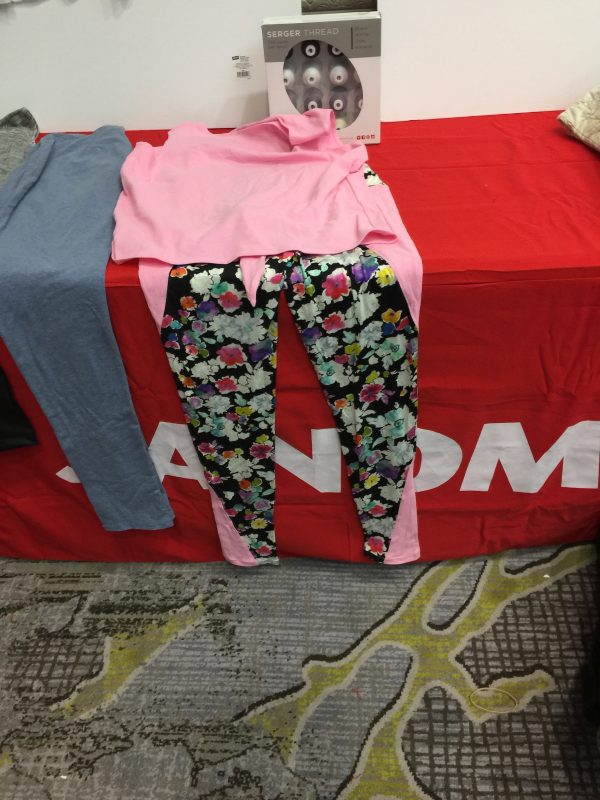
A couple knit projects up on the front table

The ladies who DID make the pencil skirt wore them and fell in love–the entire time I was thinking “I wish I had Ashley’s (DIL) measurements” because this project was ideal for her.  When I showed very petite Ashley the pattern provided (here) she was delighted and said “OMG, a pencil skirt that would actually FIT!”  The pattern has you start with your measurements, then subtract a bit, calculate the length, and presto, nearly instant skirt.   I used the full yard of fabric to make a nearly ankle-length skirt.  I didn’t have time to be afraid…we had to work FAST, so I serged up the side seams, serged the elastic (my first time ever doing that!) to the top, then switched over to the cover-stitch machine to stitch down the elastic and hem the skirt.

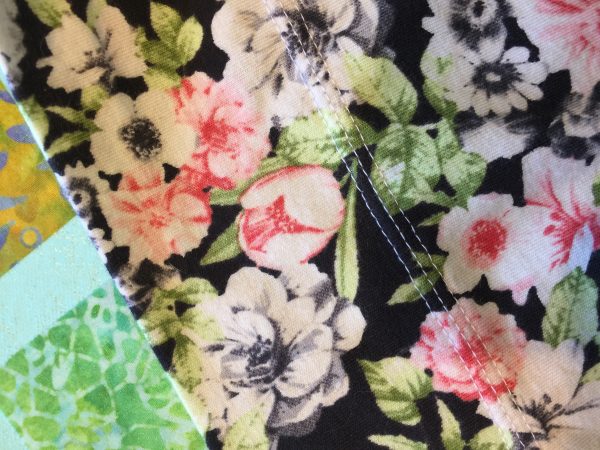
The hem of my skirt. I’ve never used a cover stitch machine before–I love the look of this three-needle hem. On a domestic machine, you can simulate the look of a cover stitch machine (or setting on a serger) by using a twin needle. The bobbin thread zig-zagging on the bottom side gives stretch to the hem, which means the threads don’t break.

After the summit I did some noodling around on the internet: the one issue I had was the fabric curling at the top edge of the hem.  Terial Magic would take care of that by stiffening the edge, but there is also stuff called wash-away tape that is 1/4″ wide.  That, placed on the cut edge, would hold the hem in place AND keep it from curling (which it does between the pins).  Thanks to Heather’s workshop I’m determined to take the fabric I bought to make leggings 2-4 years ago will be MADE UP into leggings this summer!  I’m not afraid any more!

Back to Eileen Roche– her company prints your designs (similar to Spoonflower) on a wide range of base goods (cottons, knits, poly, etc).  But she also offers software that works on PCs (sorry, not on Macs which is what I have) that helps you design repeats.  I could see having a lot of fun with this!

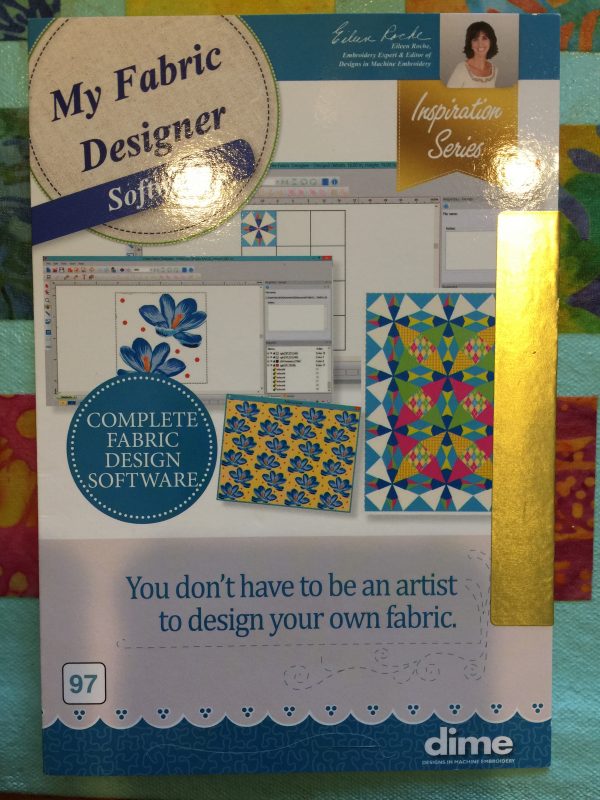
Here’s the print fabric website: https://www.myfabricdesigns.com and here’s where you find the software: https://www.inspiredbydime.com/inspiration-software/my-fabric-designer/

Although I’ve returned to earth after the rush of the Summit, just revisiting these photos has brought back what a great week this was.  A TON of good stuff packed into 3 full days!

Me on video with Terry Mingee–Janome Education Summit 2018 Post #6

Monday, July 9th, 2018

Hold on to your seats…it’s me on video! At the Education Summit in late May, the Janome Marketing department paired up the participants, then had us ask each other some questions.   They’ve just today posted those videos.  Apart from the fact that it was late in the day so Terry Mingee, whom I have met a few times before at International Quilt Festival in Houston, and I were fairy tired and relaxed and therefore didn’t sit up straight…the videos are a total hoot.  Here’s mine with Terry…I am now Sarah the Time-Turner (after a brief detour as Sarah the Ripper).  I knew we were doing OK when the Marketing staff were all laughing quietly as this went on…it was so much fun!

Here’s the link to all the videos on Janome’s YouTube web page; the interview between Kimberley Einmo, the US Janome-America spokesperson, and Tamara Kate Serrao, the Janome Canada spokesperson, is great.

Miriam Coffey, Janome Educator, at the Janome Education Summit 2018 Post #5

Monday, July 9th, 2018

Several years back I had the great good fortune to have Miriam as the educator in one of the classes I taught in Houston.  It was fun to see her again at the Summit, and a jaw-dropping experience when we got to see some of the goodies she has made.  As she put it, she’s not a bows and teddy bears sort, but she DOES to machine embroidery on her Janome embroidery machine. I don’t do hearts and bows either, so I love how her entire approach–totally in keeping with her personality–is fresh and fun and inspiring.

Miriam brought show and tell, and it’s a miracle none of us tried to sneak home some of her goodies, except we wouldn’t do that to her! This sewing items case (could easily be an iPad cover etc), she used the embroidery module to create fabric, then cut the stitched fabric designs apart to use in patchwork. All those green bits were solid / plain fabric until she decorated them with embroidery.

Miriam must have been sitting under a vent because she was wrapped in this snuggle throw. It was made from flannel on one side, the Cuddle fleece (see earlier post) on the other, then free-motion quilted using fuzzy yarn and the couching foot. Let me just say I loved it so much I have already ordered fleece which is waiting for me in my workroom!

And another one of those throws. WANT!

Here’s a close up of a sample: Miriam hooped the fabric, embroidered it with a sashiko pattern (I think using a twin needle)

Lookit how modern the tumbling blocks pattern become hen using cloth that Miriam “made” by embroidering a simple solid.  With a little imagination, it would be possible to achieve some of this effect just using the decorative stitches on most machines.

A case Miriam made…same idea!

This is part of a wall hanging Miriam made using programmed designs. But I want to try to re-create that cross-cut of tree bark and tree rings just using the variable zigzag feature on my 9440 and free-motion stitching.

And a sample of a honeycomb programmed stitch (done on the embroidery module) on top of pieced squares.   It would be a fuss, but you could do this (probably not as perfectly!) using careful marking and a satin stitch, but obviously lots easier when it is a programmed design on the 15000 that you hoop and hit “start.”   It’s almost enough to convince me to try embroidery LOL!

Anyway, Miriam was so much fun to have in class…helpful, professional, capable, and obviously has a lot of creativity and skill to teach and share.  Thanks for schlepping ALL those things to share with us, Miriam!