email Youtube

Home
Galleries
Blog
Workshops & Calendar
Store
Resources
About
Contact

Archive for the ‘Professional quilting’ Category

Published! In Quilting Arts Magazine!

Sunday, August 5th, 2007

Yes, I’m dancing on the tables! The first of two articles on bindings, titled On the Edge, is in the new August / September issue of Quilting Arts Magazine, and the second one will be out in the October/November issue. Here’s the cover:QA Aug. cover

My article is on p. 32…and I’ll share more after the magazine hits newsstands on August 7th. I’ve already shared one technique that ended on the editorial floor (I KNEW I sent more than they could fit in the available real estate –grin!), and later on another for using facings. In the meantime, I invite you to join me in a major happy dance!

The Frayed Edges Show Opens!

Saturday, August 4th, 2007

The Frayed Edges Show at the Camden Public Library (Maine) is up and open for public viewing! And, thanks to sending out press releases, we have coverage in print and online from The Village Soup (Knox County edition) and The Camden Herald, which has a picture, too! The show is in the Jean Picker Room, on the lower level. If you enter from Atlantic street, pass the check-out desk and bear left past the “new books” and card catalog computers to the room. Here’s the view as you walk into the Picker Room, which holds a new show of various art media every month; the director for these programs popped in as we were hanging, and said again that his favorites are the quilt shows…yeah!

Right wall and far wall On Thursday morning, which was sunny, warm and sticky, Kate Cutko brought up her pieces and Hannah’s from the Bowdoinham area. Deborah has shipped hers from Dallas, and Kathy–who lives in China Village–had dropped hers off at my house earlier in the week since she had to work that day. Thank heavens Kate was there, as I was all butterfingers from so many nights and days at the hospital…I think she hung two pieces for every one I managed to get up! AND, we got all but one piece displayed! Then we trotted over to Rockport Blueprint, because she realized we ought to have a guest book, and bought one!

The day began with a wondrous gathering…the first time we were able to assemble our “grid” pieces! This was an idea I had to have each of us provide a photo, then all five of us interpret the photo in something small…the pieces are all 7 inches tall. The verticals are 5″ wide by 7″ tall, the horizontals are 10″ wide by 7″ tall (size was dicated by the space available between the chair rail and maximum upper viewing level!). They are arranged so that each artist has a row for their work, and each column is five variations of one photo. Then Kathy made a great poster (and labels for all our pieces) with the five original photos from which we drew our inspiration. Here’s Kate setting them out:First layout of grid pieces

As you walk into the Picker room, you can see the grid on the center of the left wall:right wall

This shot is from the grid, around the corner to the far wall (with all our junk on the table…the room looks better when we’re not in the middle of setting up…grin!), with my Koi quilt:

Right wall and far wall
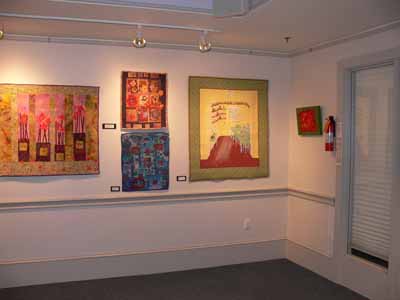
Then, turn the corner to the right wall, which has a collage of various works by four of us, Deborah’s “Anthony Avenue” piece anchoring that wall, two cool pieces (Kate’s nest on top, Deborah’s Encrusted Cairn on the bottom), Kathy’s pink flowers/trees/wonderfulness, then Hannah’s two pieces, and my Flying Toast about Gramma’s kitchen.left wall 2

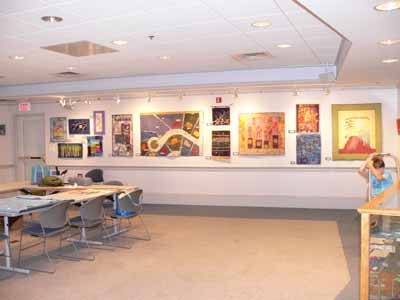
Here’s the corner next to the doors, with Flying Toast again and a small piece which I forgot to tell Kathy about (actually forgot I had it!) called Essence of Summer Rose, a mixed media…quilt on painted canvas.

Left corner by doorJust to the left of the doors is a large display case with our group round-robin books, some of Deborah’s small pieces (we’re going to work on the display of those!), will add some of Kate’s Adoption Day cards (her website is here), and a few more items. Our binder with information about the show, a picture of all of us,the Winter 2006 Quilting Arts article about us, and artists’ statements is on to, along with the guest book and our cards. Above the case is Kathy’s birches and my Autumn on the Village Green.Cabinet wall

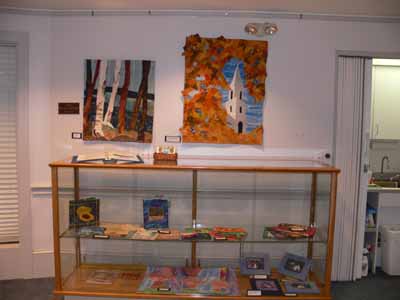
MANY of these pieces are for sale…if you are interested in any of them, just drop me a line and I’ll get back to you! Because Joshua is still in the hospital, it may take a couple of days, but I promise I’ll return e-mails as soon as I can.  More about Joshua soon.

We hope you’ll be able to come visit, and if you do please leave us a note in the guestbook on the display case.  AND if you’d like to be on our mailing list, or on my newsletter, please leave an e-mail address!

A brief return to quilting….teaching in Montreal and Lowell, Mass.!

Saturday, July 21st, 2007

Well, just a quick note and alas no pictures, but I am THRILLED to say that I will be teaching in two wonderful venues next year! I have been invited to teach at Salon 2008, in Montreal, Quebec, Canada, May 22 to 25. The show is sponsored by Courtepointe Quebec Quilts. I will be teaching in English, but my rusty French may be revived and expanded to include quilting terms!

AND I just learned that I will be teaching at the Images Quilt show / Quilt Festival in Lowell, Massachusetts next year August 7-10. WOOHOOO!

Will return in a couple of days with a Joshua update, and hope that life returns to a semblance of normalcy in a week or two (at which point hubby Paul will go in for his delayed rotator cuff surgery, which was to have been the day after Joshua’s accident). Oh joy…two male patients in the house LOL! Wonder if Doritos would help? for them…I’ll take the pina coladas…..

Foolproof miters on any width binding–Binding Tutorials (1)

Friday, July 20th, 2007

The double-fold bias binding with a mitered corner is probably the most familiar edge finish for contemporary quilts. In the set of mini-quilts I made for my forthcoming article on bindings in Quilting Arts magazine (August 2008), I created an outside edge that includes corners, a point, and inside and outside curved edges which covers most of the challenges you will face.

I hope you’ll check the forthcoming issue (due on stands and in mailboxes near you at the very end of July and early August) for more details. Because there is only so much space available, they didn’t have room to include instructions for “any-width” bias binding, only 1/4″ bias binding. I actually prefer this technique to the one described in the article, so you have my permission to make ONE copy of this blogpost, for you personal use ONLY (since I make a living, albeit modest, teaching and selling quilts, thank you in advance for respecting my copyright!).

As soon as the article is out, I’ll insert a picture of the mini-quilt here. In the meantime, the close-up above of a good mitered binding will have to do! Thanks for understanding!Cut your binding strips SIX times the width of the desired binding,Double-fold Wrap plus ¼” (or up to ½” extra if you’d like a little more wiggle room). For a binding that finishes at 3/8” that is [(6 x 3/8) + 3/8 = 18/8 + 2/8 = 20/8 or] 2 ½ inch wide strips. Sew your binding strips together with a ¼” seam allowance until you have the length of your quilt perimeter plus several inches. The seams are on the straight grain, so when folded they run at an angle to the side of the quilt (making them less noticeable). Fold the strip in half lengthwise, finger-pressing or lightly pressing with an iron.

Think Boomerang: first the binding goes away, then it comes back:

1. Sew binding strip to the quilt edge, beginning at least four to six inches from a corner, and leaving a tail of about four to six inches (on large quilts, 12 inches or more is better), figure 1. In North and South America, Europe, and Africa, since we read from left to right and top to bottom, I like to start the binding on the lower left side, where the join is relatively unnoticed as the eye travels in its accustomed path across a quilt. Loosely run the binding strip around the quilt to make sure a seam doesn’t land on a corner (too much bulk); if it does, adjust your starting point slighly.

Double-fold Step 1

2. When stitching is about 2 inches from corner, fold the binding strip back on itself exactly on the edge of the quilt and finger press. You may wish to mark with a pin or chalk to see the line better. Diagrams 2

Double-fold Step 2

3. Fold the binding strip UP so that the marked line is now exactly even with the top edge of the quilt; finger press a crease at the 45 degree line. Mark with chalk on the inside of the binding if you need to improve visibility. Diagram 3

Double-fold Step 3

4. Continue to sew the seam until you reach the 45 degree chalk line. Backstitch 3 or four stitches. Diagram 4.

Double-fold Step 4

5. Pull the quilt out from under presser foot and (this is the boomerang part) : first fold the binding away on the marked lines, then back down so that the binding turns the corner and goes down the next side. Diagram 5.

Double-fold Step 5

6. Stitch from the very outside edge of the quilt down the next side. Diagram 6.

Double-fold Step 6

7. Repeat at the other corners.

8. Stop stitching about 4-6 inches from where you began.

After you have used this method enough, you will be able to fingerpress and eyeball the corner turns instead of marking.

A little gloat!

Saturday, July 14th, 2007

First off, happy Bastille Day (France’s National Day) to one and all. Now, to our regularly scheduled blogging:

… Oooh boy, has it been a good week! Earlier this week I received in the mail my very first EVER paycheck for writing something: an article for a major quilting magazine! I will be able to tell you more about that in about 2 weeks. Then, yesterday (so much for Friday the 13th…hah! It is good luck Friday this time!), I got another check, this one for two projects that will be in a Lark Books publication that will come out in May 2008! I’ll share more about that next spring when we get publicity stuff, but to say that I am chuffed (to borrow some Aussie-speak, I just love that word) is a major understatement.

The funds are earmarked for paying for a five-day workshop with Carol Soderlund at ProChem, in Fall Rivers, Massachusetts. Long-time readers (thank you!) may remember that I took a 5-day intro dyeing class there with her last summer. Well, I get to take Week 2 this October, and I can’t wait. I haven’t done much dyeing since then (like one yard only!), but will do about 50 t-shirts this coming week and a bunch more in September. And I can say that if you EVER want to learn to dye fabric, take Carol’s class. She earns rave reviews from EVERYone for a reason, and your “color bible” is indeed one of those “grab when the house is on fire” items!

Been working madly on the book….. here is a wicked little tease, a photo to illustrate applique and reverse applique:

ApplRevAppl

and another bit of a tease, since I won’t even tell you what it’s for!

Pineapple corner