email Youtube

Home
Galleries
Blog
Workshops & Calendar
Store
Resources
About
Contact

Archive for the ‘Art’ Category

Twelve by 12: The International Art Quilt Challenge

Tuesday, May 3rd, 2011

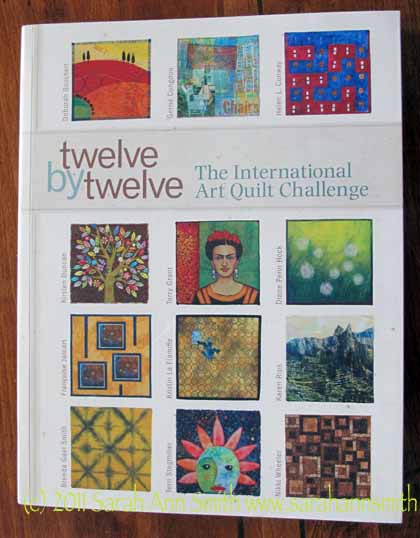
Twelve by Twelve: The international art quilt challenge

A while ago an early review of this book summed up their feelings in two words.  Ditto:

Buy it!

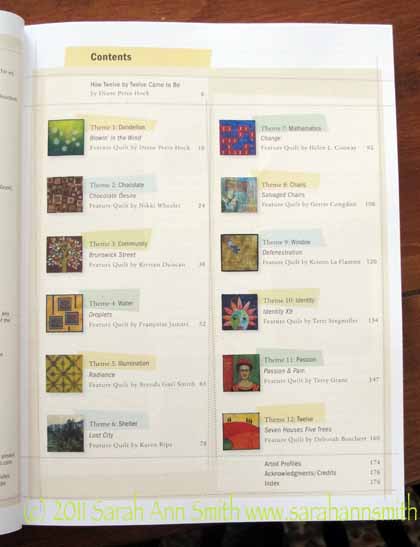
Table of contents: twelve chapters for twelve challenges

That said, here’s a few more details about this fascinating, informative book!  The project began with Diane Perin Hock, who invited quilt artists –newbies and experienced– into what became the Twelve by 12 challenge.  (You can see their website here and blog here.)  My friend and fellow Frayed Edges member Deborah Boschert (website here and blog here) is among the twelve, so I am especially thrilled to have followed this group from their beginnings, to thinking about a book and submitting a proposal, to published.  And how well they have done all along the way!

The book is arranged into twelve chapters, one for each of the two-month challenges.  The first chapter is written by Diane Perin Hock who is the featured artist for the first challenge, whose theme “Dandelion” she also selected.  Each chapter opens with all 12 of the 12×12 inch quiltlets on the left hand page and a large photo of the “featured” artist’s quilt on the right hand page.   In this chapter Diane explains how she came up with the idea for the challenge and got things rolling including  My Quilting Life, Choosing the Theme, Exploring the Theme, Creating My Piece, and Starting Your Own Challenge Group, a  how-to sidebar.  At the bottom of each page  the other 11 quiltlets are shown (larger than on the group page) with a  paragraph by each artist about her piece.

The subsequent chapters follow a similar pattern, though the person who selected the theme is not necessarily the featured artists for the theme.  The book ends with succinct artist profiles and links to their websites and/or blogs and—as every good book must have—an index. Of course I had to pick Deborah’s chapter to share:
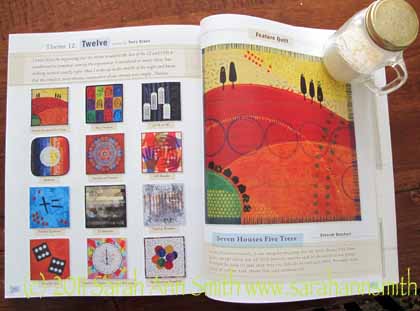
Chapter 12, Deborah Boschert featured artist; I love Love LOVE the "thread wrap" Deborah has developed for her bindings. You get a clear "end" to a piece yet the picture continues in the thread stitched around the binding. Way cool! (PS--sorry about the salt shaker...needed something to hold the book open and it was nearby!)

As I read through the book, and yes I wanted to read every word, you  can see how the sense of community developed among this group.  It is amazing that each person managed to complete every challenge on time (or pretty much on time), and they share how they needed to make the bi-monthly “reveal” date stretch to accomodate the fact that members live in Belgium, the UK, the US and Australia and the dateline and time zones shift!  Each chapter has a  how-to section, and I think what I liked most was reading how each artist developed here quilt, sometimes rejected false starts, or re-working them, or admitting that “this was my least favorite.”  Not everything “works,” and it is refreshing to see something in print that acknowledges this necessary part of the learning and art experience.

To go back to where I began:  buy this book!  It is a treasure.  You’ll want to sit down and read it through.  Then browse.  Then soak in the art.  Consider inspiration.  Consider technique.  Ask yourself “what would I have done with this theme or problem?”  Then read it again…the book is available many places online including at Amazon.


The Space Between :: Dinner at 8 Artists

Friday, April 15th, 2011

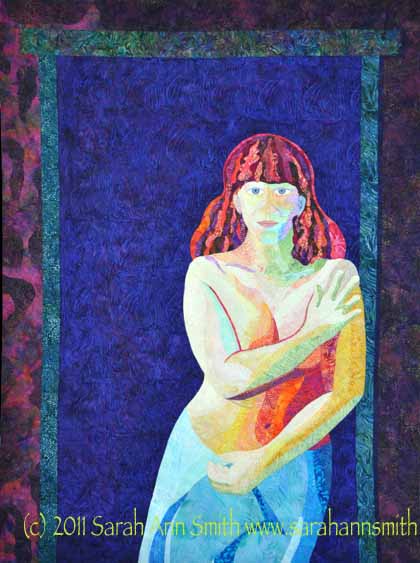
Once again I have been fortunate to be invited to submit a piece for a show curated by Jamie Fingal and Leslie Tucker Jenison and even luckier to be included in “The Space Between.”  You can read more about the show itself here, at their Dinner at 8 blog.  I’m in some rather heady company, so thrilled that my quilt, Clothed in Color, made it in! The show will debut at the International Quilt Festival held this summer in Long Beach, then we hope it will travel to Houston as did its predecessor, Beneath the Surface.

Clothed in Color, 36x48 inches

Jamie and Leslie have asked each of the participants to answer a set of questions, and I have LOVED reading the responses, here.  I encourage you to go visit the Dinner at 8 blog and see how our answers are similar and different—when I read my friend Susan Brubaker Knapp’s I had to write and tell her I had NOT read hers before I wrote and submitted mine!  We’re like twins separated by geography!  Anyway….here are  the questions and answers.

1.  What do you call yourself – art wise?

Quilter.  Art quilter.  Textile artist.  Interrupted by life!

2.  How do you jump start your creativity when you are in a slump?

Don’t know that I’ve had a slump per se.  Usually I am just too busy with life interfering with art or too tired.  That means I have a surplus of ideas and never enough time, so I just pick whatever quilt is hollering most loudly inside my head and let that one out next.

3.  If money wasn’t an issue, what would you do with your art?

Make more!   Give some of it away… I would love to do a “quilt mural” project for the local middle school (first panel is done), the continuation of “Be Inspired, No. 1” into a series of six quilts with people and places from around the world.

4.  Do you keep a sketchbook, journal, etc.?

Yes.  I’m not as diligent as I would like—it’s that lack of time thing.  But I have learned how useful they can be, am constantly inspired by my friend Kathy Daniels’ journals, so am trying to develop my own better “noodling around” habits.

5.  Where can people see your other work this year?  shows, books, magazines, etc

My book (ThreadWork Unraveled), my blog (www.sarahannsmith.com/weblog) and website, in my classes, the 2010-11 Quilting Arts Gifts issue, and whatever shows I get in (as long as I remember to apply in time).

6.  Do you teach?  where?

Have paycheck will travel–yes, I definitely teach!  I prefer to teach places where I don’t have to fly—detest airports–will gladly drive 2-3 days each way instead!  But I’ve been all over, and would love to go more places even if it involves an airplane.  Australia or Hawaii anyone?  My current bookings are on my website at https://www.sarahannsmith.com/schedule.php.

7.  Is there a particular artist who had influenced you in your art life? and why?

Vincent Van Gogh:  COLOR!
Henri Matisse:  exuberance and line
Auguste Rodin:  passion and form
The artisans of the Sutton Hoo burial grounds (UK–in the British Museum): design and ornament
Edward Steichen:  The Family of Man book/exhibit; grew up poring over the photographs and still do
The 8th grade neighbor girl who made the apron for my Barbie when I was 6–that got me started with sewing!

8. Where or what show do you hope your work will be in someday?

IQA-Houston, again I hope…
And if I ever make work I think suitable, Visions and Quilts=Art=Quilts, or if I can afford shipping the UK’s Festival of quilts and the Tokyo show.

9.  Describe your studio workspace

In progress.  We moved in February 2011, so at the moment most of the boxes are unpacked, but I still need to paint the floor (I have a large semi-unfinished space in the basement) and get some closet doors made before I can really settle in.  Despite only having four small windows near the ceiling joists (space is semi-finished, we spray painted the joists and under-floor white so it would look more ceiling-like), I installed good lights with daylight bulbs so it is bright and cheery.  I’ll have a 22 foot closet made by putting up design-wall-panels-as-sliding-doors on one wall for the detritus of art and teaching (file cabinet, teaching items, books for sale, art supplies and stored quilts  inside–don’t like working with too much visual clutter).  I hope to have a reading area, and my beloved Hoosier will be my desk.  I may even get to add a sit-down mid-arm machine this year….

10.  What 3 tools could you not live without?

MistyFuse.  Is MF a tool?
My Janome 7700 sewing machine.
Digital camera!
[and if they had allowed a fourth, my computer…my lifeline to the art quilty world and friends!]

11.  What drives you to make the work that you do?

I can’t NOT make my quilts–it would be like asking me to stop loving my kids and hubby or do without oxygen.  Just can’t be done!  I love to make things with my hands…to make something from inside my head become real.  There are so many things I want to learn how to do in terms of creating the image, both conceiving it and then physically making it.

12.  How do you balance your life?

Balance?  does *any*one have balance? (Picture Sarah ready to teeter off a rope while tossing a thousand items up in the air.)  I seem to lurch from one urgent thing to another, hoping I haven’t forgotten something important.  I know the insanity will slow down eventually, but right now I just try to make sure the family gets everything they need, and that I can still make enough art to keep myself sane!

I look forward to seeing all the quilts in the exhibit and reading all the artist interviews!  Well done, Jamie and Leslie and artists!

P.S.:  Since this post is long, I’ll do another tomorrow with some detail shots of the quilting.

A moment of beauty–March 12, 2011

Sunday, March 13th, 2011

Some days, you are filled with life and verve and sunshine.  Other days, the speed with which time disappears can threaten to overwhelm you.  Then I think of people like Melanie Testa (Every-single-day blog here) who is confronting cancer with grace and courage and beauty and strength that inspires so many of us.  We all have small and not-so-small moments of pain or sadness, so I’m thinking every now and then, I shall have to share a photograph or moment of beauty.

Slow down.

Appreciate those in your life and give thanks that they ARE alive and share themselves with you.

And that includes things with four or more feet that love you, too.

And take time to look around you and give thanks.

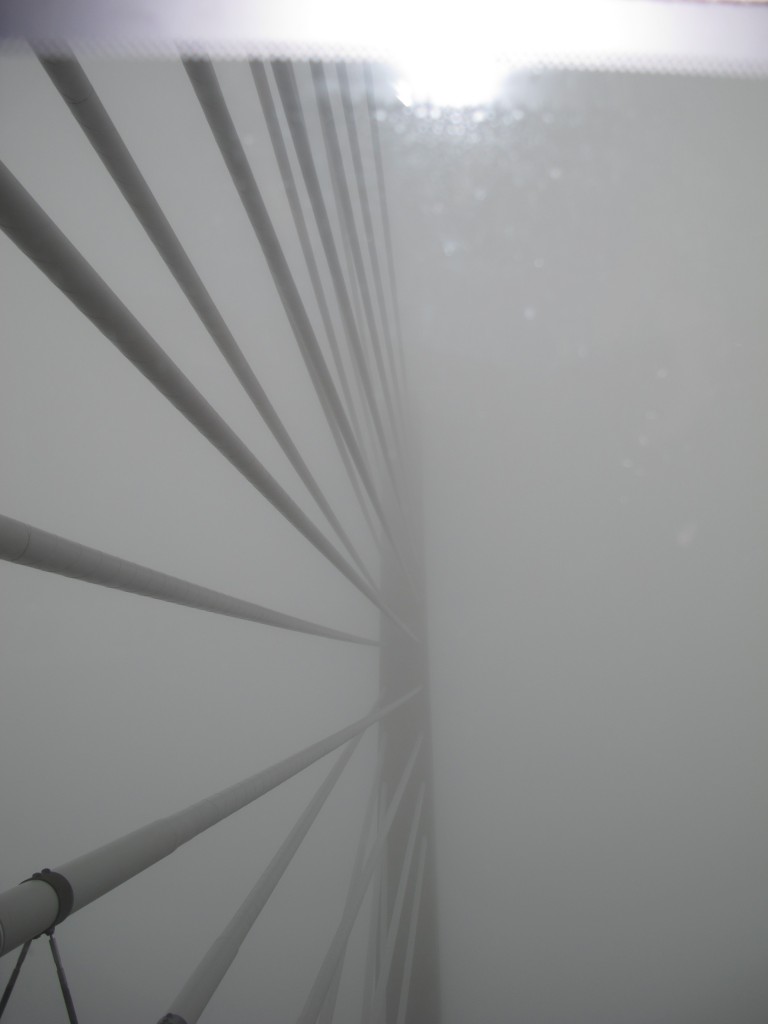
As I drove to Eli’s wrestling meet yesterday, the fog that had lifted here in Hope was hunkered down along the coast from Belfast north, including crossing the Penobscot Narrows Bridge at Fort Knox-Verona Island and over to Bucksport.  This bridge is stunningly beautiful no matter what, but yesterday it was nearly unearthly…

The Narrows Bridge over the Penobscot, looking up at the suspension cables as I drove over. Photo (c) 2011 Sarah Ann Smith. Photo is clickable to view larger

I had no idea what the photo was going to be.  I saw the wires and reached into my purse one handed, pushed the “on” button and held the camera up to the window to push the shutter.  I just clicked without opening to view screen…. some days beauty comes to find you.

Time for a little creativity even!

Wednesday, December 29th, 2010

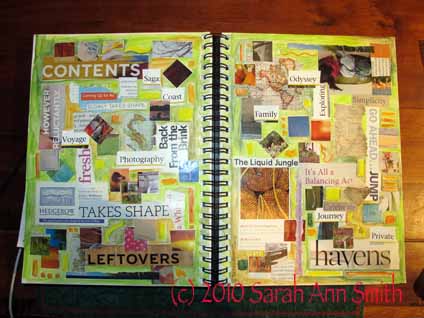
Yes, while the turkey was roasting on Christmas day and the potatoes were boiling and the pie and stuffing were done, I took a little time for art!  About a thousand lifetimes ago (meaning last winter, maybe February-ish) I took an online class with Sharon Boggon (her site is here and is now called In a Minute Ago, here blog is  Pin Tangle)  about a “working” sketchbook.  Not a fancy, work-of-art-in-itself journal, but about using a journal as a way to flesh out ideas and stimulate creativity.  Here’s a link to the class description…I really enjoyed the class!  Alas, I have been abysmal at keeping up with it–simply too much life happening.  BUT…. I have the journal and the supplies and the desire.  So on Christmas I made the time!

I just LOVE how this turned out....it makes me happy. Being creative and noodling around just makes me content. I should do this more!

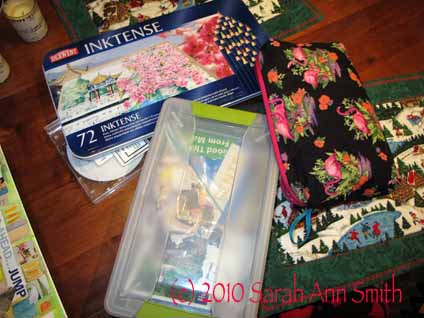
I took some of the squares I had cut from magazine pages, and some words and phrases, and started gluing them up.  One page became two…. then I took my WONDERFUL Christmas gift from hubby:  a set of 72 Derwent Inktense pencils

The Inktense pencils are in the upper left. My magazine snippings are in the box, and the bag on the right is my travel-art bag, with room for a set of 6 graphite pencils, a 12-travel-set of watercolor, a waterbrush, glue stick and a couple odd pens are inside in their custom-made pockets

and a waterbrush and, in the evening after supper while watching Starman with my family, colored in the background.  I LOVE IT!

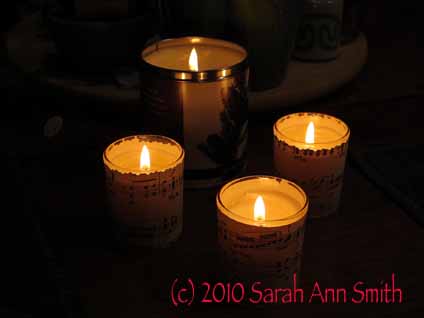
And I cannot let the last Christmas posting pass without Kate’s candles–I’ll blog about our Frayed Edges meeting in a few days, but I had to share these.  Kate found the votives in cylindrical glass cups then re-purposed old (tossed out) sheet music.  The large one is from Stonewall Kitchen (a Maine company) and smells of “Maine Forest.”

My new Canon G12 has a "candlelight" setting on the dial, and this was taken just holding the camera still, no tripod or bracing...love it!

Photo EZ, an alternative to a Thermofax

Thursday, December 2nd, 2010

OH WOW am I in love with a new product and process! 

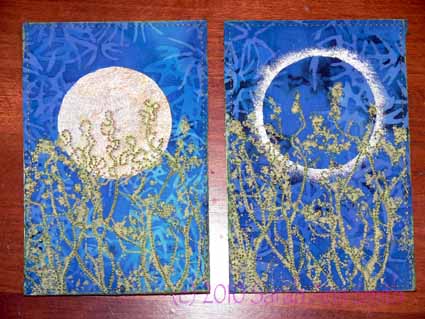
The product is called PhotoEZ and it allows you to make detailed screens for printing (on paper or fabric), such as the treetops in the fabric postcards in the picture above.   The best place to get PhotoEZ  is directly from art quilter Ginny Eckley at http://www.photoezsilkscreen.com/about.htm .  Wonder how many requests Santa is gonna get now……

Many quilt artists now use Thermofax machines to make their own highly detailed screens for surface design printing.  These machines were on their way to becoming dinosaurs and land fill when they were discovered by art quilters and tattoo artists.   In both cases, the artists involved create intricate designs which are then “burned” into an emulsion-coated screen (or for the tattoo guys spirit masters).  The process removes the image, leaving a screen to use for printing or, in the case of tattoo artists, for transferring the design to the skin to use as the guide for inking the tattoo.  As the machines become more and more scarce, the price has   gone through the roof:  reconditioned machines now cost nearly $1000.  Yes, one THOUSAND dollars.  Plus supplies! My budget doesn’t stretch that far.

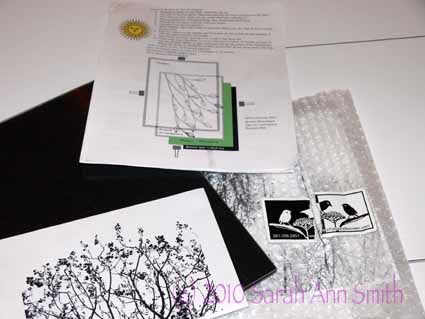
Well, a year ago at Quilt Festival in Houston, I visited Ginny Eckley’s booth where she sold (among other things) the PhotoEZ screen kits — a starter kit is $37 — and materials.  Here is a picture of my kit and the photo I used:

PhotoEZ kit, instructions and on the bottom left my image

Ginny told me she likes PhotoEZ so much she actually SOLD her Thermofax machines because she no longer used them.  Rather than carry the stuff home, I opted to order the supplies from Ginny (here) and have them shipped to my home.  One key thing:  You need to refrigerate the screen material to keep it fresh!  I have a flat baggie on the back wall of my fridge, behind the shelves, to keep mine fine.

After a year, I FINALLY got around to trying it out.  I was concerned because I don’t have strong sunlight up here in Maine most of the year the way Ginny does in Texas!  But I used my tulip-lights that I use for photography and they worked fine.  When I asked Ginny a couple of “how to” questions this year at Festival, she said she uses a light box most of the time, so this makes the process accessible for everyone (not just those of us in sunny spots).  In addition to the detailed info in the kit, you can find even more instruction on her website.

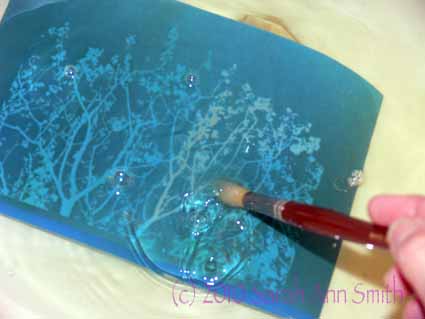
I had forgotten that the kit included an inkjet transparency sheet, so I fiddled with my photo of treetops in spring in Photoshop Elements (to turn it into a crisp black and white image) and printed it on paper.  The trick was to figure out the correct time under the lights to get the screen to burn.  I thought I had messed it up, but was elated when I did as instructed and popped the screen into the sink:

The image began to materialize; I used a soft paintbrush to swooosh away the area that had "burned" where the black ink reacted with the emulsion

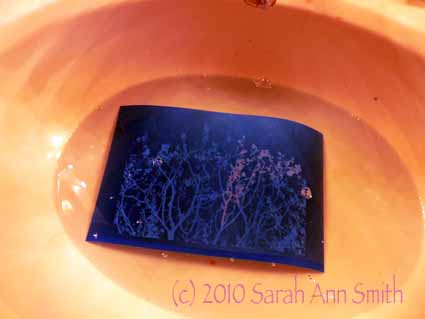
Anyway, here’s another view:

Part of the burned emulsion removed (lighter area), the rest to be removed

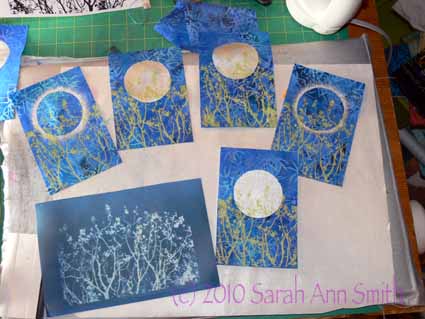
And here are the fabric postcards, for a “circles” swap I recently did, in process:

five of the postcards screened, with the full screen on the lower left

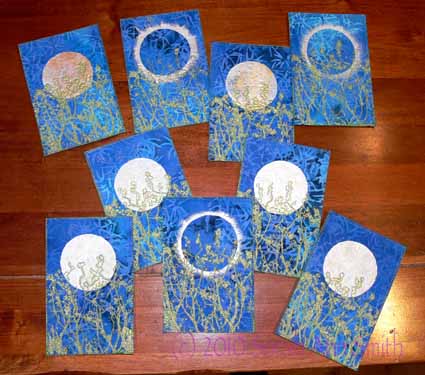
The moons and eclipse glow were done with freezer paper stencils using Lumiere paints, and the treetops were screened with Jacquard Lumiere Citrine (the lime green color).  I REALLY like the squeegee that comes with the kit…it was JUST the right balance between firm and soft for me.

What I learned:

  • I LOVE THIS PROCESS!
  • And it costs a fortune less than a Thermofax.  It isn’t, however, cheap per screen, but it will work and cost less per screen I think than a Thermofax.
  • Spring for the extra cost for transparencies for your images.  Then you don’t have to guesstimate the exposure time for your screen.  With a clear sheet, exposure time will be consistent.  If you print on paper you have to think about how heavy the paper is and how much it impedes the light working on the emulsion-ink reaction.
  • Play with your image and print it in black and white (to make sure you like how it turned out) before printing it onto the not-as-cheap-as-paper transparency.
  • Think about your images; in my case, I deliberately took the photo with only sky behind the treetops to make the photo editing process easier.
  • Clean your screens promptly so the paint doesn’t clog the screen permanently.
  • There is a learning curve about how much paint is enough but not too much; like most things, it takes a bit of practice and testing the various consistencies of paint
  • I’m gonna do more of this!

PS–I am not affiliated with Ginny in any way.  I just really liked the product and process!  I surfed around online and Ginny’s prices seem to be the best out there.  Plus she’s a quilter! While you’re at her site, check out her artwork, here.  Her newest work uses the screens and is amazing (click on the New Work button).

And a last look at all the “circles” postcards:

Spring Moonrise and Spring Eclipse postcards