email Youtube

Home
Galleries
Blog
Workshops & Calendar
Store
Resources
About
Contact

Archive for the ‘Teaching / Classes’ Category

Facings as an Edge Finish

Friday, July 20th, 2007

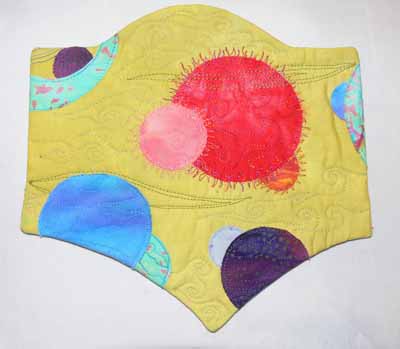
The following tutorial builds on the article published in the August/September 2007 issue of Quilting Arts Magazine. The Pillowcase (or bagged back, or escape hatch) finish for a small art quilt is simply a one-piece facing that covers the entire back of an art quilt. This method is useful if you have lots of knots or carried threads that you wish to cover, for example after extensively beading a piece. For larger quilts (or even small ones) you may not wish to cover the entire back. Instead, you can use facings. On a quilt with straight edges, like Koi, you can use a straight strip of cloth as I did here on the back / under / second side of this quilt. However, just like a dress neckline, facings work well on curved and irregular shapes. From the front, you can’t tell if this quilt is a Pillowcase backing or a faced edge:Faced quiltlet

Facings:
Borrowed from dressmaking, a facing is simply a piece of fabric that echoes the outside edges that is turned completely to the back side of a quilt. Large and small quilts with irregular edges are great candidates for facings!

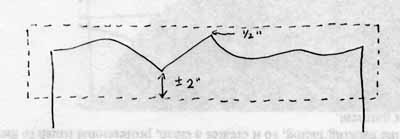
1. Cut a strip of fabric that extends ½ inch beyond the outside outermost edge and 2-plus inches towards the center of the quilt from the innermost “innie”.

Facing a weird shaped edge

2. Pin the facing to the quilt top, right sides together, on the back side of the quilt.
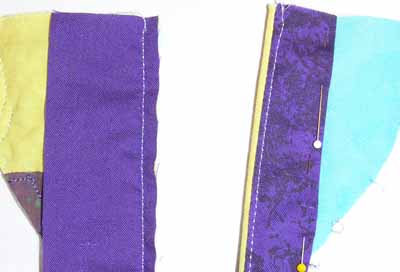
3. Sew a ¼ seam (photo below, left)

Facings–sew seam, edgestitch
4. Trim excess fabric from the seam allowance.
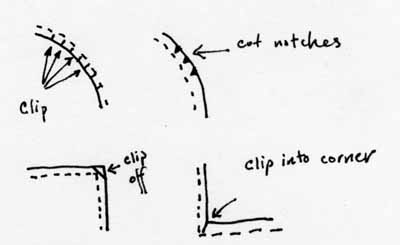
5. Clip /notch curves, clip inside corners and trim outside corners.

Facings –clip curves
6. Press the seam as stitched. Fold facing over the seam allowance and press again.

7. Edgestitch facing to seam allowance a scant 1/8” from seam line; this will encourage the seam allowance to stay put and not try to roll back to the front. (photo above right)
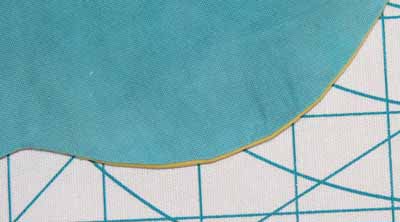
8. Fold facing to the back, “favoring” the edge. The little bit of green that you see in the photo below is the “favored” edge, which is a bit of the front rolled to the back.

Facings, favored edge
9. Iron the seam allowance and facings towards the center of the quilt. (See Step 9, above)

10. Turn under the edge of the facing and stitch in place. See the photo about edgestitching to see the turned, pinned edge.

11. Repeat on the other sides, turning under the short ends of the facing and stitch down to create a completely finished facing.

Foolproof miters on any width binding–Binding Tutorials (1)

Friday, July 20th, 2007

The double-fold bias binding with a mitered corner is probably the most familiar edge finish for contemporary quilts. In the set of mini-quilts I made for my forthcoming article on bindings in Quilting Arts magazine (August 2008), I created an outside edge that includes corners, a point, and inside and outside curved edges which covers most of the challenges you will face.

I hope you’ll check the forthcoming issue (due on stands and in mailboxes near you at the very end of July and early August) for more details. Because there is only so much space available, they didn’t have room to include instructions for “any-width” bias binding, only 1/4″ bias binding. I actually prefer this technique to the one described in the article, so you have my permission to make ONE copy of this blogpost, for you personal use ONLY (since I make a living, albeit modest, teaching and selling quilts, thank you in advance for respecting my copyright!).

As soon as the article is out, I’ll insert a picture of the mini-quilt here. In the meantime, the close-up above of a good mitered binding will have to do! Thanks for understanding!Cut your binding strips SIX times the width of the desired binding,Double-fold Wrap plus ¼” (or up to ½” extra if you’d like a little more wiggle room). For a binding that finishes at 3/8” that is [(6 x 3/8) + 3/8 = 18/8 + 2/8 = 20/8 or] 2 ½ inch wide strips. Sew your binding strips together with a ¼” seam allowance until you have the length of your quilt perimeter plus several inches. The seams are on the straight grain, so when folded they run at an angle to the side of the quilt (making them less noticeable). Fold the strip in half lengthwise, finger-pressing or lightly pressing with an iron.

Think Boomerang: first the binding goes away, then it comes back:

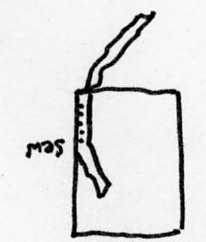
1. Sew binding strip to the quilt edge, beginning at least four to six inches from a corner, and leaving a tail of about four to six inches (on large quilts, 12 inches or more is better), figure 1. In North and South America, Europe, and Africa, since we read from left to right and top to bottom, I like to start the binding on the lower left side, where the join is relatively unnoticed as the eye travels in its accustomed path across a quilt. Loosely run the binding strip around the quilt to make sure a seam doesn’t land on a corner (too much bulk); if it does, adjust your starting point slighly.

Double-fold Step 1

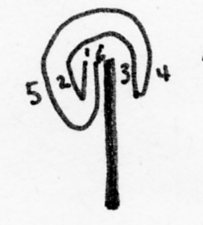
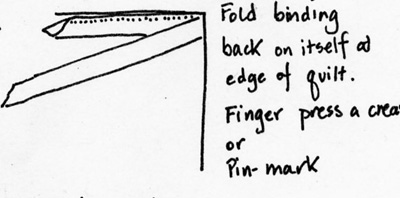
2. When stitching is about 2 inches from corner, fold the binding strip back on itself exactly on the edge of the quilt and finger press. You may wish to mark with a pin or chalk to see the line better. Diagrams 2

Double-fold Step 2

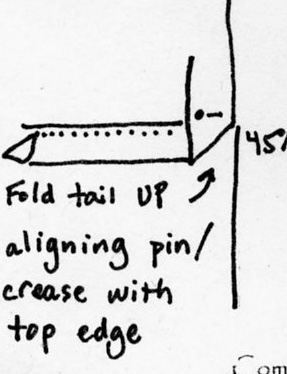
3. Fold the binding strip UP so that the marked line is now exactly even with the top edge of the quilt; finger press a crease at the 45 degree line. Mark with chalk on the inside of the binding if you need to improve visibility. Diagram 3

Double-fold Step 3

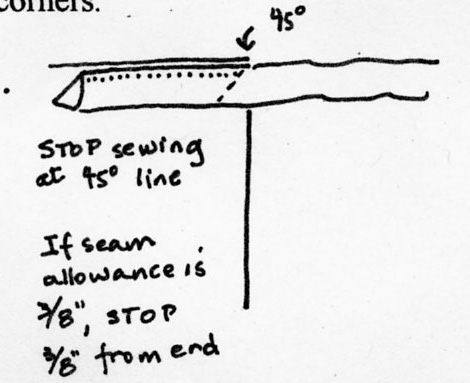
4. Continue to sew the seam until you reach the 45 degree chalk line. Backstitch 3 or four stitches. Diagram 4.

Double-fold Step 4

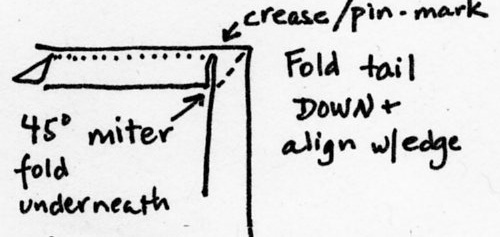
5. Pull the quilt out from under presser foot and (this is the boomerang part) : first fold the binding away on the marked lines, then back down so that the binding turns the corner and goes down the next side. Diagram 5.

Double-fold Step 5

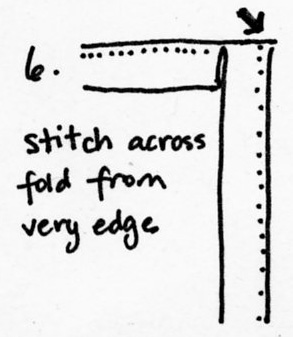
6. Stitch from the very outside edge of the quilt down the next side. Diagram 6.

Double-fold Step 6

7. Repeat at the other corners.

8. Stop stitching about 4-6 inches from where you began.

After you have used this method enough, you will be able to fingerpress and eyeball the corner turns instead of marking.

How to make a “Go” of it as an art quilter

Friday, June 22nd, 2007

Recently on the SAQA (Studio Art Quilts Associates) group list, a discussion came up about how one can make a bit of a living as an art quilter. I’ve received some positive comments about my post, so thought I’d tidy it up a bit, add an intro paragraph, and share it here. Hope this is interesting or helps some of you!

Perhaps the most useful think I have done is to join the QuiltArt list (www.quiltart.com). That is an on-line group of 2500+ souls around the world. Some are new to art but longtime quilters, some are experienced artists but new to sewing, some have super demanding day jobs and can only enjoy art quilting part time, and others of us are trying to make a go of it. By reading the list… and I will warn you the traffic is sometimes voluminous!… I have learned about art, about quilting, about the business side of things, entering shows, you name it. I told hubby that it was my on-line Master’s Degree in art quilting, and it really is.

And here’s what I wrote to the SAQA list:

I am faaaaarrrrrr from a known quantity, but here’s what I’ve done, and bit by bit it is working… seems as though I have (through sheer dumb luck) done much of what Pamelala (Pamela Allen, art quilter extraordinaire) has done…..

On the theory that I can’t sell my work if (a) I’m not known and (b) it is not seen, I have:

entered juried shows—can’t afford to do as many as Pamelala, but I look at geographic location when entering. Some like PIQF in Santa Clara I do again, others like Road2California I won’t (shipping there and back is more expensive than PIQF). Big name shows: if I can get in, I pay to ship no matter what (i.e. Houston, Paducah, and may even start thinking about UK and Japan…).

entered juried exhibits—both art and quilt venues, though mostly the latter, looking for geographic diversity!

participate on line–on QuiltArt, the Janome 6500/6600 list, a small group or two, I have actually gotten teaching jobs here in Maine through a referral from Florida–someone on the Janome list told a friend in Maine about me!

participate in travelling challenges that go to various venues–these have been through the QuiltArt list, but Annie Copeland’s exhibits were a great start, and currentliy Fabled Fibers

teach–as someone once told me, your students will like your work and some may buy it, and they are the word-of-mouth that is so valuable

have a website and keep it updated

have a blog and write regularly—this has been the biggest surprise. Google LOVES my blog! And it has brought me jobs, folks who like my work, etc. I’m migrating the blog to the website later this summer, which should help bring readers to the website and do even better with the search engines (and an additional note for my blog readers: I can’t believe how much fun I’ve had writing these “letters to you at the other end of the ether”…thanks!)

had local shows…at the bank. All I had to do was sign up for a month. Sent press release to the paper, which resulted in a page 1 of the B section full page article. Both led to great name recognition around town, which in turn led to…. This October at the new coffee house… just asked the owner, brought my work, she said yes! And ditto for the library… a gorgeous facility (small, we are after all a town of 5,700, but it draws paying members from neighboring towns because it is so good) where my mini-group (which was in Quilting Arts last winter) will have a show in August

walked into a local gallery, started chatting with staff, and then owner, who remembered my show at the bank–she agreed to try selling some of my work, said she didn’t know if it would sell but we could try. So we did and guess what…it works! I am a total unknown, she had never even SEEN an art quilt let alone know what it was called, but she liked it and was willing to give it a go (it’s a quirky gallery… prize winning carved and painted duck decoys, scrimshaw, as well as more traditional media)

Enter exhibits like the journal quilts… now Karey Bresenhan actually knows who I am, and has even bought my work… first a postcard I donated to FFAC (Virginia Spiegel’s cancer research fundraiser), then a major piece that got juried into the Viking “Imagine That” show (purchased for the IQF collection) and included two I Remember Mama quilts and journal quilts in her books. (And apart from that major ego boost, I have learned more than I can express by having been a part of he journal quilt process!)

Enter magazine contests and write article proposals: Quilting Arts! Made it to finalist one year in the calendar contest, and after many tries, have articles in the pipeline for later this year (still not saying much so as not to jinx things ) Working on the other mags

So as (One SAQA member) said, just keep doing it. It is a LOT of work. And I mean work. The playing with cloth and thread is fun. So is going to Festival. But it is also meeting the people that go with the names, making the connections, making yourself visible, and doing the (kinda yucky not fun) marketing stuff. The meeting people is fun, but the “selling yourself” is less pleasant, but if I don’t do it, no one will. So I just grit my teeth and do it, pleasantly, and sometimes I meet some totally cool people and it turns into fun.

Hope this helps?

Cheers, Sarah

website: https://www.sarahannsmith.com
blog: https://www.sarahannsmith.com/weblog/
and http://www.planet.textilethreads.com

Then I remembered to add the next day:

And your comment about one step at a time reminds me… My friend Kathy said to me a couple weeks ago “Did you have this all planned out? It seems like you’ve had this map in mind and set about achieving it” or something to that effect. My answer: heavens no! I have done one thing at a time, then another occurs to me, then maybe three or four (like I have another thing to pursue, but no time this year, so maybe by October?)…. so it’s one thing leads to another leads to another. And sometimes an opportunity pops up out of nowhere, and you just have to go with it, whether it is convenient or not.

Now, if I were still at my old day job, I’d have most nights and weekends to myself, and get paid about 10 times as much….. but I still wouldn’t go back (at least not while the kids are home…when they are off to college… maybe, for five years, just long enough to get a full pension…….)