email Youtube

Home
Galleries
Blog
Workshops & Calendar
Store
Resources
About
Contact

Archive for the ‘Machine Quilting’ Category

The Mechanics of Machine Quilting Web Seminar

Wednesday, August 28th, 2013

Hi all!  I’m happy to report that if you want, you can now sign up for my September 5th Web Seminar on the Mechanics of Machine Quilting with Interweave/Quilting Arts!

Learn how to get ready to machine quilt with Sarah Ann Smith.  Set up your space and materials so they help (and don't hinder) you!

Learn how to get ready to machine quilt with Sarah Ann Smith. Set up your space and materials so they help (and don’t hinder) you!

Here is the link:
To buy it in the store: http://www.interweavestore.com/mechanics-of-machine-quilting

And here’s what QA/IW says about the live Web Seminar:

Want to know how to machine quilt? Join artist Sarah Ann Smith for an informative webinar on Thursday, September 5, at 12p.m. EST. Learn the fundamentals of the quilting process!
 
Sarah will cover a range of helpful topics:
  • Preparing your workstation and tools for an effective quilting session
  • Which needles and thread are best for specific projects
  • Proper sewing machine tension
  • How to baste a quilt in order to get smooth, even layers
  • Practicing good ergonomics so you’re comfortable while you’re quilting
  • Making sure your vision is in good standing to accurately see your projects and workstation
  • And more!

Practice makes perfect, and machine quilting is no exception. Sarah will not only run you through the elements of this process, but she will also encourage you to be comfortable with your beginner status. Don’t miss out on this opportunity to learn machine quilting techniques from the start!

Don’t worry if you can’t tune in on the 5th!  The Seminar is recorded and you can listen in at any time at your convenience.  To learn about how this works (you’ll need an internet connection for your computer or tablet), visit the hotlink above.

There will be more links and information in the coming days.  There is already something on FaceBook!
Facebook: https://www.facebook.com/QuiltingDaily
Twitter: https://twitter.com/QuiltingDaily
Pinterest: http://pinterest.com/quiltingdaily/


And I’ve added a link to my  Pinterest boards–I’d love it if you’d follow me!

All of the boards are here:  http://pinterest.com/sarahannsmithq/boards/

and the one just for teaching and publications:

http://pinterest.com/sarahannsmithq/sarahs-teaching-and-publications/

Webinar and Blog-o-versary!

Wednesday, August 21st, 2013

Today, I’m celebrating 8 years of blogging (SHRIEK…how can it be that long?) by announcing my upcoming Quilting Arts Webinar, an online seminar on getting started in Machine Quilting, which will be on September 5, 2013, at Noon East Coast (US) time.  I’ll be talking all about what you need to do to get started in machine quilting–the prep work that goes before the actual quilting.  And to answer the obvious question first, What’s a Webinar?, it is an on-demand web seminar.

Tips and tricks for getting ready to Machine Quilt in Sarah Ann Smith's Quilting Arts Webinar, Sept. 5, 2013

Tips and tricks for getting ready to Machine Quilt in Sarah Ann Smith’s              Quilting Arts Webinar, Sept. 5, 2013

The links and advertising for the webinar will go live soon at Interweave.com, but I wanted to give all of  you a heads-up! and let you know first!  You’ll need an internet connection (which you obviously already have if you are reading this!).  Once you sign up, you’ll receive instructions on how to open the page in your browser and “sign in” and listen in (and see some slides) and even ask a question.  The Webinar will run 60-90 minutes.  If you can’t tune in at Noon on the 5th or need to leave, that’s OK because they record the webinar and you can listen in when it is convenient for you!!

When I teach, I like to tell students that machine quilting is sorta like painting a house:  if you don’t sand and spackle and prime that peeling paint on the windowsill, you’re not gonna get a good result.  It doesn’t matter if you have the best paint, paintbrush, and painter, if you don’t get things prepared well, your results won’t be as good as if you DID prepare AND understand what it is you are doing and why.  So I’m going to talk about the “whys” of the prep part of machine quilting.  Then you’ll have your machine working WITH you, not against you.  I hope some of you will surf on in and join in the webinar.  If you can’t be with us at noon on Sept. 5, however, you can STILL download a recording of the webinar, all the information I share and the Question and Answer session.

I’ll confess right now:  at first I didn’t “get” why anyone would pay $20 or more for a webinar.  Then I listened to some of the QA webinars, and OMG what a TON of information.  For a modest price, and you can listen in at your convenience.  They were fabulous!

One of the goodies that comes with attending the Webinar is QA often gives attendees a discount for future purchases (though I’m not sure how long the discount is valid) including my book, which they carry.  THEN,  my DVD on “Art Quilt Design From Photograph to Threadwork with Fabric Collage and Machine Quilting” will be available for download in mid-September and on DVD about October 1st!  WOOT!  More on that in a future post.  (Yes, I am teasing you!)  More, including hotlinks, when they go live!


Mastering Metallic Threads

Monday, August 19th, 2013

Lookit what arrived in the mail today!   My September/October issue of Machine Quilting Unlimited, with my Metallic Threads article mentioned ON THE COVER!  I’m thrilled with the layout and how the article looks and reads, and hope you will be too.  You can find MQU at Barnes and Nobles (on Sept. 1) as well as order this and back issues online, here.


Machine Quilting Unlimited...notice the Metallic Threads on the left, that's my article!  WOOT!

Machine Quilting Unlimited…notice the Metallic Threads on the left, that’s my article! WOOT!

I LOVE Metallic threads, and once you learn a few basics it really isn’t difficult to use at all!   My book, ThreadWork Unraveled, talks all about threads including metallics, but for the skinny on just the metallics, it’s covered in this six-page (!!!) article.

THe opening spread on the Metallic thread article.  The golden eagle quilt on the left, 13 x 13 inches, is a wholecloth quilt using one of my murky "background / forest floor" hand-dyes.

The opening spread on the Metallic thread article. The golden eagle quilt on the left, 13 x 13 inches, is a wholecloth quilt using one of my murky “background / forest floor” hand-dyes.

I was thrilled that my buddy Jim VanderNoot, who lives in Pennsylvania but will be returning to the best place on Earth (well OK, the are other really great places too, but Maine ROCKS) when he retires in a few years (or sooner we hope in the local guild…Jim is a welcome addition!), let me use his “Celebrate!” quilt for the article.  Jim’s a fabulous quilter, so I can’t wait until he and his wife get to move north.  Thanks, Jim!

Here's the last page of the article with Jim VanderNoot's quilt on the top--love his sense of whimsy and UBER LOVE his quilting.  That's my Garuda Dances Under the Ocean Moon on the bottom, made with Princess Mirah Bali batik fabrics.

Here’s the last page of the article with Jim VanderNoot’s quilt on the top–love his sense of whimsy and UBER LOVE his quilting. That’s my Garuda Dances Under the Ocean Moon on the bottom, made with Princess Mirah Bali batik fabrics.

AND…drum roll for thorough readers…. MQU has a “Web Extra,” a free PDF download of my 2008 article on sewing machine needles.  Click here to visit MQU’s Web Extras page and find the link.

I’ve finally finished the major house chores–well, except for painting ALL the trim on the garage–done, so hope to get back to a regular blogging schedule soon!   In the meantime, hope you can lay your hands on a copy of this magazine and enjoy this and the other great articles.  MQU is  one of those magazines that I read cover to cover AND keep all the back issues!   Thrilled to be able to write for them again.

P.S.  And one benefit to this article… in the past I had avoided bobbin work like the plague.  But I thought it would be good to include bobbin work in the article.  Guess what… I now LOVE using the Razzle Dazzle thread–I figured out a way to use it and still fill my need to SEE what I’m doing with something that needs to be worked upside-down!   So add one more technique to my arsenal…and a few more spools of thread to my stash.

Good news, bad news, and a bit of progress

Friday, June 28th, 2013

And the good and bad news are the same news.  And you my be wondering WHY in heaven’s name would I show you a photo of our fridge decked out in white, gray, stainless steel, and coolers.

The fridge, draped in white and gray cloth and white board and stainless steel.  Why?  To figure out how a white or stainless steel fridge would look instead of the black we currently have. Stainless steel wins.

The fridge, draped in white and gray cloth and white board and stainless steel. Why? To figure out how a white or stainless steel fridge would look instead of the black we currently have. Stainless steel wins.

Ahem.  This moring I decided since it was rainy, damp and chilly to fix hot oatmeal and add some frozen raspberries.  The good AND bad news when I opened the bag from the freezer:  they were already defrosted.  Ooops.  Checked freezer.  Many items could be called “previously frozen.”  Called local appliance store, and no repairmen available until Tuesday, but the nice gal reminded me about defrosting the bottom, in case the condenser coils (behind a panel inside at the back) were crusted in ice, which can happen with the humid weather we’ve had, especially with a leaky gasket seal which we also have.   Bad news:  no ice buildup inside.   That meant a bigger problem.  On a thirteen year old fridge.

So, sigh, we went to the appliance store and bought a new fridge today.  KaCHING!   And we don’t yet have a water hook-up for an ice-maker and no time to schedule one before I leave for California to teach, so we’ll deal with that in August.   But we’ll now have a nice, reliable Maytag fridge as of about 8:30 tomorrow morning!

And the progress:  I’ve been beavering away for months and months on many assorted projects, hence the absence of posts here.   I’ll eventually get you caught up on my doings–oh yeah, other bad news:  I actually WORE OUT the track pad on my laptop!   It started acting up, so instead of having a entire week to quilt, I’ve either ferried teenage boys hither and yon (both of them) OR spent 8 hours (4 hours Weds., 4 hours Thurs.) driving to and from the Apple Store in Portland to get the issue diagnosed and repaired.  The good news is that the repair was $91 (plus gasoline), and not a new laptop needed.   So I’m still behind on work, but getting closer.   Now…back to projects:

As part of the Janome America artist/teacher program, I perodically do things / projects for them in exchange for their support / loan of a machine.  One biggie this year was being able to use a Janome 8900 on the set of my Quilting Arts DVD!   I was so happy to be able to demo on the machine I use at home and love, and they were happy to have it onscreen.  Then I’ve been wanting to do a special item for them since last fall, but good things (like articles and DVD) kept happening.  Finally, I am now able to give you a sneak peek at something I’m working on for them:

The quilting, as you can see, is partially done on this banner/tablerunner/long quilted thing!   I’m having a ton of fun and will share more when I can.

Having fun with a lovely floral, colorful thread, and quilting!

Having fun with a lovely floral, colorful thread, and quilting!

Now, back to hoping the frozen stuff doesn’t go bad by morning (yes, in cooler, with ice) and hoping no new calamity crops up tomorrow so that I can actually, what a concept, work in the studio!

Deciding on a new machine

Friday, January 11th, 2013

Someone from one of the Janome yahoo lists that I am on asked me a great question, and since my answer was detailed, I thought maybe it might help others so I decided to post it here.  Apologies in advance for the length.  Here’s the incoming (shortened) inquiry followed by my reply.  Bottom line, I am THRILLED with the Janome machines I have had the fortune to use since 2004:  each new version just keeps getting better and better.  They have been utterly dependable with great stitch quality and all the features I need most.  What you need to do is figure out what YOU need, then find the machine that best meets those needs.  There is no such thing as the one and only perfect machine–just what is best for you.

You can (at least on my machine with this large hoop) temporarily get the hoop out of the way just by swinging it up and hanging it on the center of the machine.  Useful for corners where too much of the grippy on the bottom is on the table surface instead of the quilt.

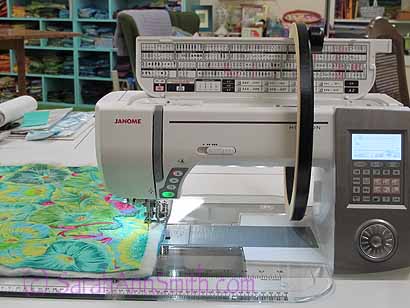
Here’ s Gandalf, “my” new Janome 8900.  He replaces Rubeus Hagrid, the brilliant Janome 7700.  I must say, I DO miss that ruby red, but I think the changes on this machine make it even better (hard to fathom!) than the 7700.  As always, thanks to Janome America for their support since 2004!  (And that odd black thing hanging on the machine’s harp is a Martelli quilting ring…go back a couple of posts for more information.)

Hi Sarah,
I’m sorry to bother you.  ….!  I hope to retire within the next four years and dedicate more time to sewing/quilting.  In the meantime though, I would like to invest in a very nice sewing machine.  I currently sew with an XXXX .  I am curious in your opinion of which brand I should buy.  Thanks for your time. (Note: she specifically asked about Bernina and Janome machines, hence the brands in my reply which follows.)  Signed, XXX

Dear XXX:

That’s a decision you’ll have to make, alas.  Berninas are brilliant machines, at a very high price.  Some of the machines (all brands) have become–for me anyway–too complicated!   I like having the computerized machine, but there is a point where you need a Master’s in Computer Science to navigate all of it.  Just too much…and sometimes too finicky.  Where the line is depends on the individual user.

THE MOST IMPORTANT THING:  figure out what you need and will use.  When we built a house in 1997-8, our builder told us to list Need, Want, Wish.  All items on the “need” list should be in the house, a number of the wants, and even a wish or two.  For example, we needed three bedrooms, a kitchen, and two baths.  We wanted an extra half-bath and a studio space for me.  That sort of thing.   So sit down and list what you need on a sewing machine.  For me, the list would be something like this:

  • Harp space for Free-motion quilting.
  • Really good balanced tension.
  • Good satin stitch.
  • “Single” (not boldface) blanket stitch
  • Small increments to increase/decrease stitch width and length on zigzag, blanket stitch, straight stitch, and blind hem stitch (.01 as opposed to .05, that sort of thing)
  • Good lighting
  • Good local dealer/support

Bernina machines I sometimes say are all the quality at double the cost.  Janome gives outstanding value for the price:  what you can get on a 7700 or 8900 would *easily* cost $2-3000 (yes thousands) more in another brand, and the other brands might not be as reliable.   Bernina has the best presser foot system (changing, quality of manufacture) in the industry bar none–but their feet are expensive.  So buy a sturdy metal  foot for $40?  Or buy a Janome foot that does the same thing for $10 then replace it in a decade if/when it wears out?    So far, I’ve not had a single Janome foot die from over-use, and I use my machine a lot.

Once you’ve figured out WHAT you need, then figure out what simple set of things will allow you to test different machines.  When I bought a machine in 1996 just before leaving the rat race (and the nice salary), I took a quilt sandwich to each dealer and tried different things on it, writing my notes on the white cloth.  If you make garments and buttonholes, take some stabilizer and cloth similar to what you would use and test-drive the buttonholes.  Put notes right on the cloth (or safety pin or staple paper to the sample) to remind you what you thought as you made it:  was the process easy/intuitive?  Convoluted?

Repeat this process at each dealer/brand/machine.  Then think about it.  And don’t forget that a top dealer with good, courteous, prompt customer service is worth their weight in gold!

A couple years ago, when the Bernina 830 came out, I test drove it and frankly, it was amazing,  but so far beyond my budget… so I applied to be in the Bernina teacher program despite misgivings because Janome has been SO good to me.  Bernina never really answered.  And since then I’ve heard some grumbling about the 830 being TOO complicated and finicky but don’t know if that is operator error or what–there are always people who grumble.

I LOVE that the Janomes are so dependable, take any thread you put on them and sew well, etc.  And the price–even if I were paying full retail–is a fraction of the Bernina, Viking, etc.  Not sure about BabyLock as I have never lived anywhere that had a BL dealer, so have no experience with them at all.    And since that time, Janome came out with the 7700 which was pretty close to being my dream machine, and I’m thinking that the 8900 is even better (except I wish it still had that ruby red instead of the silver-gray!).

BOTTOM LINE:  I’m really glad Bernina didn’t offer me the opportunity to try their machines on a teacher loan program.  Since then the 7700 has come out and now the 8900, and they are simply FABULOUS machines.  I’m definitely a Janome girl!

As for Top of the Line versus better but not most expensive in a given brand , last summer when teaching at Vermont Quilt Festival, one of the muckety mucks from Janome ended up sitting in my classroom for an hour or so at lunch.  I had opted to stay and teach through lunch, and they needed someone in the class and were able to accommodate my desire to keep the classroom open.  Well, he must have liked what I was teaching and how, because he offered to have Janome lend me a 12000 that I could take home from the show!!!! So I went down to test-drive it.  Answer:  brilliant machine, thank you SO MUCH for the generous offer, but not for me.  It didn’t have the two feet I use most:  open toe accu-feed, and circular free-motion foot (the one in the convertible set).  [Note:  I’ve heard that the open toe accu-feed will be out this month, and there is now a free-motion foot that would meet my needs that fits on the 12000.]  That ruled the machine out right there.  Plus, to change tension you had to go through several screens on the computer.  I don’t like computer interface stuff–there’s nothing wrong with it, I just vastly prefer the simplicity and ease of turning a dial or knob like you can on the 6600, 7700 and 8900!  It’s one of those “what’s your favorite flavor of ice cream things.”   So I thanked the Janome honcho, said it was a fabulous machine but wasn’t the best machine for me.  The embroidery capabilities would be wasted on me…. I’d rather wait until whatever was going to replace the 7700 came along—and that I hoped it had the visibility around the presser foot of the 12000 on the 7700 body.  Well, guess what the 8900 is?  Exactly that!    So I think I’m going to be very happy with this machine.  It’s a matter of figuring out what YOU need and will work for you, then comparing the machines/brands/models until you find the best fit.

Hope this VERY long reply helps, and think I’ll post it to the groups, too, as others may have the same question!  Thank you for asking!

Cheers, Sarah

Author of bestseller ThreadWork Unraveled
website: https://www.sarahannsmith.com
blog: https://www.sarahannsmith.com/weblog
e-mail: sarah@…………


PS:  Someone asked about the knob/dial on the 7700 and 8900:  it is actually a dial that you see when you flip up the lid on the top of the machine.  If you think of the dial like a tire, the “tread” shows on the top curve of the dial.  Just above and to the right of the take-up lever area (which is that gray stripe up the front left of the machine) is where   the dial is located.  It is a manual adjustment and easy pease:  see, do!