The perfect 1/4″ seam, part two
Thursday, May 7th, 2015Thanks to my contact at Janome America, I learned of a couple new things that will help owners of the Janome machines that are capable of the 9mm wide stitches. The top-of-the-line 15000 has a new throat plate that has THREE holes in it, including one on the right. And there is a quarter inch “Clear View” foot that will work with that throat plate. First, the presser foot: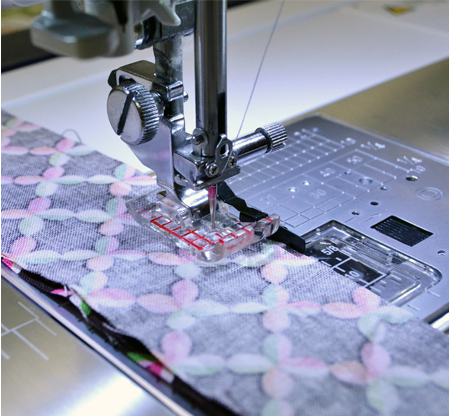
janomeknowhow clear view quarter inch
My contact wrote:
” I wanted to pass along this information sheet on a foot that we released for 9mm stitch width models last fall. Maybe this will help her. I’m also going to include this small excerpt from my contact in Tokyo too, as it applies directly to your machine –
*This foot can also be used with the MC15000, but by using the right needle position of the MC15000’s straight stitch needle plate with the 1/4″ Seam Foot O (a standard accessory), or the Clear View Quilting Foot and Guide Set (Optional Accessory No.: 202-089-005), the same results can be achieved.
The above note is because the MC15000 has that three hole straight stitch plate, based on needle position. Previous models only have one or two holes in the straight stitch plate.
Just passing this along since I saw it!“
Here’s a link to information on the Janome website, and another link for the PDF which has more information than on the Janome website janomeknowhow clear view quarter inch .
The throat Plate is called the Straight Stitch Plate for the 15000, but can be used on Janome machines with a 9mm stitch-width capability (but check with your dealer FIRST to be positive it is compatible with your machine). This is a not-so-great photo of the one from my machine. Notice there are THREE holes. The left and right holes are slightly not-round, which permits one to fine-tune the needle position to get your perfect seam allowance (see previous post).
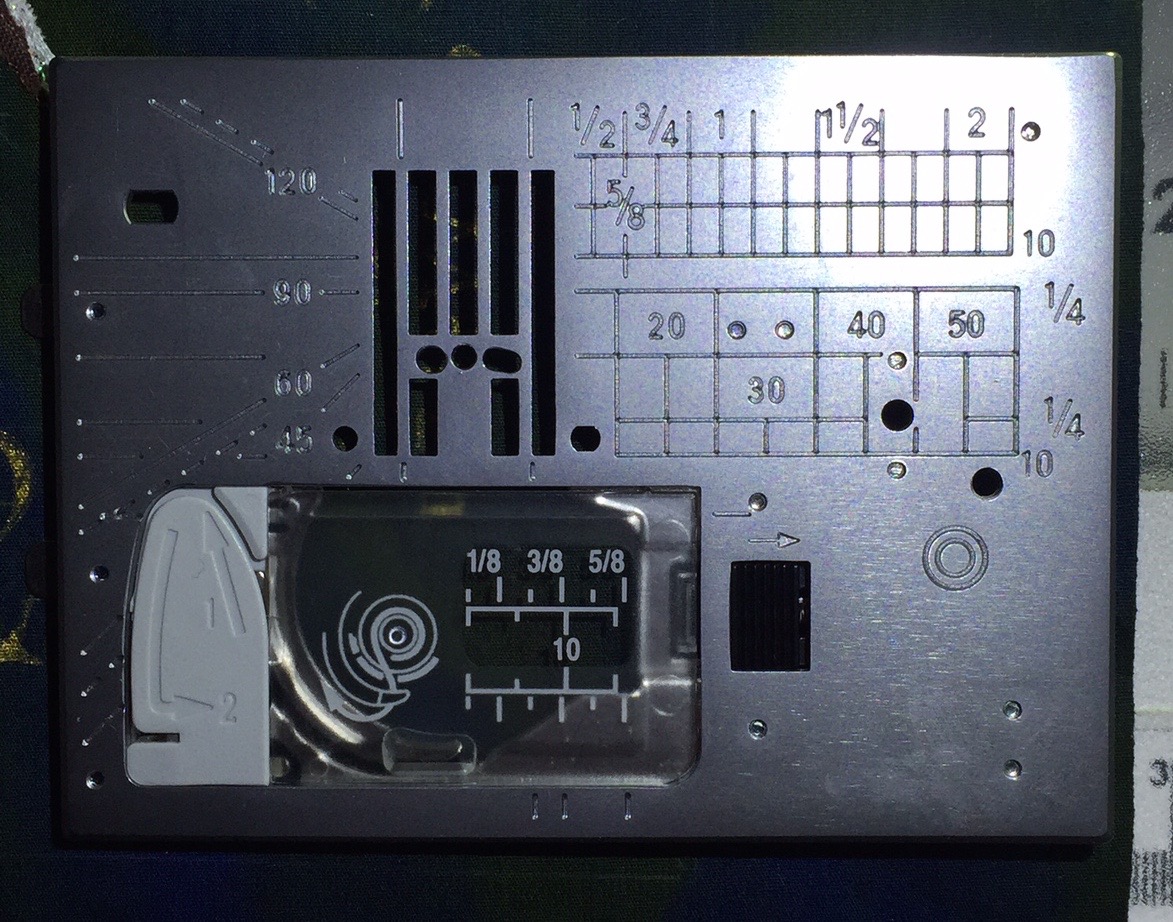
Straight Stitch Plate for Janome 15000; if I can get my hands on the part number, I’ll update this caption.
My contact added that
“Yes, this foot will work with the 8900 as it is a 9mm model also. If you
wanted, you could ask your dealer to order the Mc15000 straight stitch
needle plate (with the third hole) and that would fit all the 9mm models
also. You just have to watch your drop position. Like you mention in your
post, because of the feed dogs and purpose of different sewing machines,
the needle drop is not always the same from machine to machine. This
happens when you are switching from quilting models, like an 8900 to
embroidery/quilting models like the MC15000. The “standard” positions are
changing based on the model.
This will definitely solve her problem then, allowing her to use a straight
stitch and set needle position with the straight stitch plate included
with her machine, and achieve a 1/4″ seam.”
I have to say, Janome is incredibly responsive to its customers. I was THRILLED my contact read my previous post and wrote to suggest these new offerings. Another great thing developed for the 15000 (which I sew on now) is the AMAZING extension table. I don’t know what they did to the surface, but it is absolutely the “slippy-est” extension table I’ve ever felt. Even though it doesn’t look as slippery as the clear plexi (perspex in the UK I think) tables, it is vastly superior. When I saw the US VP for Janome at a show after I got this machine, I told him they needed to make ALL their extension tables out of this stuff. It totally rocks!