email Youtube

Home
Galleries
Blog
Workshops & Calendar
Store
Resources
About
Contact

Archive for the ‘Travels’ Category

Coming home to Maine

Tuesday, May 25th, 2010

OK, so in the last post I showed you the outbound journey from Owl’s Head (a Head, by the way, is a peninsula) airport. It’s always fun to see the Camden Hills rise up in the distance…you know you’re almost home:

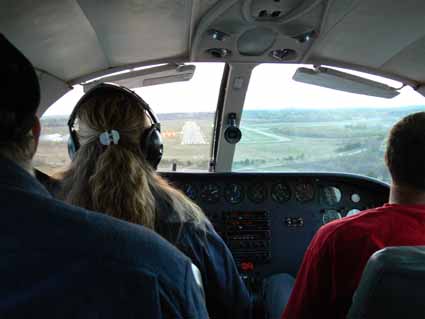
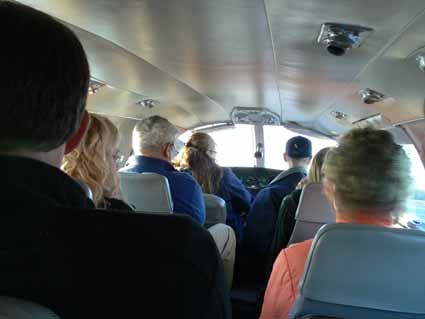
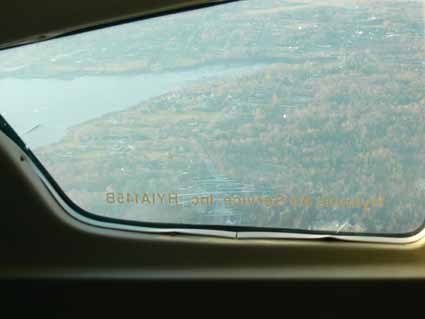
First, you can spot the runway as you approach.  This is what it looks like when you come home in not-winter (otherwise it would be pitch dark), as viewed down the short “aisle” and through the cockpit window:

Next you see all the buildings that make up the airport including the private aviation side.  I learned upon our return that sigh, sob, our ticky tacky little building will go the way of the Dodo bird this fall.  They are building a new “terminal;”  I will be sad to see our homely little old place gone, but I expect the folks who work there will be mighty glad to work in a building designed to BE an airport!

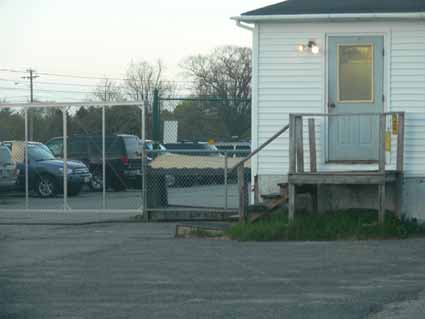
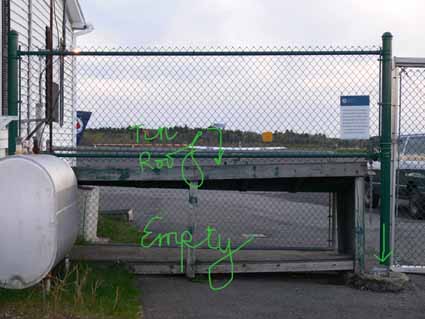
Then you spot the baggage return….this is from the runway side.  Please notice that corrugated tin roof to the immediate left of the white building.

You exit the plane, and walk into the “terminal,” go out the front door and down the splintery wooden stairs (the ramp is currently out of service due to rot, at least it was being worked on when I got home) and turn left to access the baggage claim area.

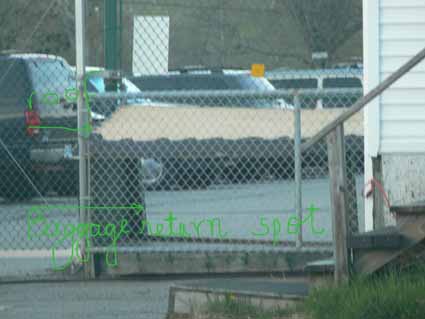
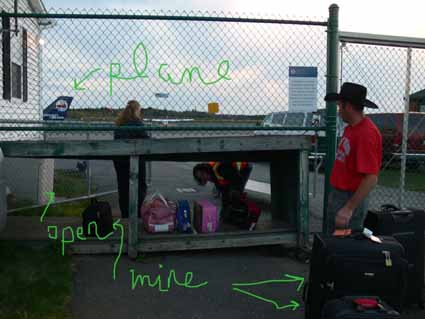
Yes, that opening in the chain link fence is the spot.  There is a locking gate on the back side to prevent deer, racoons, wandering pets, and other threats to national security from wandering onto the runway and getting access to one’s baggage. Here’s what it looks like from the front side–note the arrow on the right.

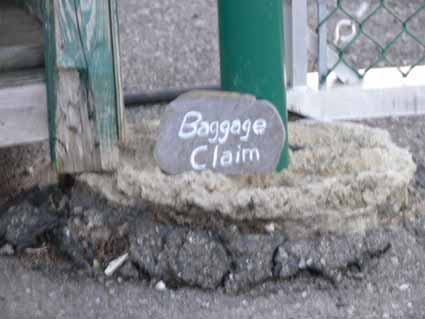
That arrow points to my favorite thing ever…our Baggage Claim sign:

Have I said recently, I LOVE MAINE!!!!!!!!  Here is the loaded up baggage claim “carousel”:

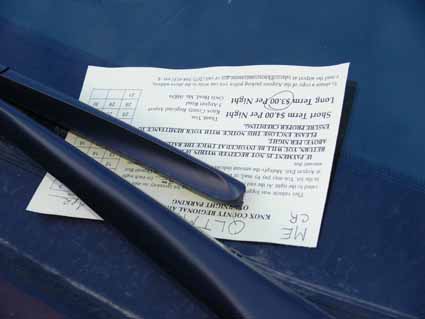
Next, to the Long Term Parking.  Short term parking are the 20 or so spots next to the double-wide.  It costs a bit more… all of $4 per day (charged by how many nights you are there).  You walk through the short term lot to the long term lot (which holds maybe 30 cars/trucks).  The only hazard is stepping into a pothole in the dark.  Cost:  $3 a night.  To pay, you go to your car and look at the windshield:

Yes, that card is your ticket to pay.  They mark the day you arrive.

You have ten days to mail your check in for the correct amount.  They actually neglected to put the card on my car for a week, so I paid them the extra 7 days anyway…   The major drawback to this system is winter.  The cards FREEZE to your windshield, and tend to disintegrate when you try to get them off.  Many times, you can’t, so you go home in the snow with the wipers on, and with every pass they scrape and rub off another layer of the card.  We make it work anyway.  It’s nice to be from a small town!

And one last bit of beauty…can you see why I love coming home to here?

This is not a minivan

Saturday, May 22nd, 2010

This is, in fact, the view from the last seat of the Cape Air flight from Owl’s Head Airport (officially it is the Knox County Airport in Rockland, Maine, but everyone call’s it Owl’s Head after the nearby little peninsula and light house) to Boston.

In the past, I’ve had some fairly hilarious conversations about traveling out of and in to Maine.  Two years ago, I had the great good fortune to teach at the Lowell Quilt Show, in Massachusetts, and ate dinner several nights in a row with a great bunch of teachers (lots of laughing, lobster, and some wine!).  One of the teachers said “well, I travel out of a very small airport, we have only ten gates.”  I just looked at her and blurted out “that’s nine more than we have!”  We all laughed out loud…then I added that our airport is actually an old double-wide manufactured (mobile) home:

Yes, that white and gray building is the airport.  All of it.  It leaks.  It is creaky.  The carbuncle / bumpout on the back is the extra waiting room added where you sit after you go through the TSA screening.  The only bathroom is on the outside of the screening, so if the urge hits, you leave everything inside the bumpout, run to the bathroom in your socks, and then pass through the detectors again.

Maine is a neighborly place.  Once, I got fogged out of my early flight and had to wait four hours for the next puddle-jumper to Boston.  One of the other passengers had forgotten her laptop power cord, so the desk agent said “You live on my way to the grocery store; I’m going to pick up some things before the next flight, want me to drop you at home on the way?” and off they went!  Anyway, speaking of puddle jumpers, here’s a picture of the 8-passenger seat (sometimes a passenger also sits in the co-pilot seat) plane, at Logan in Boston:

The baggage goes in the nose, the tail, and carry-ons go in the wings.  There is no on-board storage.  Even a large purse goes into the wing compartment!

And this is a view out the window at Knox County, Maine, where I live:


And here’s a typical aerial view of the Maine coastline at near-dawn (I always take the 6-am-ish flight out so I can connect to whatever else it is I need to get where I’m going):

THIS congested view is what it looks like near Boston (i.e. the gateway to the rest of the world)–too many people!

Next…I’ll show you my favorite thing…coming home, the baggage return, and the “long term”  parking lot.  Stay tuned <GRIN>!

Corporate Good Guys: Delsey and Mighty Bright

Tuesday, February 9th, 2010

So often, we hear gripes about bad encounters with corporations (and wait ’til I tell you about Continental Airlines, it’s a doozy but that’s a different post).  This post is about corporate good behavior!

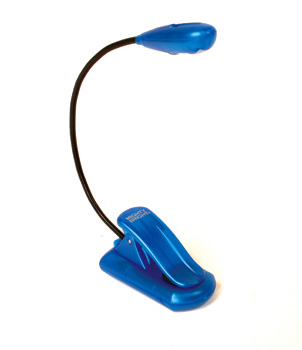
A while back I bought the Mighty Bright Flex2 light with ac adaptor (plug).  I liked it so much, and so did Paul, that we bought a second one for him.  Since glare from the sofa lamps on the TV screen bugs Paul at night for TV watching, I bought mine to use as a reading light while on the sofa with him.  Well, mine died after less than 3 months, and they have a bulb life of a few thousand years.

So I looked up the company and wrote, saying I didn’t know what they might be able to do, as I had thrown out the receipts.  I did test the light with batteries, and with Paul’s light with my plug, and my light with Paul’s plug, and was able to determine that my AC plug was fine, but the light was not.  Lo and behold, about 2 weeks later, a replacement arrives, no questions asked, no need to return the dead one, nothing…just a company wanting to make good on their guarantee and make their customers happy.  They succeeded!

This is what my light looks like, and here

is the info from the Mighty Bright company.  I bought mine at a Barnes & Noble.

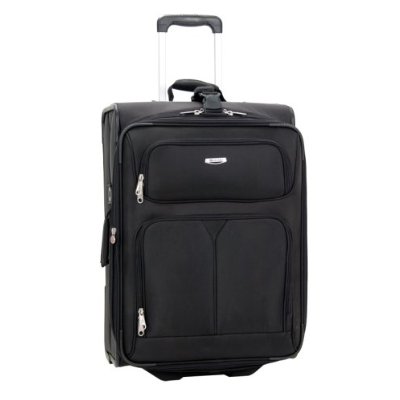
The second story is about Delsey suitcases.  In 1987 or so, while moving with the US State Department to Bolivia, Paul and I bought our first hard-sided suitcases.  Those two molded-plastic suitcases were the first generation of wheeled bags, and they STILL function.  But, wheels and technology have vastly improved, so about 15 months ago I bought a new Delsey on sale.

Two weekends ago, while racing to get set up for a class (we got in to the building a mere 30 minutes before the class was to begin, and I usually need a good hour to set up for that workshop), I accidentally stepped on a buckle and broke it.  I wrote to Delsey USA via their website to describe the part I had broken, and ask how I could purchase a replacement part (it’s the gizzie that you can use to “chain” or tow another suitcase…if you look at the picture, it is the thing in the middle of the top).  A couple days ago I get an envelope in the mail with TWO replacement pieces, the whole thing not just the half of the buckle that I broke because I’m a klutz, with NO charge!  Once again, I am a HAPPY customer.


GOLD STARS to both Mighty Bright and Delsey.  It’s nice when huge companies do right. Thanks folks!

Merrimack Quilt Guild

Saturday, January 30th, 2010

As you might have guessed by the lapse in posts, I was busy/away.  Last weekend was fun… on Thursday evening I gave my Decorated Quilt lecture for the Merrimack Quilt Guild of Plaistow, NH (about a stone’s throw from the Mass. border, literally!) and on Saturday taught Fabric Postcards,

which is really a play-day with an introduction to a bunch of art quilt techniques.  Instead of having to buy a zillion things and stuff, I HAUL a zillion things and stuff and folks can try fusing to collage their postcards, Angelina, fabric stamping (I demo stamp carving, so they can see how easy it is, but too sharp tools, too many distractions to do that in the class with so much else going on), fabric rubbings, using found objects as stamps, resists and rubbing plates,  freezer paper stencils, assorted paint techniques, and finally couching yarn as an edge finish. (PS… given the costs of shipping, this class is now available only within a 2-day drive of home…..)

Because it was just a wee bit too far to drive home on Thursday getting home at 2 in the morning on Friday, then get up at 4 in the morning to drive back down on Saturday , my gracious host Cathy Harnish invited me to stay with her, and on Friday—oh joy of joys–we went to Ikea!  I’ve been to this one about three years ago (for a one hour zip through en route to somewhere), and the one in Seattle maybe 8 years ago?   The first time I drove through Boston after we moved to Maine, I just about flipped out…this bridge had NOT been there when I was in grad school in 1981-3!  Since I was a passenger this time, I got to snap pics.  It is supposed to echo the shape of the nearby Bunker Hill monument (an obelisk) and the sailing ships of the days of yore.  It is GORGEOUS…there is a great abstract quilt in this bridge’s lines:

I did pretty well, buying not much–a bamboo placemat for rubbings in the class (which I forgot to unpack and USE in this class…next workshop!), a small lamp for the hall at home, and some shadow boxes in my quest for more ways to display and sell small quilts.  BUT, I saw this… I WANT THIS KITCHEN.  I WANT LIME GREEN COUNTERS!

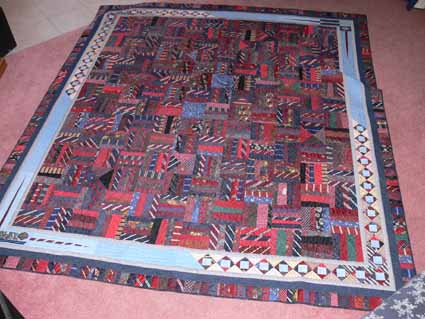
On Friday night, Cathy invited over a table full of guild members, with her dear hubby braving the table of women.  We had show and tell after, too.  While I was there, Cathy shared this commissioned quilt she did for someone made of ties and shirts.  I LOVE LOVE LOVE this border, and think it may be one of the most effective I have seen anywhere–it may have been dictated by the size of the embroideries on the shirts and the leftover scraps, but it is brilliant:

On Saturday, we had a quick set-up time, and then got going.  The morning on this class is learning to use fusibles, especially my favorite  MistyFuse (light hand, easy to use, never any “issues”).   The class was great, and enjoyed the “art smorgasbord” in the afternoon when I set out all the goodies to enjoy.  Everyone always enjoys something different… there are a few things I don’t use hardly ever, but every time I think of eliminating them from the class, there is someone who finds it to be “THEIR” thing, so I keep the materials and techniques included.

I’m afraid I didn’t get names for the makers of all these cards, but thought I’d share them with you… great variety!  Clearly the upcoming Valentine’s Day was on a couple of minds….

Thanks to all who attended the lecture and came to class… it was, as always, a gas!

Things to think about when teaching on the road….

Wednesday, January 13th, 2010

A question arose on the QuiltDesigners Yahoo group recently (many of the designers also are quilt teachers) about digital projectors.  That led  to a longwinded reply on my part, and it occurred to me that you folks might like to read some of what we need to think about when we travel, schlep mountains of stuff–HEAVY stuff–to teaching venues, and have to invest in the equipment.  Though teachers’ fees might seem high, when you spread the income out over the days you travel for which you are not paid, the prep for each class for which you are not paid, the cost of handouts and class supplies it’s not very much in the end (usually I don’t charge for routine stuff–only add a kit fee if the cost is something like $10 per student instead of $2–even in a class of 24, that’s $48 out of pocket for handouts etc).  My laptop bag probably has about close to $5000 in laptop, projector, videocam, cables, not even talking about the WORK that goes into the programs and whatnot.   So here goes…

The digital projector model I have (bought about 15 months ago) is probably not made any more but the best advice I got was:

  • buy the lightest weight one you can afford—they seem to gain an ounce with every step down every airport concourse!
  • buy the most lumens you can afford—many places that we teach and lecture there is a lot of ambient light. You need to be able to project a good image on the wall (or white flannel or foam core!) with light from windows, etc. I think mine is 2600 (the most in the under $1000 range when I purchased), and it did great in the well-lit classrooms in Houston. Use them for teaching, not just lectures….

I bought a very inexpensive, very small video camera and small tripod. I set them up on my table to project live demos on the wall, and students love it! I understand you can now get “wireless” communication between camera, laptop and projector in some instances/situations. That would be good. That snake’s nest of cables is a trip hazard! The tripod I bought is a mini…good for using directly between me and the sewing machine to get images of the needle/foot area. A taller one, set to the side to “beam down” on demos I do would also be useful, but don’t have it yet. There are also gooseneck cameras, so you can have this little bitty “eye” reach over from the side and look straight down on what you are doing. That might be a solution.

Jan Krentz has done up small “slide show demos” of things she demos in class. First she demonstrates the steps live, then she’ll put on the slide show on “loop” (endless repeat). The key instructions are written onto the slides that are projected. She can walk around the room and help while things are playing, students can look up and follow along at their own pace. This is my goal…to prepare mini-presentations that need this method for my classes. While I teach things that don’t always lend themselves to this approach, it’s fabulous when it does help you.

Also from Jan I learned about pre-class information/entertainment. Jan has her projector on before the class begins with instructions on what you need out and ready, and what can stay stashed under the table until later. Brilliant! As students filter in they can read and heed, while Jan gets to greet new students instead of endlessly repeating herself (well, she probably does that, too, but still….).

In a lecture Jan gave up here in Maine, she also told us a little about herself and San Diego (she lives near there) at the start. So I did up a “pre-show entertainment” for Houston, with slides of Camden, Maine through the seasons, our house, a not-close-up shot of the kids (they’re not identifiable really in it) and the dog…. and students really seemed to enjoy looking at the pictures. That meant *I* had time to get set up and prepped for class. So often I find students want to chat and be friendly–I do too, but I really MUST prep and have things ready to go the minute time starts!

From TSA (the US Transportation Security Agency): I bought a special laptop briefcase which means I don’t have to take the laptop out of it. It also holds the projector and all cables. HOWEVER, that is too much stuff for the scanners to cope with. It is faster if I leave the laptop in the case as it was designed to reveal the laptop, but remove the projector and baggies of cables/cords and put them in the gray bin.

I bag my stuff by product: all the projector stuff goes in one sturdy ziploc baggie, all the videocam stuff in another, the iPod and phone chargers and cords in a third. I just empty that compartment of the briefcase–four items (projector and three baggies) into a bin and I’m through easy peasy. Re-packing that section of the briefcase is fast then, too!  Mo’ bettah!

Another jem from Jan Krentz: Buy some of the day-glo/ bright colored Duct Tape and make “tags” for EVERY cord, cable, laser pointer, remote control, and put your name and contact info. With a glance around the room at the end of the day I can tell if one of my lime-green-tagged items is mixed in amongst the snarls of other black cables around the room. And if one gets left behind, folks can contact you and return it.  This saved me $80 for a remote control I left on a podium up in Augusta, Maine..phew!

Finally, take a small surge protector (mine is in the baggie with the projector stuff), but ask your hosting venue to have a long extension cord–they just weigh too much to haul around.

Thanks to Jan for sharing so much of her hard-earned knowledge with newbie teachers!  I took a traditional workshop with her up here in Maine because I wanted to watch her teach.  I had met her the year before when we were both teaching in Paducah at the big AQS show; we shared a 2-hour van ride to and from the airport, plus ran in to each other in the room where the teachers shipped-ahead boxes were stashed.  She was SO generous, plus she’s nice and I learned a ton, both in Paducah and in her class up here.  THANKS, Jan!  Her website is here–I can heartily recommend classes with her.

Cheers, Sarah

PS–late additions:

Photograph all your equipment—every cable, remote, everything.  In Photoshop or printed out add the item name and product number, along with the 800 number of the company (both manufacturer or place where you can order re-supplies).   Keep this photo at home, and another in your travel bag.  Make sure the 800 number for the company is on it so if a piece breaks (like heaven forfend the lightbulb) you can order replacement parts ASAP/overnight delivery.  I order much of my photo stuff from B&H Photo Video in NYC, and have their phone number too.

Numbering stuff is good, too.  Then you can do a quick count:  if I have four items in the bag, I need to look for one more thing–that idea.

I also made a “cheat sheet” on setting up the projector and laptop.  I need to plug in the projector, turn it on, link up the laptop with the USB cable, THEN start up the laptop.  Otherwise the projector has “issues” finding the laptop which leads to needing to re-start the laptop.  Since I don’t use the set-up all the time, I keep a page with instructions to myself inside a page protector in my bag to remind myself of those little things.  Those friendly quilters asking to help sometimes distract me and I get confused with all the cables, etc.