email Youtube

Home
Galleries
Blog
Workshops & Calendar
Store
Resources
About
Contact

Archive for the ‘Techniques’ Category

Photoshop–Finding the Stamp Tool, Thermofax screens

Tuesday, March 28th, 2017

WAHOOOO!   I’ve discovered something almost as cool as the holy grail!  At least if you want to make thermofax screens…..and yes, you may liberally share the link to this blogpost so that others may learn and play with paint.

If you want to find out how to do this the easy way, keep reading!

So I was on a quest for my next project:  creating thermofax screens using my new (to me) thermofax machine.  I remembered a tool I loved in Photoshop Elements (PSE), but it wasn’t in Photoshop (PS–full thing).  How could that be?  So I opened up my 2010 PSE software and discovered the tools I liked were called Stamp and Photocopy, in Sketches under Filters.   So I googled around to find out how to create actions in full PS to do what those tools did.  Turned out I didn’t need to–Adobe included those tools but then HID THEM.   So here is how to find and use these awesome tools.

Note:  I realize this will sound like gibberish unless you are into PSE or PS….if you aren’t, just skip!  But this is SO AWESOMELY COOL AND USEFUL for those of us who want to make Thermofax screens and use Photoshop! So if you are interested, read on!

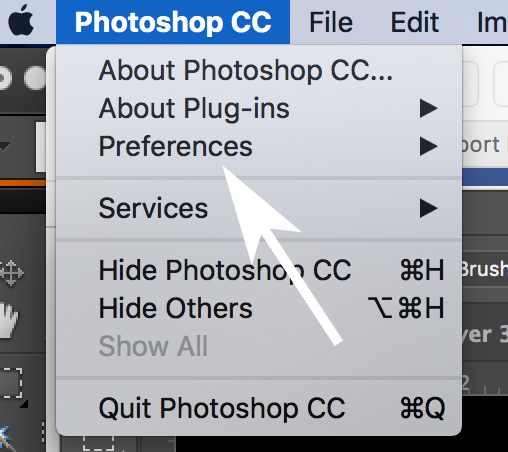
First, you need to install all of the Filters in the Filter Gallery.  Yeah right.  Not as hard as it sounds.  Under Photoshop, find and click on Preferences.

First you need to find Plug-Ins and load the Sketching filters.

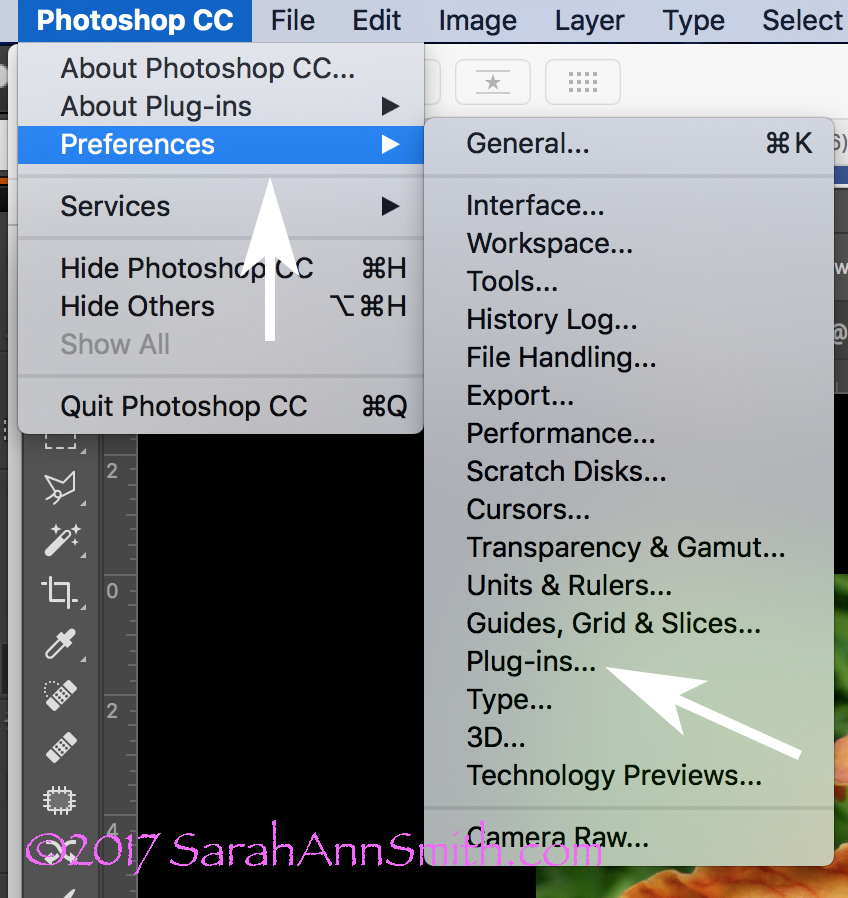
That will cause a pop-out to appear; look for and click on Plug-Ins:

The flip-out widow reveals Plug-Ins. Click on it.

When you click on Plug Ins this window opens up.  Check the box to show ALL Filter Gallery Groups and names.  Sheesh….why was this not the default?????
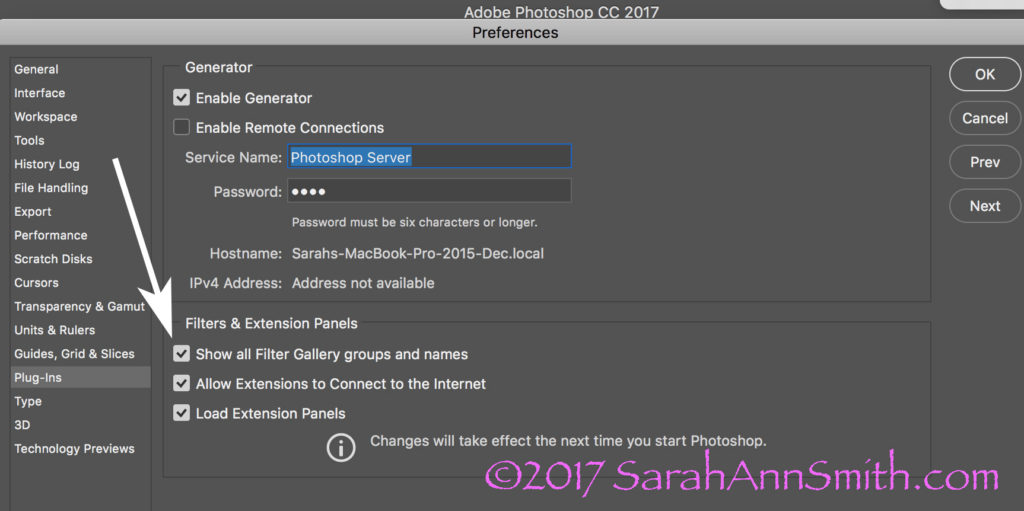
This window will pop up. The box at the bottom of the arrow will be blank. WHY Adobe? WHY? Check it and the wonder and joy of more filters will appear in your PS workspace.

Here’s a colorful photo I use in my Quilting the Garden workshops.  NOTICE the COLORS in the Foreground and Background boxes on the bottom left corner.
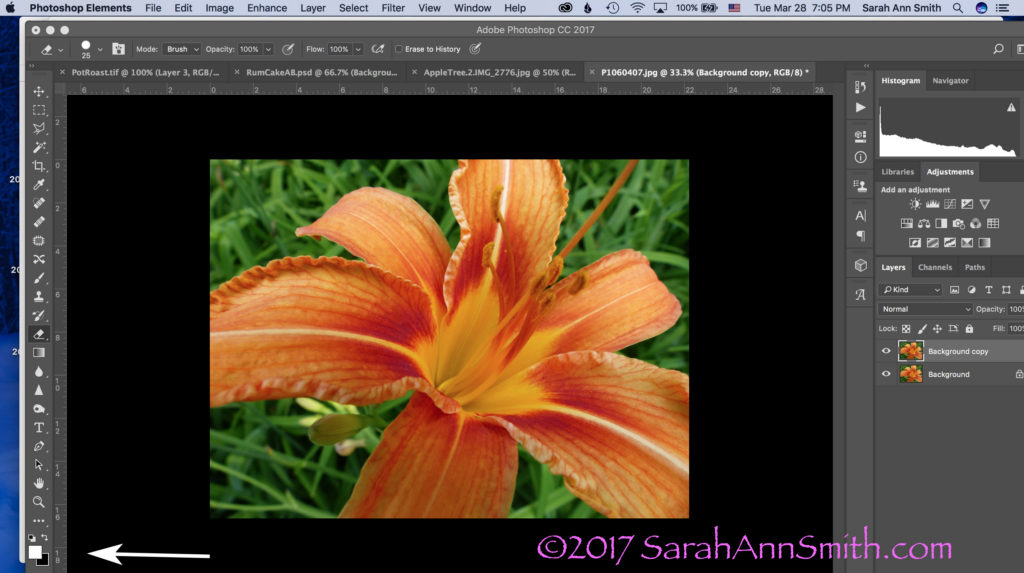
Let’s pretend I want to convert this image to black and white to create a Thermofax screen.  Take note of the little Foreground/Background boxes at the bottom left.  They are important.

Boxes are important!   The next step is to USE the Stamp tool.  Look across the top of your PS window.  Click on Filter, then Sketch, then Stamp.
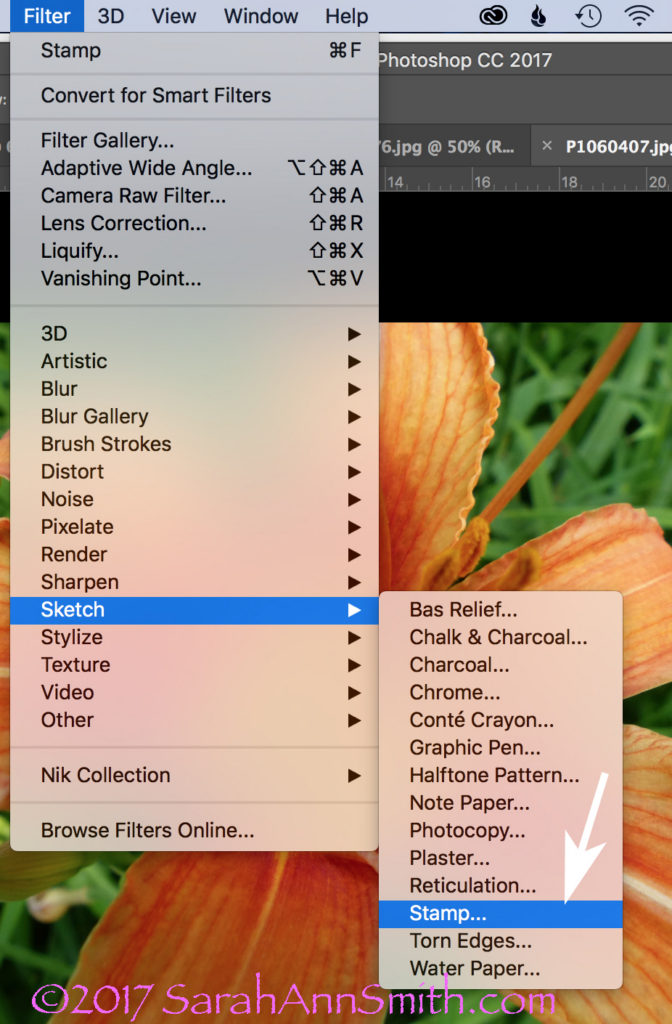
To use the Stamp tool, go to Filters (on the menu across the top), select Sketch, Then Stamp (see arrow).

When you click on Stamp, the following window opens.  But I ended up with Grey and Black.  WHY?  It used to be black and WHITE, right?  So what was I messing up?
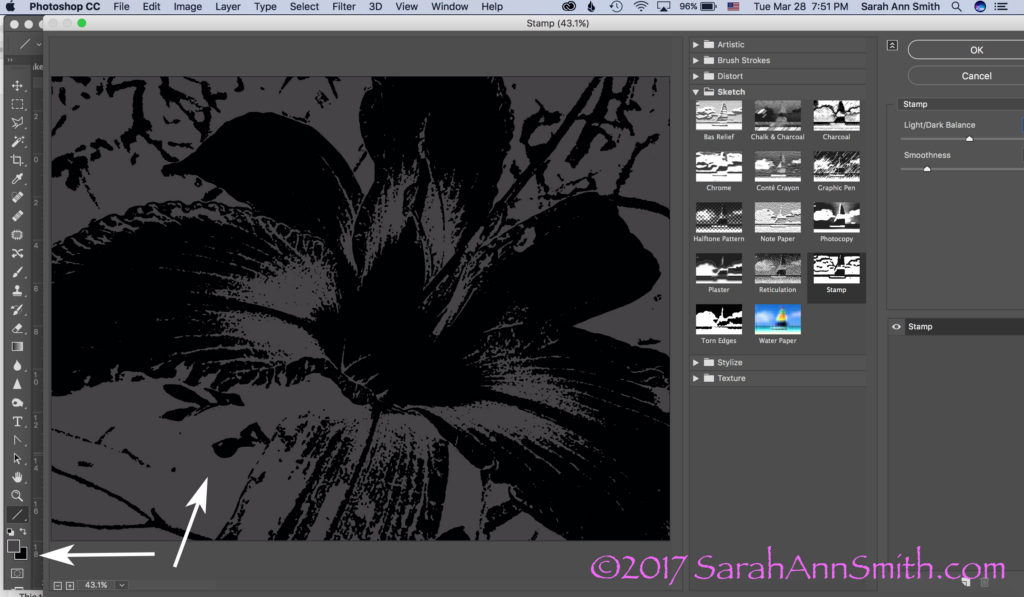
This was not what I had in mind. Then I had a lightbulb moment (who me? I know, rare, but it does happen sometimes). Remember those BOXES?

YEP…..the Foreground color, due to something I’d done not so long ago, was dark grey, not white.  Aha!  A glimmer of light (pun totally intended).  Groan.  Remember, Boxes are Important!  I switched the foreground color from dark gray (above) to WHITE.  And lookit what I got!
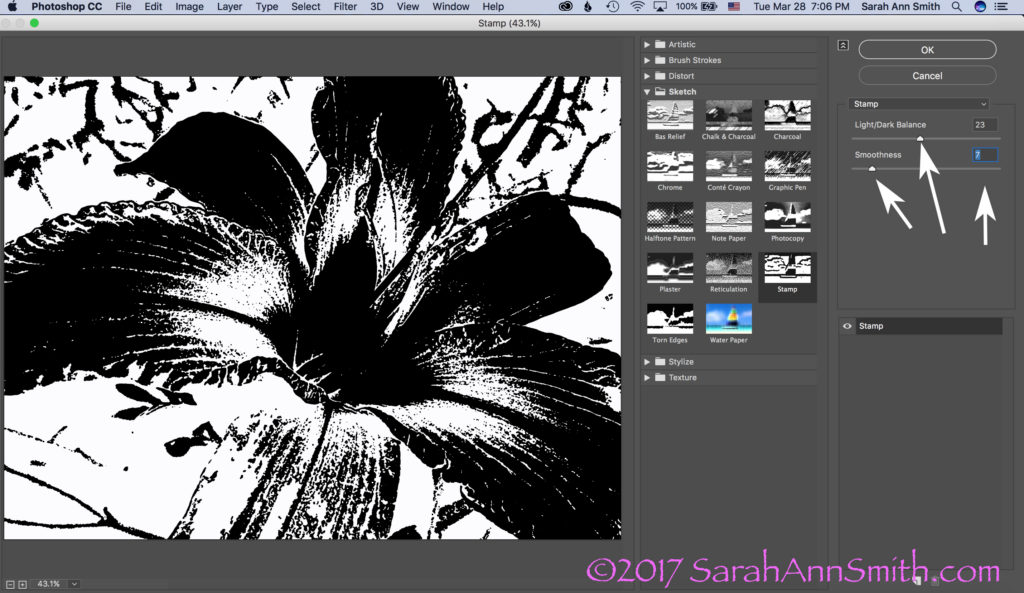
Drum roll……stamp is once again black and white!  Notice the arrows on the right:  use the sliders or the number boxes to adjust the level of black/white and the degree of detail.  Now isn’t it a whole lot easier to get to this point in a hurry, THEN fine tune with the eraser tool to clear out extraneous yuck?

Those arrows on the right point to fun things to play with to adjust the amount of black, white, detail, etc.  But the realization that the foreground/background colors could make a mess make me think….hmmmm……COLOR!  What would happen if….

BUT, one more tidbit about what you see in the window.  The one below looks like a lot of nothin’, right?  That’s because is it at 100 percent, which doesn’t fit.
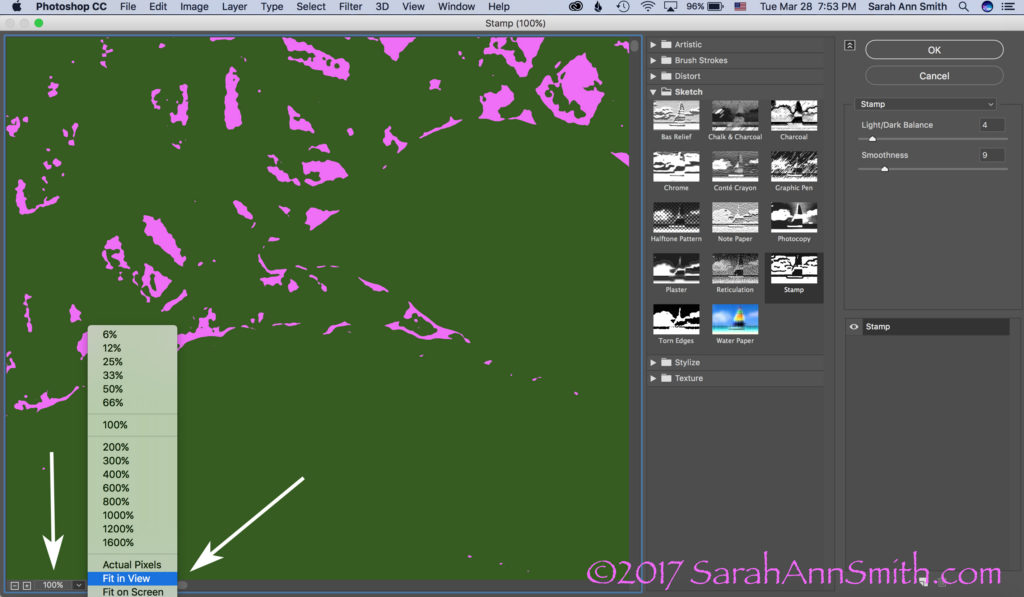
Then I realized I could play with COLOR. When you open this window, however, it opens at 100 percent. I prefer the “Fit In View” option, so check out the arrow once again.

If you click on the little down arrow to the right of 100%, you can switch it to Fit In View or whatever you like to use.  For my pea-brain, it’s a whole lot easier to figure out what I’m doing when I can see the entire picture, like this:
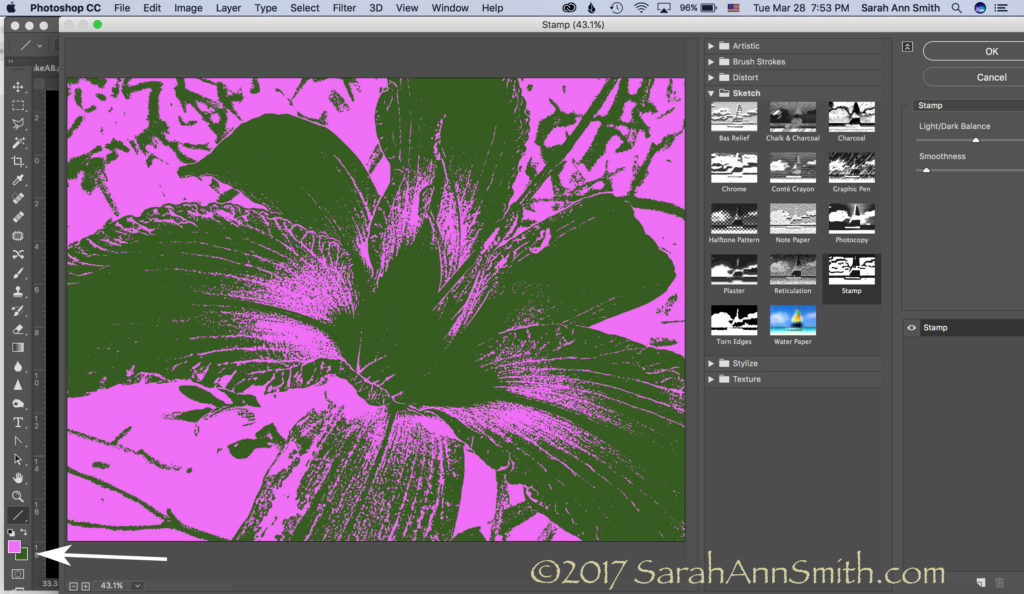
Then you can create a really bizarre two-tone hot pink and green image. Just what you always wanted, right? Not! But you can see the potential, right?

Let’s just say I am ridiculously happy.   I asked for help on FB today and got it…THANK YOU Lynn Krawczyk, Lyric Kinard and Leslie Tucker Jenison among others.   Then I — having learned this lesson before — googled around for online information, including the forum at Adobe, which is where I found the clue that the Sketch filters WERE in full PS.   But I didn’t know the terminology (like where to find the Line tool to create an arrow to illustrate these screen shots), so YouTube search box to the rescue.

SQUEEEEE!     I don’t need to use my antique PSE, I can use full PS and not have to move between the two, AND (best of all) I have my easy-peasy Stamp tool back!   Time to CELEBRATE!  Lynn, I may just have to fling some paint!  And now that I have written this up to share ASAP in thanks, I am going to celebrate, perhaps with chocolate! Or maybe Talenti.  Or some culinary Venn diagram that involves the intersection of Talenti, banana and chocolate.  SQUEEE!

And a PS, thanks Whiskers for asking the questions:  Hi Whiskers!  Yes, I will do a blogpost eventually on thermofax screens.   Not sure when, so the quick response is the Thermofax machine is the predecessor to today’s photocopier.  They were used in the 50s/60s in the office to copy stuff.  They are no longer made (consequently they cost a fortune, it has taken me a decade to save up and make the purchase, $1350! If you buy one be sure you get one that works with the mesh, not just the purple ditto masters!)…but folks have figured out if you use an image with carbon in the ink (laser printer, some inkjet printers, carbon ink, lead pencil) and you run it through the machine with a plastic-backed mesh, the plastic melts where there is carbon.  When you separate the two sheets (paper and plastic mesh) you end up with a screen.  Tape up the edges, then push the paint through.  I actually just taped a segment for Quilting Arts TV on this!


Inspired by the National Parks

Friday, December 30th, 2016

2016 was a very good year for me, including being published in books and magazines.  It was also a very hectic year and I have neglected my blog and sharing my news, so I’m going to get caught up this week and next, at least on the published works.   One of the delights of the year was FINALLY being able to share a small quilt I made some time ago for an exhibit and book to celebrate the centennial of the founding of the US National Parks, website here.

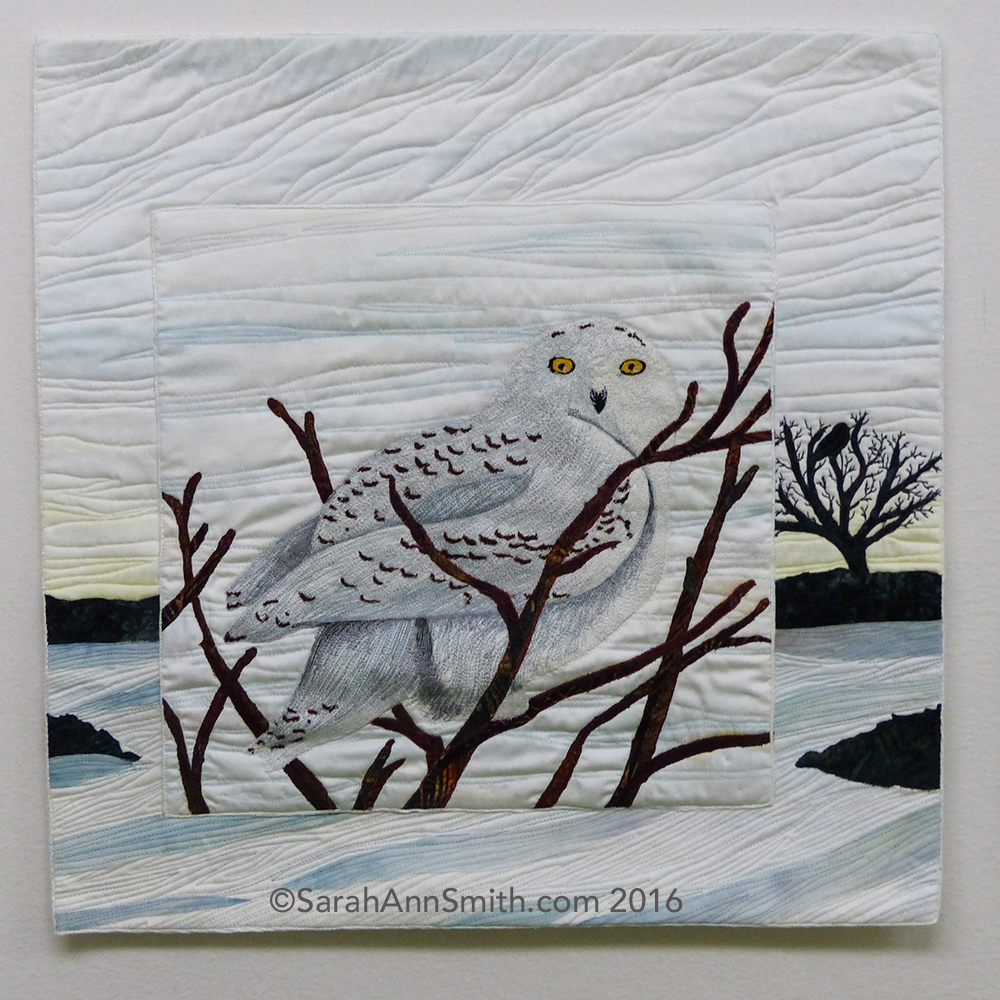
Snowy Owl by Sarah Ann Smith, ©2015/2016

Part of the exhibit debuted at International Quilt Festival in late 2015, but the book was not released until Spring 2016, so we were asked not to share photos online.   For once, since my contribution was for Acadia National Park, I was not alphabetically challenged (with a name like Sarah Smith, I’m at the end no matter whether lists are done by first or last name).

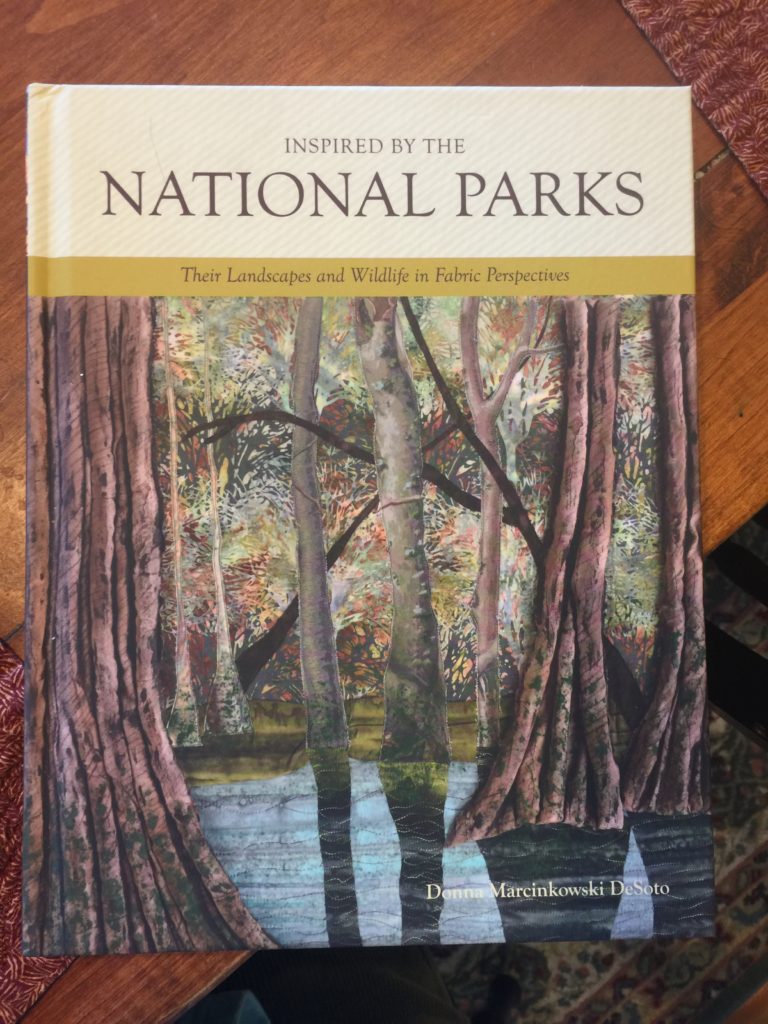
Inspired by the National Parks, by Donna M. DeSoto. You can visit the exhibit website here and purchase the book here.

There were to be three categories of quilts:  Landscape, Flora and Fauna.  The landscape quilt is a long vertical or horizontal.  The Flora and Fauna quilts are squares.  When displayed together, the three works create a square.  Subject to availability, those participating got to choose which  theme and the subject, as long as someone else hadn’t already chosen.  For example, blueberries are very Maine, but they are also part of the scenery in other northern tier states and were already gone.  To be blunt, this could have been a disaster.  Instead, the work exceeds all expectations and forms the most wonderful whole.  I so wish I could see the entire exhibit **in person.**

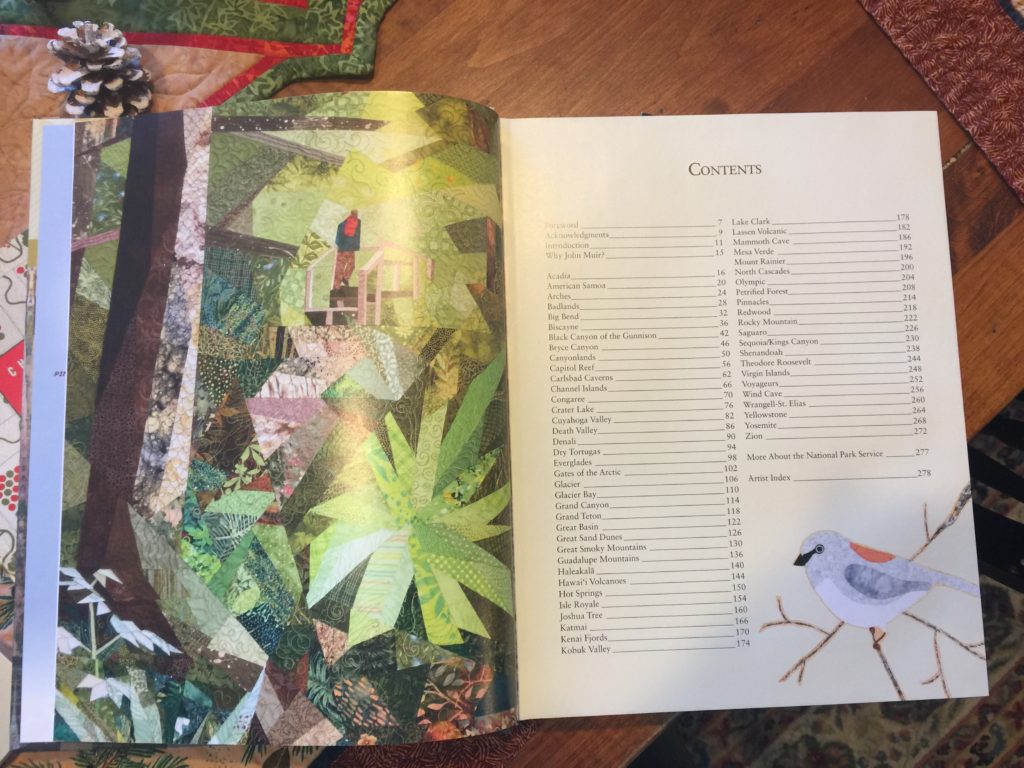
In the book, Donna has contributions from one of the US Park Rangers working at each of the national parks, writing about the park, along with tidbits of information about each place.

Inspired by the National Parks, Table of Contents

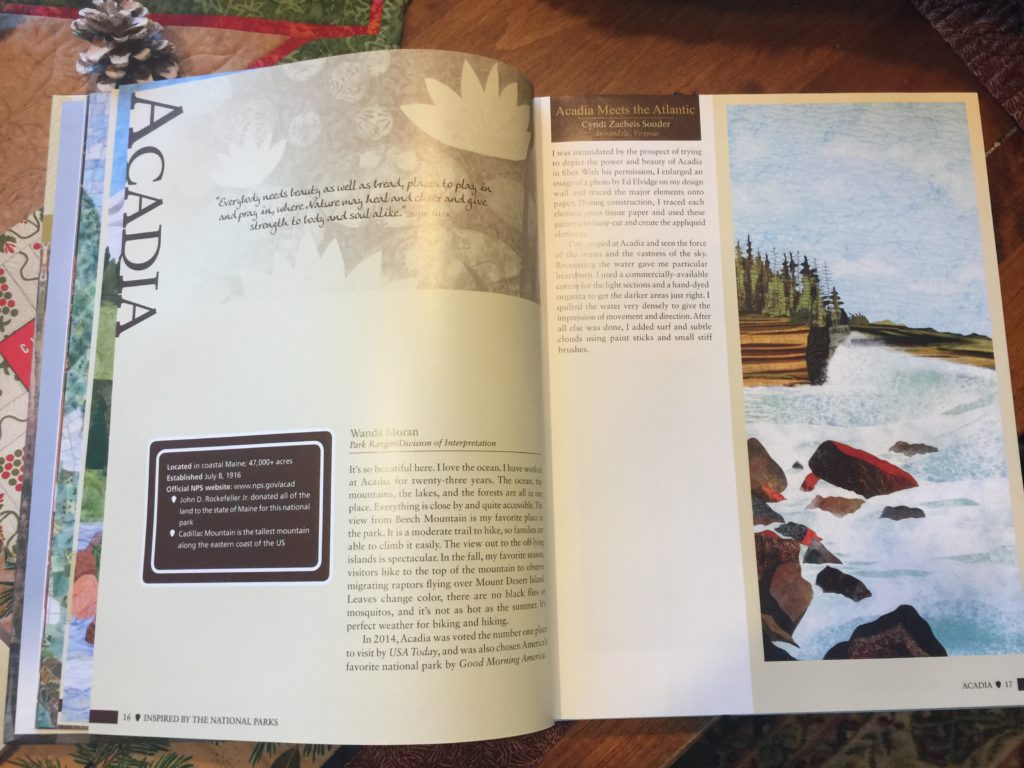
The next photo shows the opening for Acadia National Park, here in Maine:

Acadia National Park, opening pages with statement from a park ranger and the landscape quilt, by Cyndi Zacheis Souder.

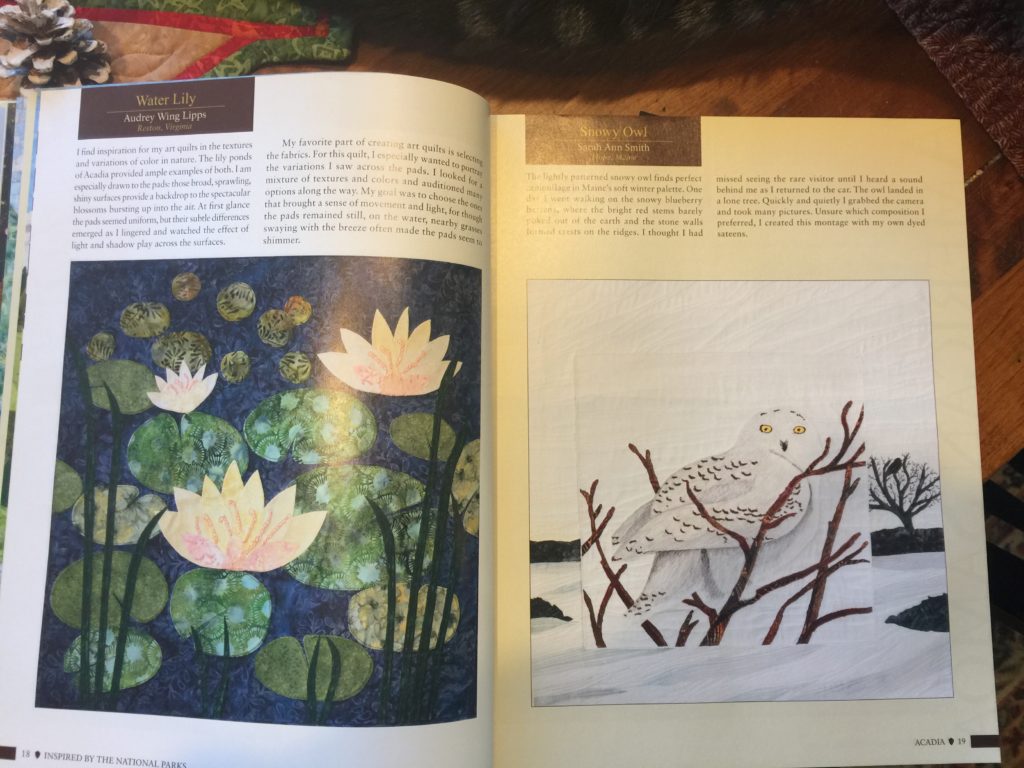
And the flora and fauna quilts for Acadia, including my snowy owl.  They wisely edged the photo with a fine line of black so it wouldn’t “moosh” into the page!

Water Lily by Audrey Wing Lipps and Snowy Owl by me

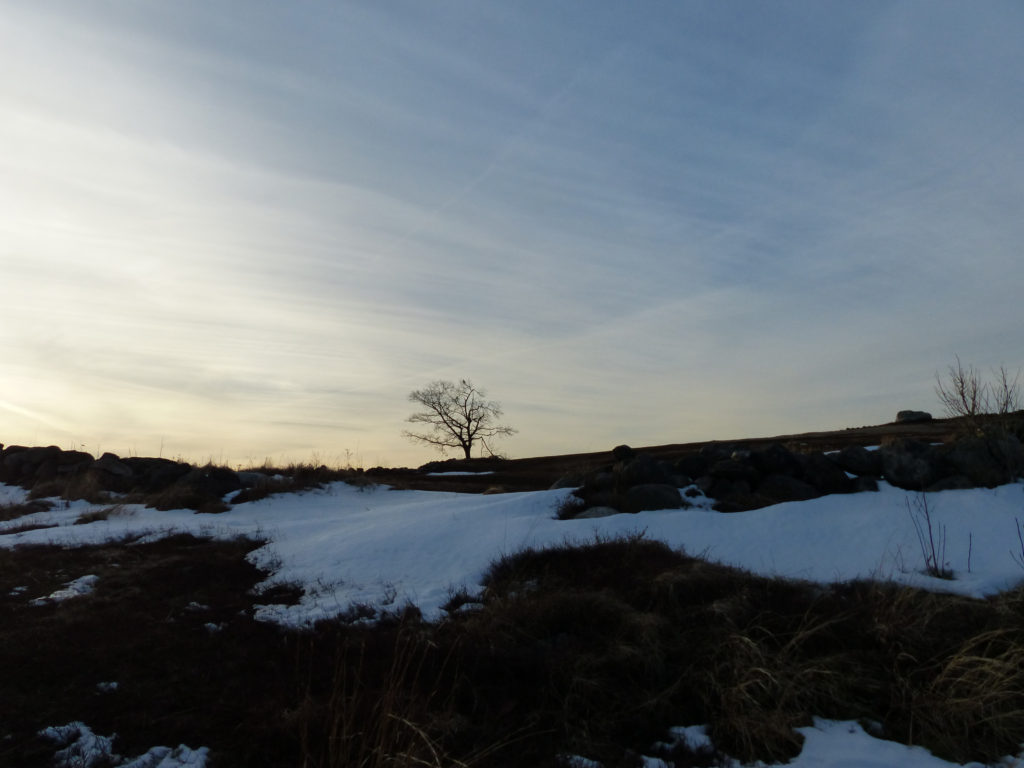
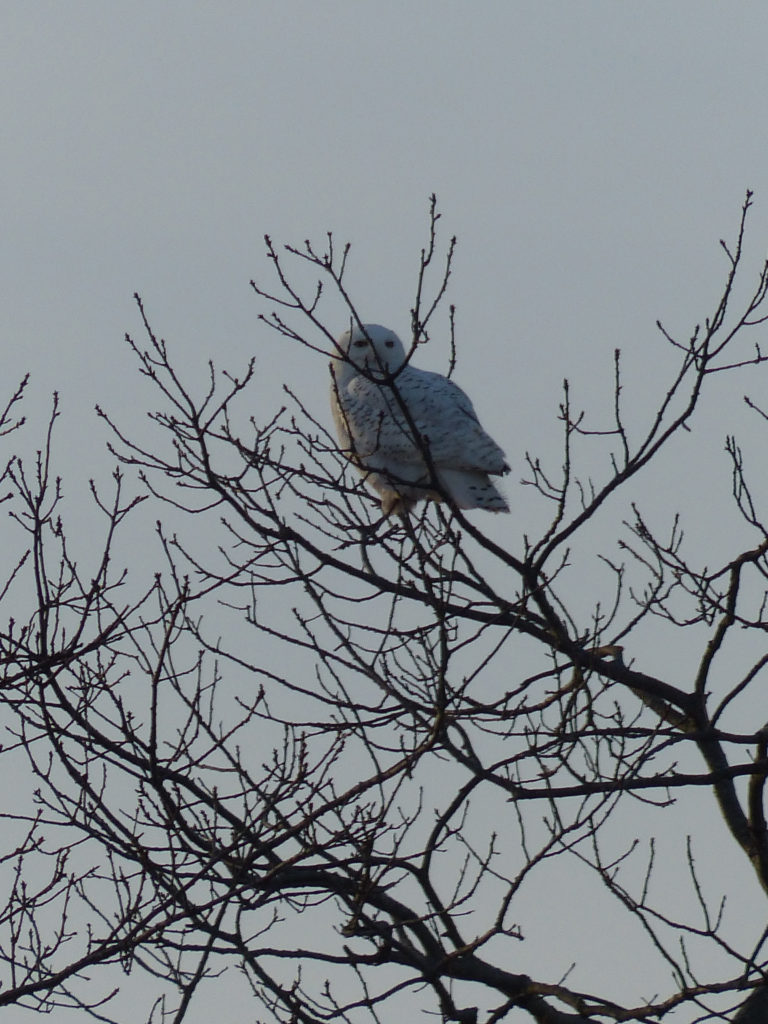
A couple years ago, there was an “irruption” of Snowy Owls, meaning they migrated a lot further south than usual, and were relatively easy to spot here in Maine.   I added the Snowy Owl to my birder’s “life list” that winter.  I went to Clarry Hill in Union, where two or three owls had been spotted.  I walked along the path through the blueberry barrens on the bare hilltop, but nothing.  As I was about to turn around, I spotted one at a great distance (beyond the no trespassing signs), so I was happy, but no good photos.  Then I returned to the car.  As I approached the car park, I turned and saw an owl in a tree growing next to a stone wall…camera OUT!   Snap! Snap!  Snap!  Thank heavens for auto-focus.

This was about 4 pm, as the sun was beginning to set. There was an owl in the tree on the ridgeline!  The owl had followed me down the path and was checking me out!

The owl few even closer, so I got some better images. I still get goosebumps looking at this photo! To hear the rustle of an owl’s wings and landing….wow!  Hopefully, one of these days Sony will make an even longer focal length zoom for my a6000 mirrorless camera…I am saving already because it WILL be expensive, but worth it!  I am inspired by Jeannie Sumjall Ajero’s nature photos she shares on Facebook.

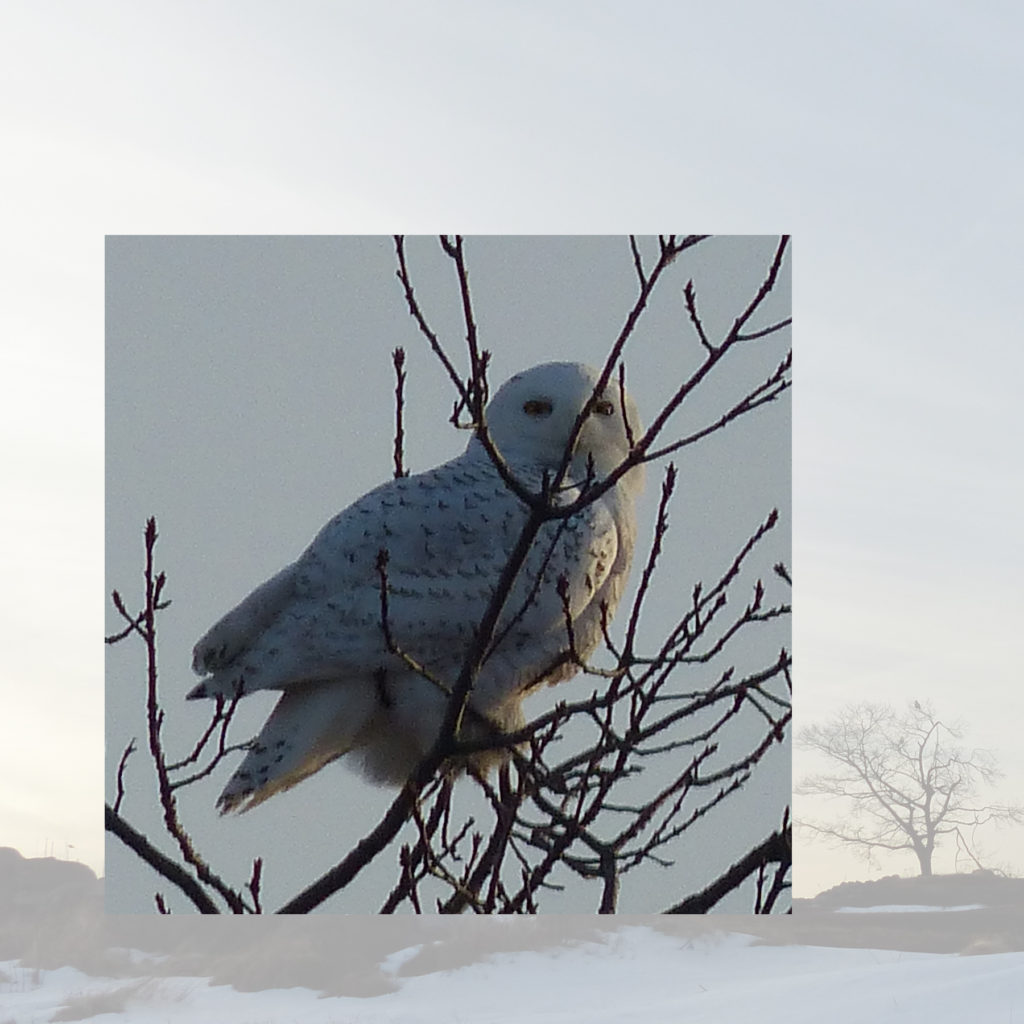
When it came time to make my quilt, I couldn’t decide which view.  So I messed around in Photoshop, and thought, well why not BOTH?

A composite photo image that was my guideline. I obviously adjusted the branches and the placement of the stone wall/tree in the final work.

The subtle winter palette is challenging in terms of finding fabric, so I dyed some cotton sateen.  Despite being stingy with the dye, my first attempt there was too much color, so I tried again and got just the pale tones I needed.

I created the bird on white cloth, used stabilizer, and did the very heavy stitching on the bird first, then appliquéd her (probably a female because there is a lot of barring, the brown bits) to the smaller close-up image.   I then composed the background quilt and appliqués the smaller one to the larger one.   I’ll enjoy having her fly home eventually.  Until then, if you get a chance to see this exhibit, DO!   And no matter what, the book is a delightful volume.   The **Library of Congress** has included the book in a display this year…how amazingly cool is that?  Kudos to Donna and all the artists.  Exceptionally well done!

You can order the book on Amazon here.  What a great thing to do on a long winter’s day!


She makes clothes, too!

Saturday, December 10th, 2016

It has been a while, but I have gotten back to making clothes over the past year or two.   I began life as a garment sewer, but abandoned that when I discovered quilting.  Now that I am getting older, I find that I don’t always like the generic stuff available and have begun sewing clothing again.  Sometimes, I find the PERFECT top though, and can’t find it again.  That leads to making your own patterns.

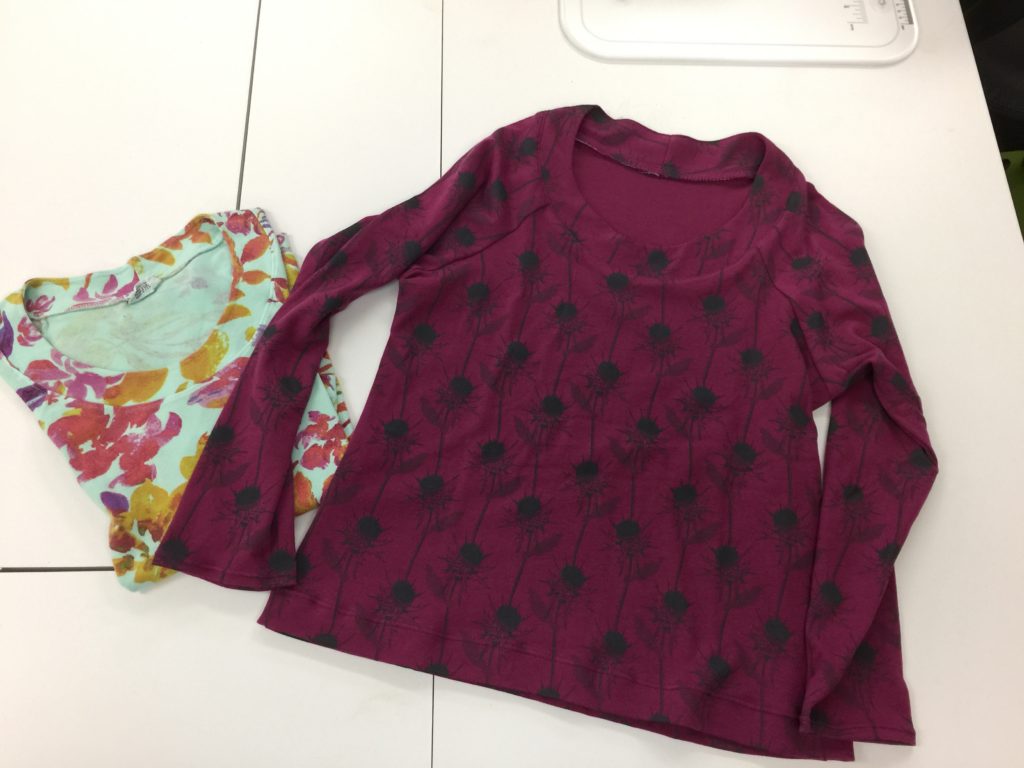
Success! I actually made a KNIT garment. The original shirt (purchased) is on the left. After making the pattern from that shirt, I made the plum one on the right. I'll do a separate blogpost later this week with more info on how I did it and which stitches used.

Success! I actually made a KNIT garment. The original shirt (purchased) is on the left. After making the pattern from that shirt, I made the plum one on the right.

The aqua shirt on the left, from Habitat, is a favorite.  It is also getting old and tatty.  I found the plum knit (Anna Maria Horner) at Alewives Fabrics a couple years ago made up in a dress.  They had 1/2 yard more than needed for the dress, so I bought all of it.  But I decided rather than make a summer dress, I would make a top and leggings or two tops out of it, since it seemed more autumn-y to me.  The fabric is long since sold out, but Alewives has a great selection and does mail orders!

I took some cheap paper (a roll of medical exam table paper bought from my doctor about six years ago and the roll is still not near done) to make tracings of the original shirt pieces (which involves some creative pulling and pinning to get things like the sleeves outlined) to make a pattern.  I smoothed out the lines, lengthened the sleeves from 3/4 to full length for winter, and cut out my fabrics.  For my shirt, I used a lightweight fusible interfacing for the neckline, but mine turned out a bit stiffer, so maybe next time I’ll try a LOT of starch and no interfacing.

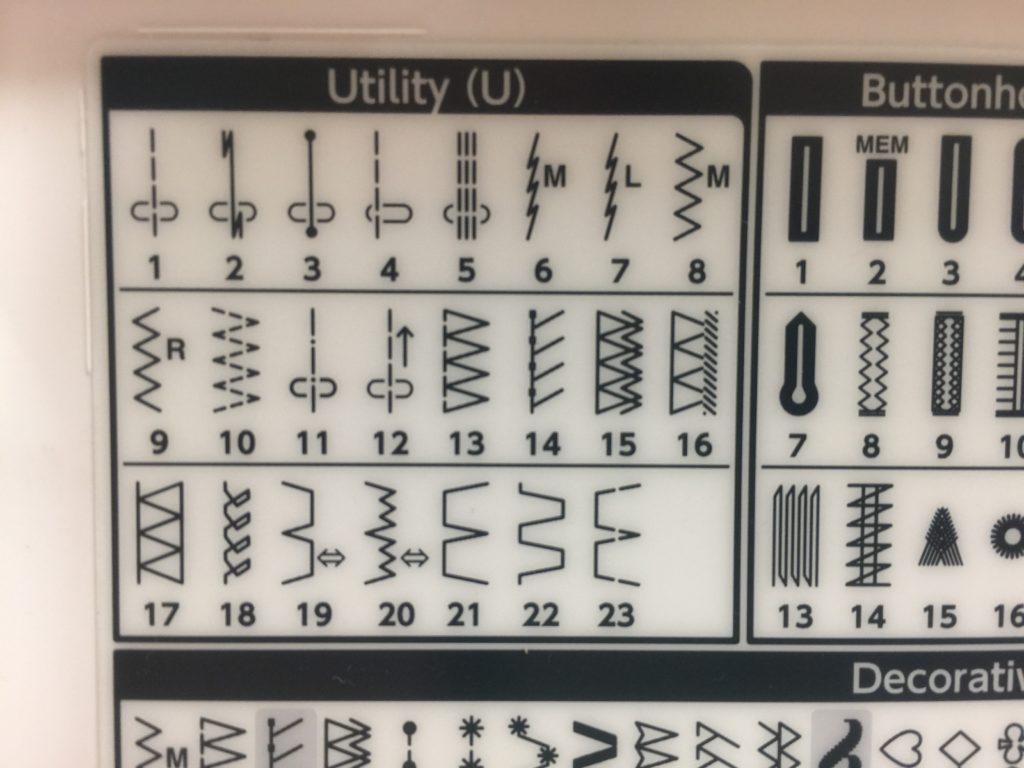
When sewing knits, you want to use a stitch that has some stretch in it and a BALLPOINT or Jersey needle–this keeps it from cutting holes in the knit fabric.  You can use a straight stretch stitch that is standard on even the most basic machines…it looks like three vertical lines next to each other, stitch 5 in the photo below.

Utility stitches on the Janome 9400. These stitches are available on even the most basic machines.

Utility stitches on the Janome 9400. Most of these stitches are available on even the most basic machines–the only ones you might not find are 6, 7, 12 (reverse), and 18.

A few thousand years ago, I took some sewing on polar fleece classes, and in those learned to use a zigzag for stretchy side seams on garments, so that is what I used for this top.

asides

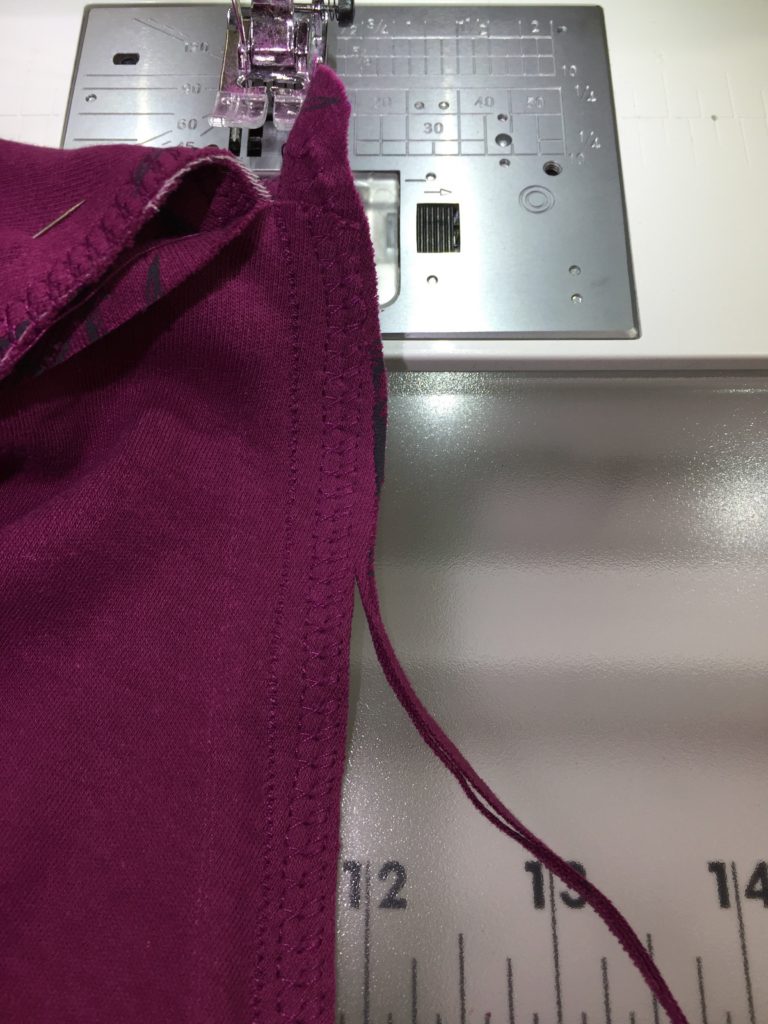
This photo shows that I used stitch 6, which I think of as a lightning zigzag, for the seam, and  Stitch 18 for an “overcast” stitch before trimming away the excess on the edges.  I like a nicely finished garment!   One could also use stitches 10 or any in the 13-23 range for an overcast if you don’t have something like 18 on your machine.

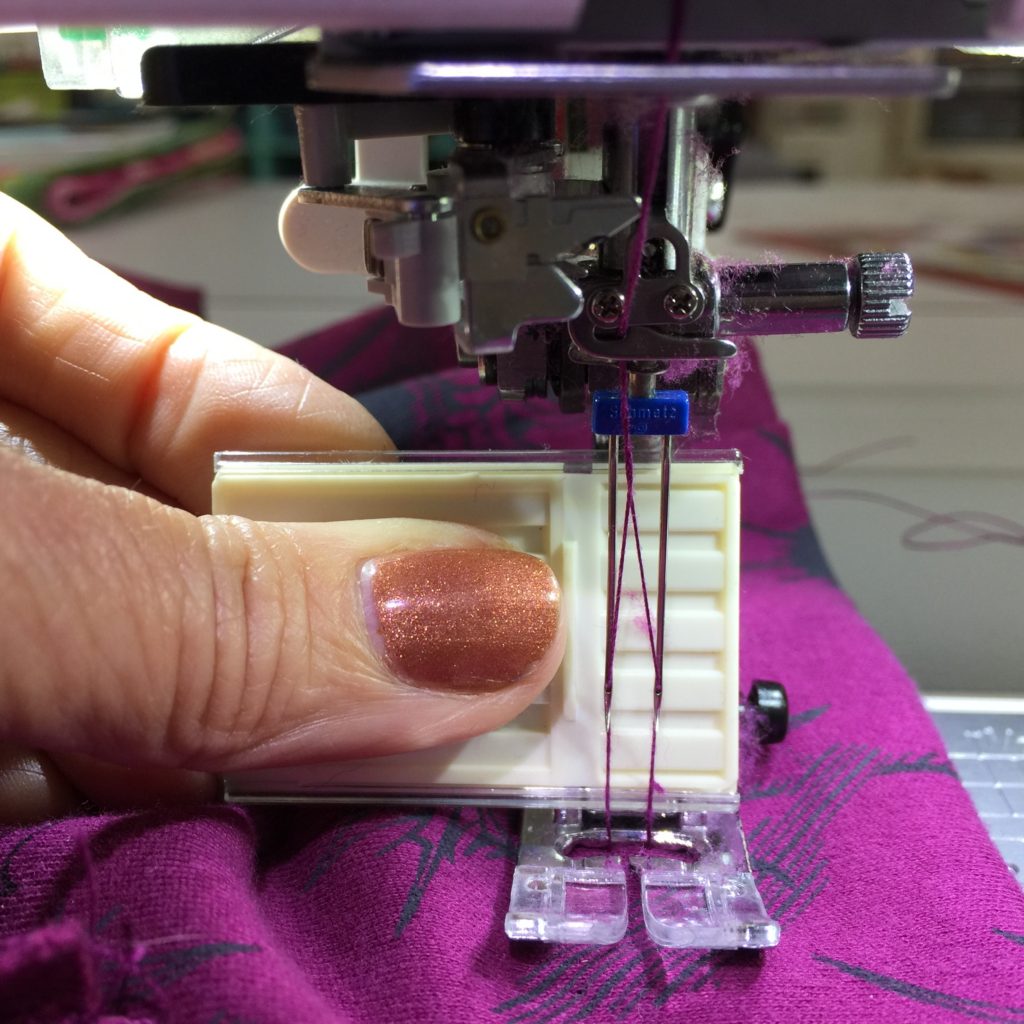
To hem my top, I used a Ballpoint Twin needle (i think mine is a wider separation between the needles, nearly 1/4″).  When sewing on knits, always use a ballpoint so the tip doesn’t cut the threads in the knit fabric.  I wound some thread onto an extra bobbin and placed it on the second spindle.  Then you thread the machine holding both threads as if they were one.  After passing through the last thread guide (photo below), hand thread (don’t use the automatic needle threader as it won’t go to the correct spots) the needles.

Twin needles

Twin needles make a lovely stitch.  The bobbin thread forms a zigzag, which makes the seam stretchy (which means the stitches won’t pop and break when you stretch the hem).

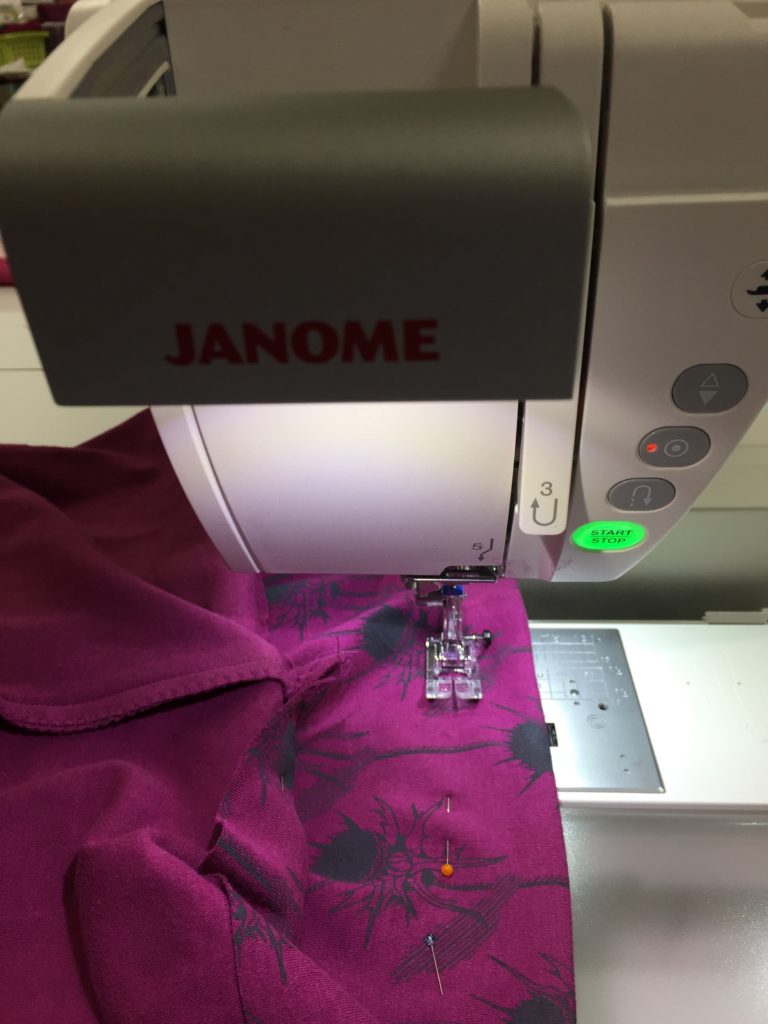
Sewing the hem. I am using a line on the throat place as a guide to create a gem that is about an inch deep.

Sewing the hem. I am using a line on the throat place as a guide to create a hem that is about an inch deep. After stitching, trim away excess fabric above the stitching.

I’m fairly pleased with my top.  I’d do the interfacing slightly differently next time (and yes, there will be a next time–the neckline on this top is flattering on me and comfortable), but the Janome 9400 performed flawlessly.  WOOT!


Modern Winter Placemats and TableRunner

Wednesday, December 7th, 2016

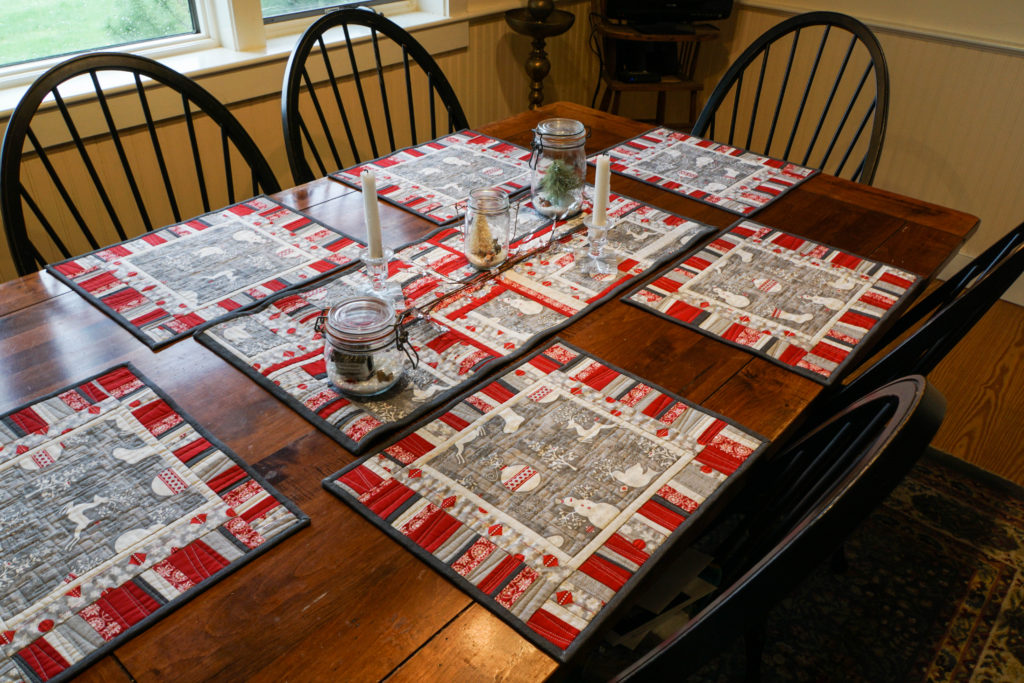
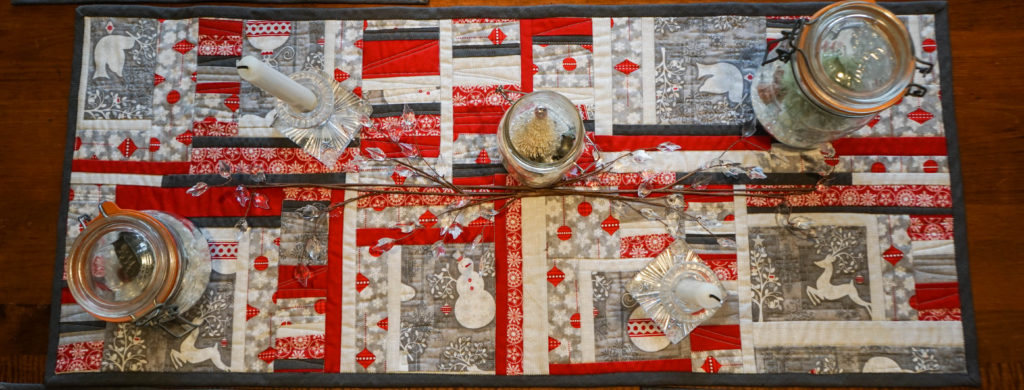
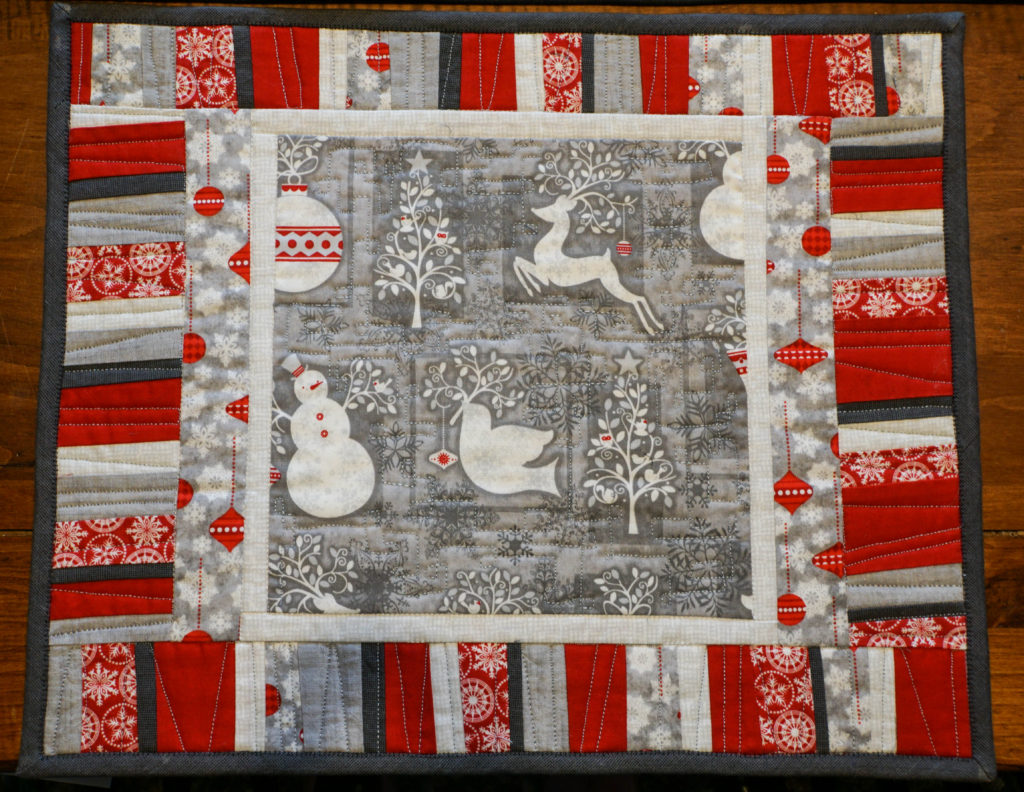
Last December at our local Coastal Quilters Christmas/Holiday meeting, we had a little game where you each bring a giftie, and end up with a different giftie.  I ended up with a lovely set of fat quarters in very “Quilt Modern” colors:  the red, white and gray winter themed ones.  I decided to add some new winter placemats and table runner made from the theme fabric using improvisational piecing. You can find the pattern at Janome America’s blog, here.

Modern Winter placemats and table runner.

Modern Winter placemats and table runner.

I added the solid red and dark gray fabrics.  I will advise you:  MEASURE YOUR TABLE FIRST.  I made the placemats first, rather oversized.  I had two of them bound.  Then I discovered they were too big, had to pick off the binding, cut them down (the instructions on the Janome site are for my final size), and re-do.  Erk.

Depending on the fabric you select as a feature fabric for the centers, you can adjust the size of the inner borders (or omit them entirely).  I had just a half yard of the feature print, so I needed to use smaller cuts and build them out.  If you buy a little more, then you can omit the inner border and strips.

An overhead

An overhead view of the table runner; I used the few remaining bits of the feature print and built them out with strips, then fit them together.  Can you say “liberal use of partial seams?”

Overhead view of placemat

Overhead view of placemat

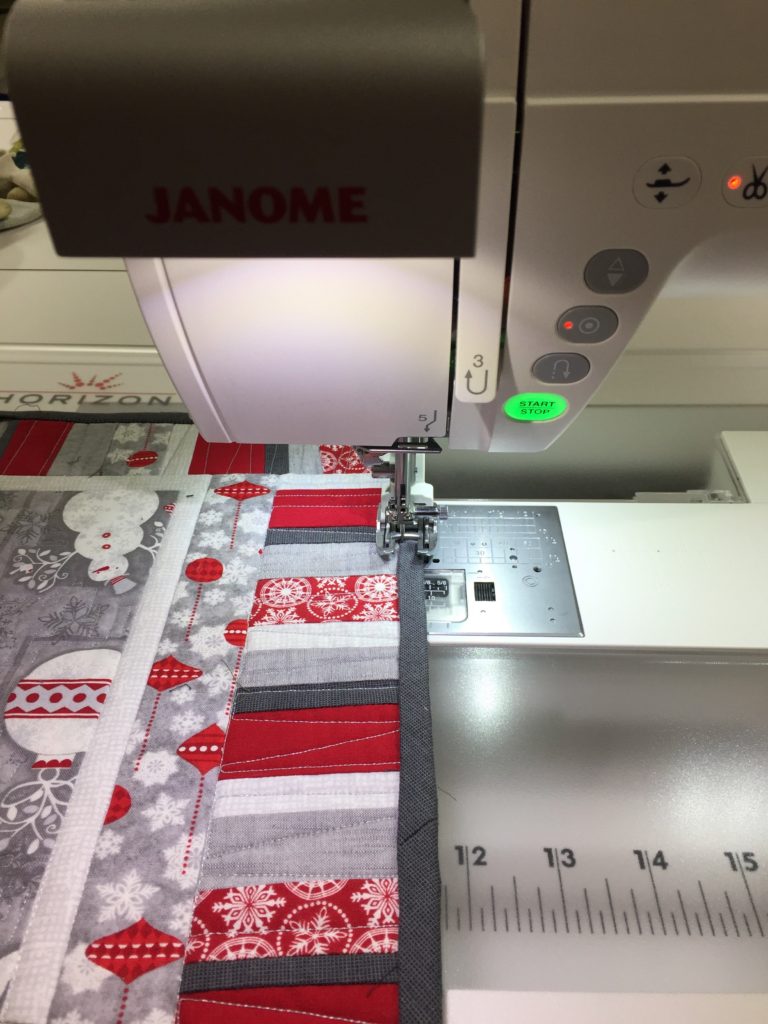
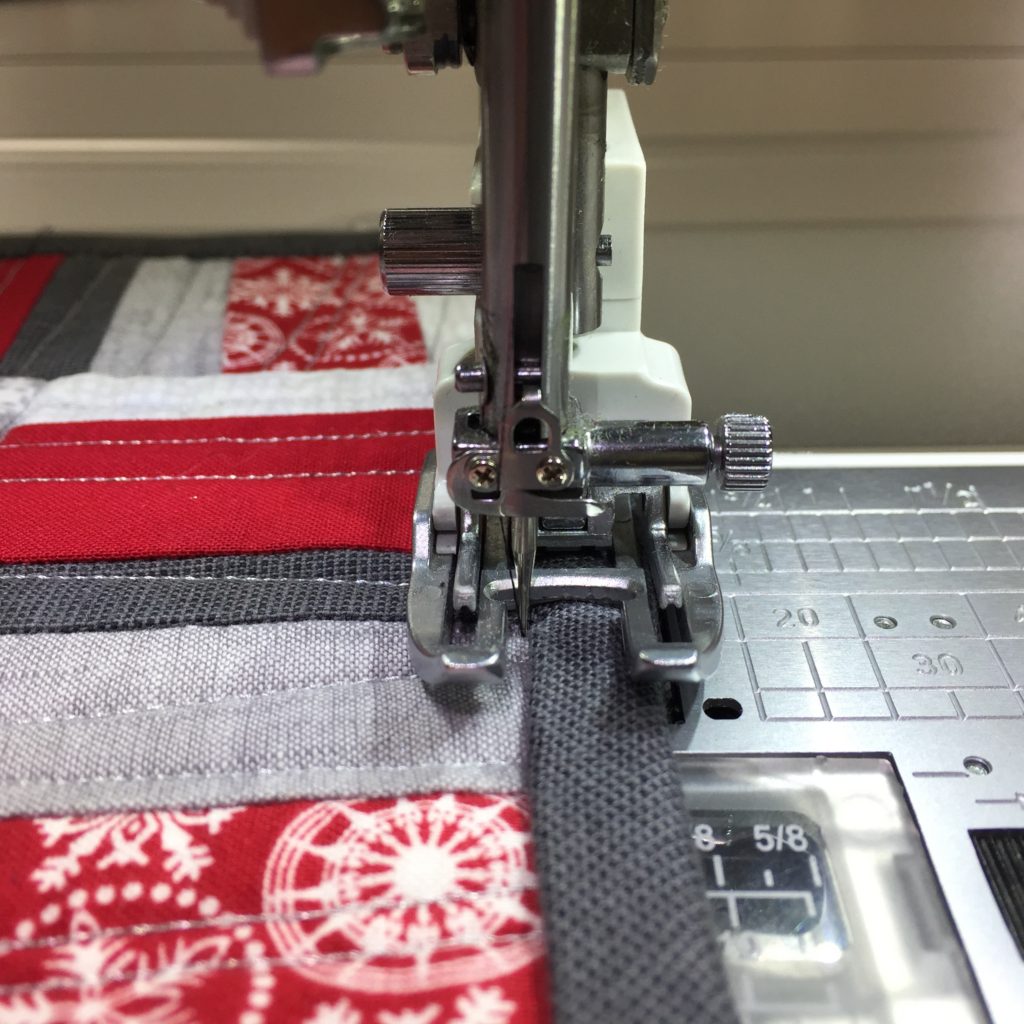
My favorite way to do bindings is by machine.  My secret:  glue stick!   I only use the glue stick on things that will be washed (probably often), so I wouldn’t do this on a high-end art quilt, but for a baby or bed quilt or table linens?  You betcha!

stitching down the bindings on the Janome 9400

Stitching down the bindings on the Janome 9400.  Love that pull-out light!  I sew the binding to the back, wrap it to the front, then at the ironing board use glue stick on the seam allowance.  I press the binding down and it stays put–no pins!  no bumps!  no wiggling out of place! 

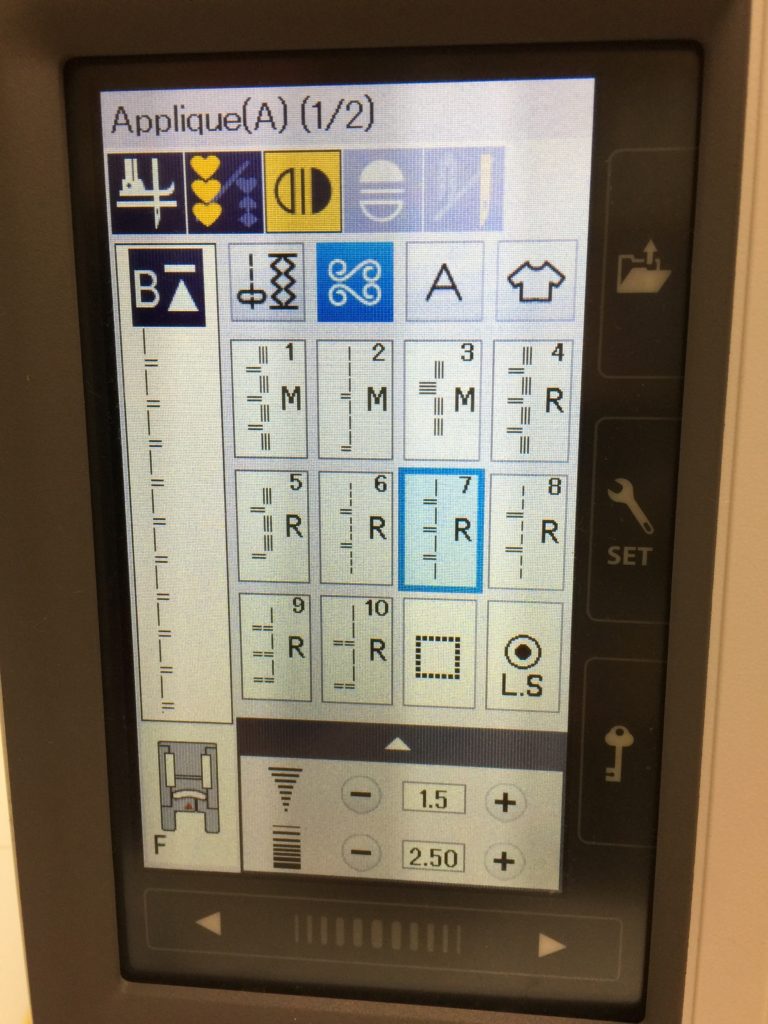
I used a blanket stitch, with the straight part in the “ditch” (just to the left of the dark gray binding), and the “zig” going onto the binding.

I used this stitch to finish the bindings, and used the mirror image button (above in yellow) so that the swing of the stitch goes to the right of the straight line (see the stitch as displayed at the left of the screen).

I used this stitch to finish the bindings, and used the mirror image button (above in yellow) so that the swing of the stitch goes to the right of the straight line (see the stitch as displayed at the left of the screen).

A closer view. The needle just barely misses the binding when going straight, then swings over onto the binding to hold it in place.

A closer view. The needle just barely misses the binding when going straight, then swings over onto the binding to hold it in place.

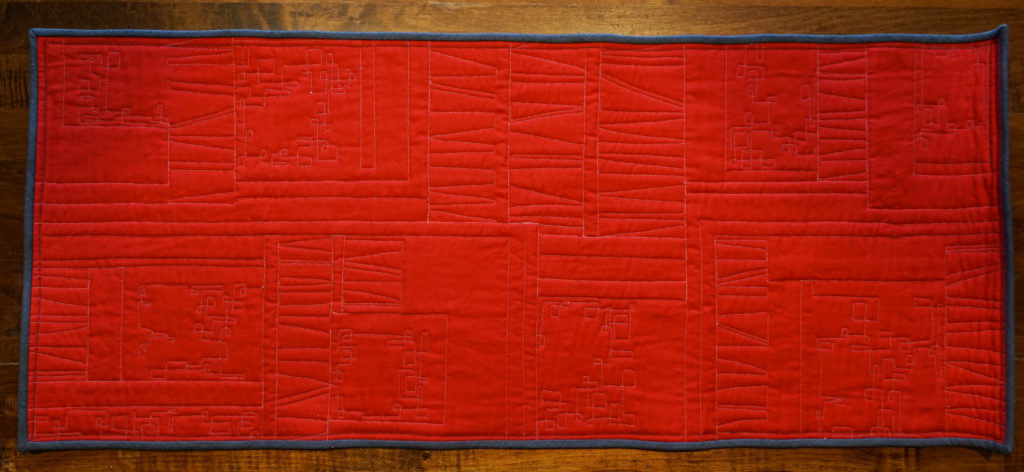
Back view of my quilting. I used a FMQ ruler (thicker than a cutting ruler) with the QO foot (this is not necessarily recommended, you really should use a proper "Ruler Foot" but I was extra careful)

Back view of my quilting. I used a FMQ ruler (thicker than a cutting ruler) with the QO foot (this is not necessarily recommended, you really should use a proper “Ruler Foot” but I was extra careful) to do the straight line quilting across the strip sets, then used a squared off loop in the background of the feature fabric bits.

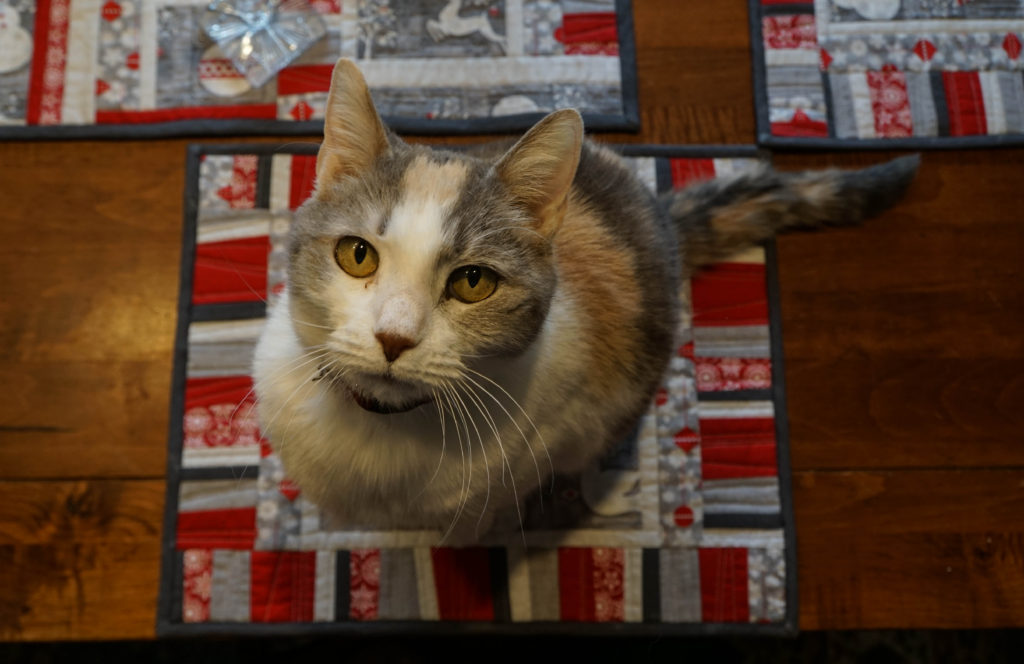
It must be good: it has passed the cat-sitting-on-it seal of approval!

It must be good: it has passed the cat-sitting-on-it seal of approval!


Teaching at Quilt Festival Houston–sign up soon

Sunday, October 2nd, 2016

Online signups for classes at International Quilt Festival in Houston end on October 7th !!!!! I’d love to see you in one of my classes.  Here’s my very busy line up!

Screen Shot 2016-07-19 at 4.39.58 PM

I’m thrilled to be so busy and hope to meet many of you.  Here’s a blogpost about The Nest, a new and totally fun half-day (or full day if a guild wants a full day) class, it’s a blast and the extensive kit/materials provided make it easy to prep.  I’m also teaching my intermediate/advanced Tame Fussy, Fiddly Threads for Machine Quilting class for those of you who want to learn more about the “cranky” threads–that really aren’t cranky if you just learn how to use them!

Houston has revamped the catalog a little bit. There are now (yeah!) pictures in the catalog (not just online) and there are weblinks so you can go to my website for the FULL supply list and handouts.   To shorten the process, if any of the above look good to you, you can go to my class listings page here for info about my classes.  Each description has a hotlink to the pdf Supply list.  If I have blogged about a class, that also is in the description.  You can also find all my supply lists in one place on my Resources page.  If you click on “Resources,” Look at the jump links at the top.  Click on Class Supply Lists and it will jump you down the page (instead of having to scroll down).

Here are some more blogposts about the classes I’m offering in Houston:

Decorative Stitch Applique here and here

Easy-Peasy Inside-Out Bag here

Can’t wait to see you in Houston!