email Youtube

Home
Galleries
Blog
Workshops & Calendar
Store
Resources
About
Contact

Archive for the ‘Tutorials’ Category

Binding with Sheer Fabrics and ribbons

Saturday, August 18th, 2007

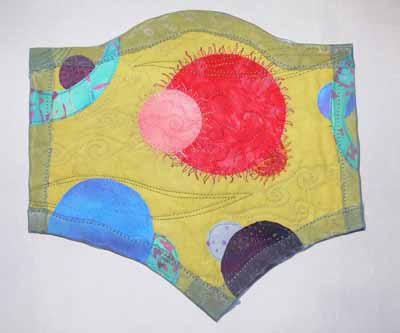
Today’s tutorial will add a bit more depth to the section of the Quilting Arts article on edge-finishes published in their August/September 2007 issue. Please order a copy here so you can have the whole article, then feel free to refer to this blogpost for more in-depth explanations! I hope someday to convince a publisher to let me do a book!!!!Sheer-finished quiltlet

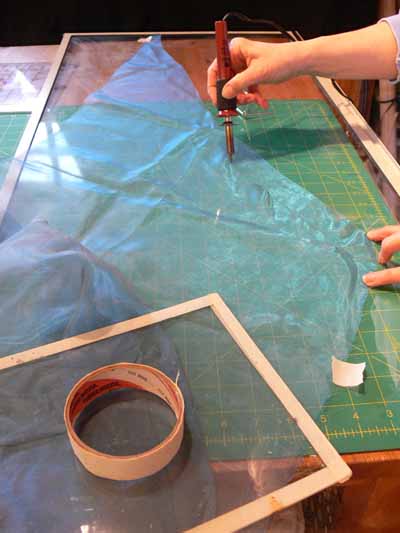
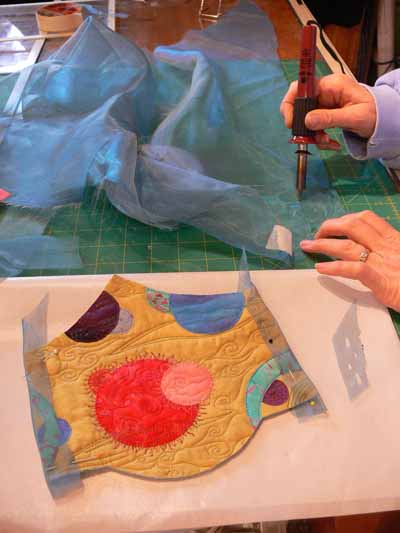
To “cut” your strips, place your synthetic sheer fabric on top of an old storm window or a piece of glass from a photo frame (tape the edges of the glass to avoid cuts). A cutting mat under the glass gives you lines to Heat-tool to cut sheers, 1follow. Secure the fabric with tape at each end.

On a corner, test your heat tool to make sure it is hot enough to cut / sear the edges.

Heat-tool to cut sheers, 2

Cut your binding at least 1½ inches wider than the desired width. For a ½” edge, cut your strip 2 ½ to 3 inches.

Hints: if you sear too close to the stitching, your sheer may pull loose. Also, you might melt your threads–eeek! Practice on a scrap and on the back side of the quilt before working on the front. Keep the heat tool somewhat vertical or you may accidentally melt the binding with the hot shaft of the tool. This polka-dot look could be really fun (what if?!) on the right quilt. Here’s what not to do:

I hope these extra photos help explain how to have fun playing with sheers as a binding! If you have any questions, just ask.

Cheers, Sarah

Facings as an edge finish

Tuesday, August 14th, 2007

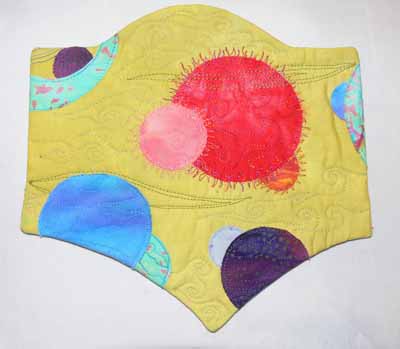
The following tutorial builds on the article published in the August/September 2007 issue of Quilting Arts Magazine. The Pillowcase (or bagged back, or escape hatch) finish for a small art quilt is simply a one-piece facing that covers the entire back of an art quilt. This method is useful if you have lots of knots or carried threads that you wish to cover, for example after extensively beading a piece. For larger quilts (or even small ones) you may not wish to cover the entire back. Instead, you can use facings. On a quilt with straight edges, like Koi, you can use a straight strip of cloth as I did here on the back / under / second side of this quilt. However, just like a dress neckline, facings work well on curved and irregular shapes. From the front, you can’t tell if this quilt is a Pillowcase backing or a faced edge:Faced quiltlet

Facings:
Borrowed from dressmaking, a facing is simply a piece of fabric that echoes the outside edges that is turned completely to the back side of a quilt. Large and small quilts with irregular edges are great candidates for facings!

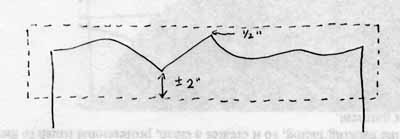
1. Cut a strip of fabric that extends ½ inch beyond the outside outermost edge and 2-plus inches towards the center of the quilt from the innermost “innie”.

Facing a weird shaped edge

2. Pin the facing to the quilt top, right sides together, on the FRONT side of the quilt.
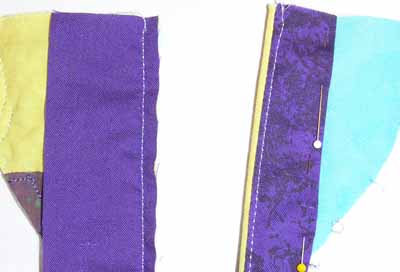
3. Sew a ¼ seam (photo below, left)

Facings–sew seam, edgestitch
4. Trim excess fabric from the seam allowance.
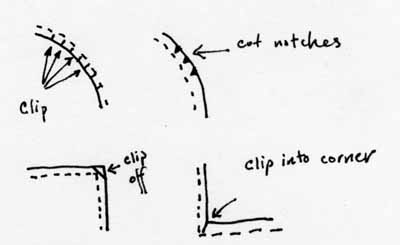
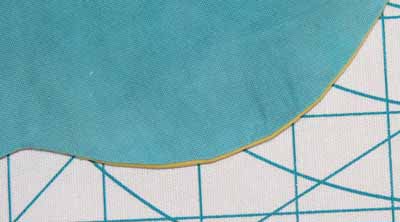
5. Clip /notch curves, clip inside corners and trim outside corners.

Facings –clip curves
6. Press the seam as stitched. Fold facing over the seam allowance and press again.

7. Edgestitch facing to seam allowance a scant 1/8” from seam line; this will encourage the seam allowance to stay put and not try to roll back to the front. (photo above right)
8. Fold facing to the back, “favoring” the edge. The little bit of yellow-green that you see in the photo below is the “favored” edge, which is a bit of the front rolled to the back.

Facings, favored edge
9. Iron the seam allowance and facings towards the center of the quilt. (See Step 9, above)

10. Turn under the edge of the facing and stitch in place. See the photo about edgestitching to see the turned, pinned edge.

11. Repeat on the other sides, turning under the short ends of the facing and stitch down to create a completely finished facing.

Foolproof miters on any width binding

Saturday, July 28th, 2007

The double-fold bias binding with a mitered corner is probably the most familiar edge finish for contemporary quilts. In the set of mini-quilts I made for my forthcoming article on bindings in Quilting Arts magazine (August 2008), I created an outside edge that includes corners, a point, and inside and outside curved edges which covers most of the challenges you will face.

I hope you’ll check the forthcoming issue (due on stands and in mailboxes near you at the very end of July and early August) for more details. Because there is only so much space available, they didn’t have room to include instructions for “any-width” bias binding, only 1/4″ bias binding. I actually prefer this technique to the one described in the article, so you have my permission to make ONE copy of this blogpost, for you personal use ONLY (since I make a living, albeit modest, teaching and selling quilts, thank you in advance for respecting my copyright!).

As soon as the article is out, I’ll insert a picture of the mini-quilt here. In the meantime, the close-up above of a good mitered binding will have to do! Thanks for understanding!Cut your binding strips SIX times the width of the desired binding,Double-fold Wrap plus ¼” (or up to ½” extra if you’d like a little more wiggle room). For a binding that finishes at 3/8” that is [(6 x 3/8) + 3/8 = 18/8 + 2/8 = 20/8 or] 2 ½ inch wide strips. Sew your binding strips together with a ¼” seam allowance until you have the length of your quilt perimeter plus several inches. The seams are on the straight grain, so when folded they run at an angle to the side of the quilt (making them less noticeable). Fold the strip in half lengthwise, finger-pressing or lightly pressing with an iron.
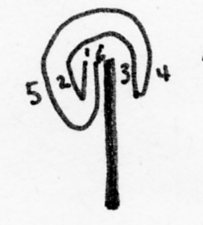
Think Boomerang: first the binding goes away, then it comes back:

1. Sew binding strip to the quilt edge, beginning at least four to six inches from a corner, and leaving a tail of about four to six inches (on large quilts, 12 inches or more is better), figure 1. In North and South America, Europe, and Africa, since we read from left to right and top to bottom, I like to start the binding on the lower left side, where the join is relatively unnoticed as the eye travels in its accustomed path across a quilt. Loosely run the binding strip around the quilt to make sure a seam doesn’t land on a corner (too much bulk); if it does, adjust your starting point slighly.
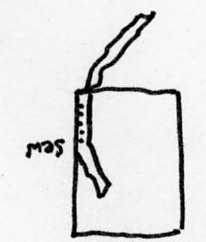
Double-fold Step 1

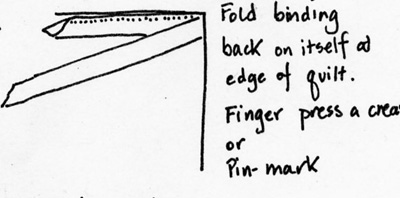
2. When stitching is about 2 inches from corner, fold the binding strip back on itself exactly on the edge of the quilt and finger press. You may wish to mark with a pin or chalk to see the line better. Diagrams 2
Double-fold Step 2

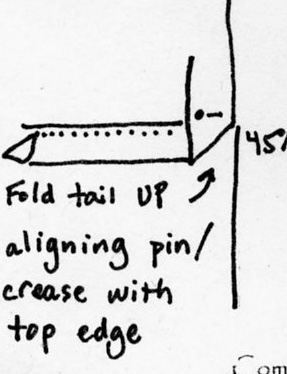
3. Fold the binding strip UP so that the marked line is now exactly even with the top edge of the quilt; finger press a crease at the 45 degree line. Mark with chalk on the inside of the binding if you need to improve visibility. Diagram 3
Double-fold Step 3

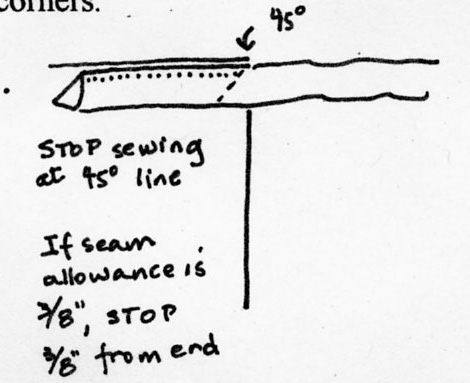
4. Continue to sew the seam until you reach the 45 degree chalk line. Backstitch 3 or four stitches. Diagram 4.
Double-fold Step 4

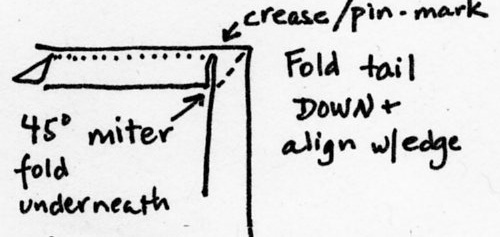
5. Pull the quilt out from under presser foot and (this is the boomerang part) : first fold the binding away on the marked lines, then back down so that the binding turns the corner and goes down the next side. Diagram 5.
Double-fold Step 5

6. Stitch from the very outside edge of the quilt down the next side. Diagram 6.
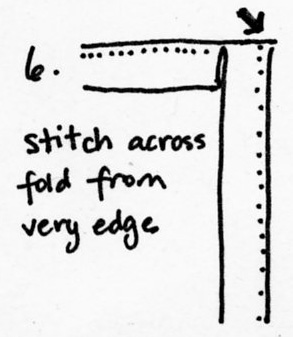
Double-fold Step 6

7. Repeat at the other corners.

8. Stop stitching about 4-6 inches from where you began.

After you have used this method enough, you will be able to fingerpress and eyeball the corner turns instead of marking.
Facings as an Edge Finish

Friday, July 20th, 2007

The following tutorial builds on the article published in the August/September 2007 issue of Quilting Arts Magazine. The Pillowcase (or bagged back, or escape hatch) finish for a small art quilt is simply a one-piece facing that covers the entire back of an art quilt. This method is useful if you have lots of knots or carried threads that you wish to cover, for example after extensively beading a piece. For larger quilts (or even small ones) you may not wish to cover the entire back. Instead, you can use facings. On a quilt with straight edges, like Koi, you can use a straight strip of cloth as I did here on the back / under / second side of this quilt. However, just like a dress neckline, facings work well on curved and irregular shapes. From the front, you can’t tell if this quilt is a Pillowcase backing or a faced edge:Faced quiltlet

Facings:
Borrowed from dressmaking, a facing is simply a piece of fabric that echoes the outside edges that is turned completely to the back side of a quilt. Large and small quilts with irregular edges are great candidates for facings!

1. Cut a strip of fabric that extends ½ inch beyond the outside outermost edge and 2-plus inches towards the center of the quilt from the innermost “innie”.

Facing a weird shaped edge

2. Pin the facing to the quilt top, right sides together, on the back side of the quilt.
3. Sew a ¼ seam (photo below, left)

Facings–sew seam, edgestitch
4. Trim excess fabric from the seam allowance.
5. Clip /notch curves, clip inside corners and trim outside corners.

Facings –clip curves
6. Press the seam as stitched. Fold facing over the seam allowance and press again.

7. Edgestitch facing to seam allowance a scant 1/8” from seam line; this will encourage the seam allowance to stay put and not try to roll back to the front. (photo above right)
8. Fold facing to the back, “favoring” the edge. The little bit of green that you see in the photo below is the “favored” edge, which is a bit of the front rolled to the back.

Facings, favored edge
9. Iron the seam allowance and facings towards the center of the quilt. (See Step 9, above)

10. Turn under the edge of the facing and stitch in place. See the photo about edgestitching to see the turned, pinned edge.

11. Repeat on the other sides, turning under the short ends of the facing and stitch down to create a completely finished facing.

Foolproof miters on any width binding–Binding Tutorials (1)

Friday, July 20th, 2007

The double-fold bias binding with a mitered corner is probably the most familiar edge finish for contemporary quilts. In the set of mini-quilts I made for my forthcoming article on bindings in Quilting Arts magazine (August 2008), I created an outside edge that includes corners, a point, and inside and outside curved edges which covers most of the challenges you will face.

I hope you’ll check the forthcoming issue (due on stands and in mailboxes near you at the very end of July and early August) for more details. Because there is only so much space available, they didn’t have room to include instructions for “any-width” bias binding, only 1/4″ bias binding. I actually prefer this technique to the one described in the article, so you have my permission to make ONE copy of this blogpost, for you personal use ONLY (since I make a living, albeit modest, teaching and selling quilts, thank you in advance for respecting my copyright!).

As soon as the article is out, I’ll insert a picture of the mini-quilt here. In the meantime, the close-up above of a good mitered binding will have to do! Thanks for understanding!Cut your binding strips SIX times the width of the desired binding,Double-fold Wrap plus ¼” (or up to ½” extra if you’d like a little more wiggle room). For a binding that finishes at 3/8” that is [(6 x 3/8) + 3/8 = 18/8 + 2/8 = 20/8 or] 2 ½ inch wide strips. Sew your binding strips together with a ¼” seam allowance until you have the length of your quilt perimeter plus several inches. The seams are on the straight grain, so when folded they run at an angle to the side of the quilt (making them less noticeable). Fold the strip in half lengthwise, finger-pressing or lightly pressing with an iron.

Think Boomerang: first the binding goes away, then it comes back:

1. Sew binding strip to the quilt edge, beginning at least four to six inches from a corner, and leaving a tail of about four to six inches (on large quilts, 12 inches or more is better), figure 1. In North and South America, Europe, and Africa, since we read from left to right and top to bottom, I like to start the binding on the lower left side, where the join is relatively unnoticed as the eye travels in its accustomed path across a quilt. Loosely run the binding strip around the quilt to make sure a seam doesn’t land on a corner (too much bulk); if it does, adjust your starting point slighly.

Double-fold Step 1

2. When stitching is about 2 inches from corner, fold the binding strip back on itself exactly on the edge of the quilt and finger press. You may wish to mark with a pin or chalk to see the line better. Diagrams 2

Double-fold Step 2

3. Fold the binding strip UP so that the marked line is now exactly even with the top edge of the quilt; finger press a crease at the 45 degree line. Mark with chalk on the inside of the binding if you need to improve visibility. Diagram 3

Double-fold Step 3

4. Continue to sew the seam until you reach the 45 degree chalk line. Backstitch 3 or four stitches. Diagram 4.

Double-fold Step 4

5. Pull the quilt out from under presser foot and (this is the boomerang part) : first fold the binding away on the marked lines, then back down so that the binding turns the corner and goes down the next side. Diagram 5.

Double-fold Step 5

6. Stitch from the very outside edge of the quilt down the next side. Diagram 6.

Double-fold Step 6

7. Repeat at the other corners.

8. Stop stitching about 4-6 inches from where you began.

After you have used this method enough, you will be able to fingerpress and eyeball the corner turns instead of marking.