email Youtube

Home
Galleries
Blog
Workshops & Calendar
Store
Resources
About
Contact

Archive for the ‘Sewing hints’ Category

Perfecting the Tote Bag–Part 2, the Sheep in Sweaters Tote

Wednesday, September 27th, 2023

So FINALLY we get to the Sheep in Sweaters Tote!  When I started the previous post, I discovered I’d never blogged about the turquoise tote, which is the forerunner and partner of this one!  I will say now that I have finished this post (Part 2), it is LONG–but I wanted to be sure you got ALL the good info. If you’re here for just the totebag part, skim the embroidery bits! Thanks for reading!

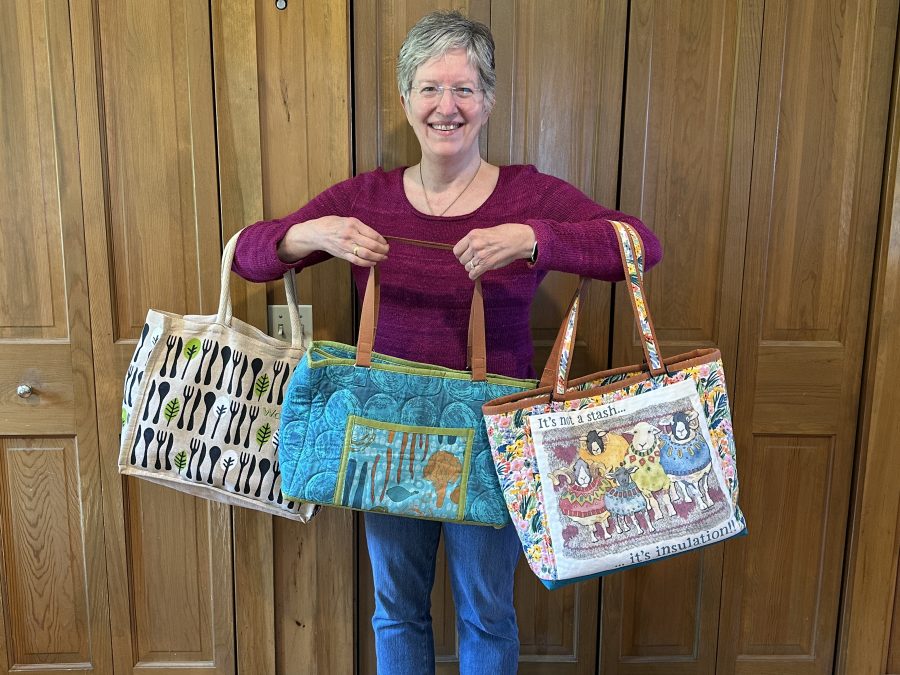
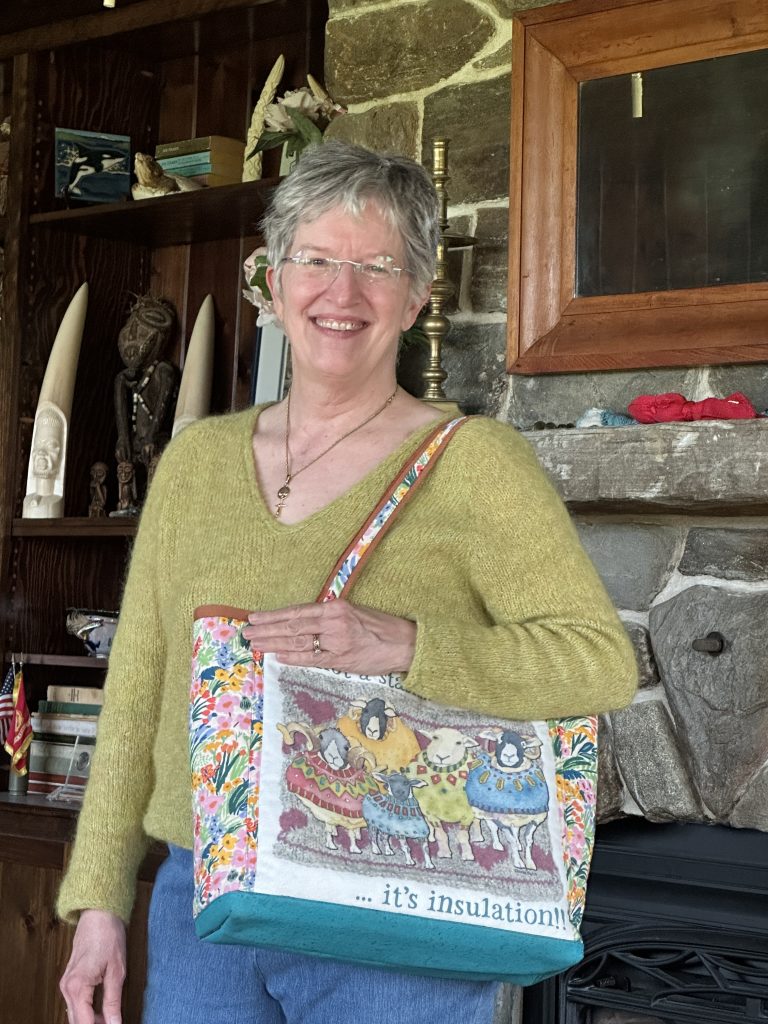
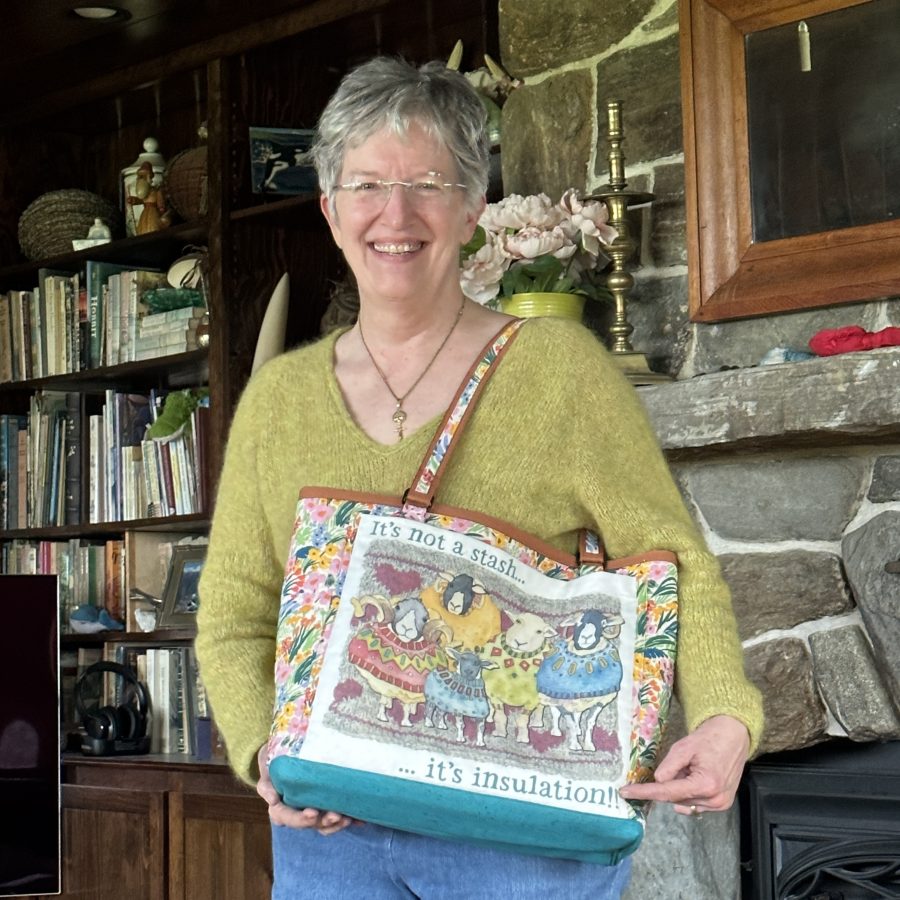
Those of you who get my newsletter (sign up in right sidebar on this blog or the bottom of all the other website pages–if you prefer enter 12345 as your zip code when it asks) or follow me on social media (@sarahannsmithq and @sarahannsmithartist on FB and @sarahannsmithdesigns on IG), may remember that in 2022, older son Joshua, daughter-in-love Ashley and I spent two weeks in Scotland.  While there Ashley spotted a hilarious totebag with this illustration.  It was a soft, squishy tote, but inexpensive so I bought it and vowed I would convert it into a bag I LOVE!
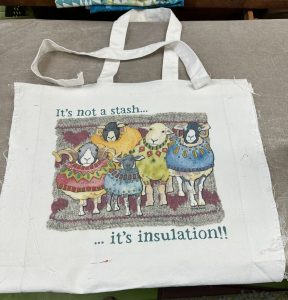
I forgot to take a photo before I picked out the side seams, but you can tell it is pretty supple.  Great for packing flat into a suitcase, but collapses and not so comfy when full.  In a minor miracle, it has only taken about a year to re-make it.  In the last post, I mentioned that I really like bags that stand up on their own, and that I wanted at least one pocket large enough to hold a knitting pattern in a page protector and/or an iPad.   FYI:  links to supplies / info on products is at the VERY end of this post.

The overall size of this tote was determined by the size of the image in the photo above and the width of the fabric I purchased to go with the colors of the illustration.  At Fiddlehead Artisan Supply (online shop, but if you EVER get anywhere near Belfast, Maine, you MUST go–quilting and garment fabric, books, art supplies galore, craft supplies…. LOVE), I found a Rifle Paper Company fabric with just the right colors.  Since it was about 43-44″ wide, that determined the circumference of the bag (didn’t want to buy a whole extra 27 inches to get just a short side panel!).  As with the turquoise onions tote, I quilted the fabric first, using cream thread and going around the motifs in the print.
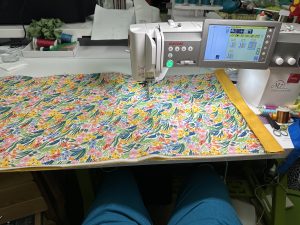

I DO recommend clearing the area of stray stuff, like paper….that you really didn’t intend to quilt into the bag.  Ahem. Another truth-in-teaching moment……
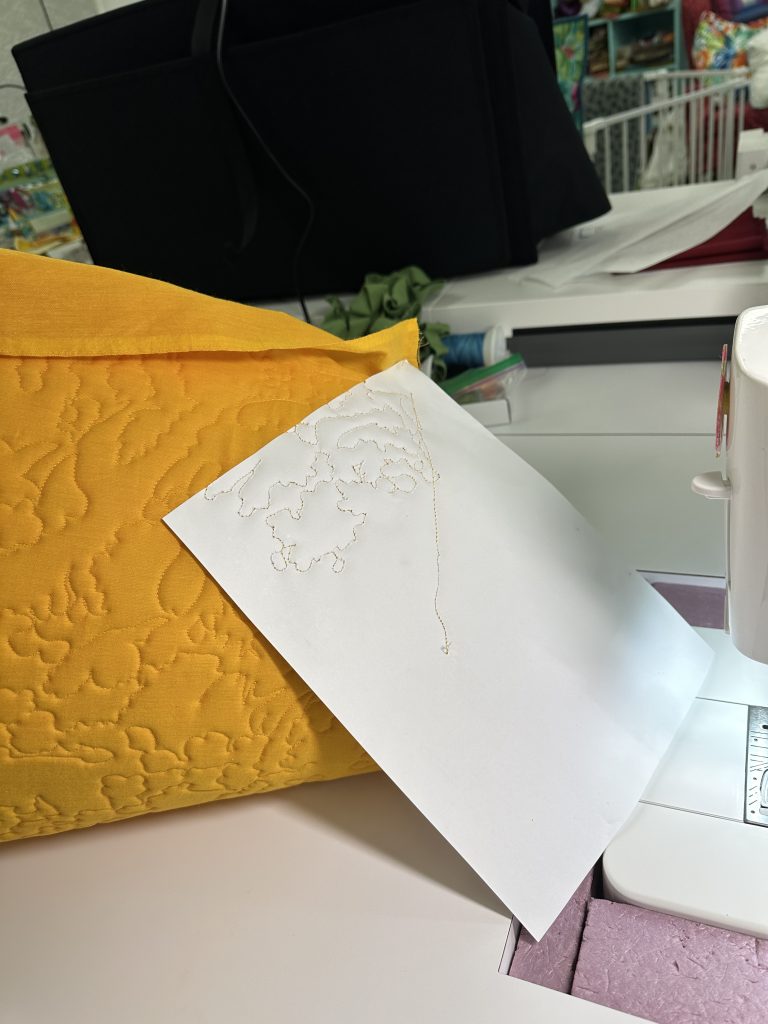

At least you can see the lovely quilting pattern?

This year, as a Janome Artisan, I am one of the very few who was unbelievably fortunate to receive the new, top-of-the-line Janome sewing, quilting and embroidery machine, the M17 Continental.  I was determined to overcome my trepidation and learn machine embroidery.  OMG–yes I am affiliated but I’d say it anyway–the fact that I could get this outstanding a result on literally my first attempt says a lot of very good things about the machine and software as my skill level was way low (but I’m learning!).  I purchased an 18-color-change Tula Pink design from the Moon Glow collection at OESD.  I adjusted the colors very slightly (my blues are darker) due to the bazillion threads I already have and to better blend with the fabric colors.

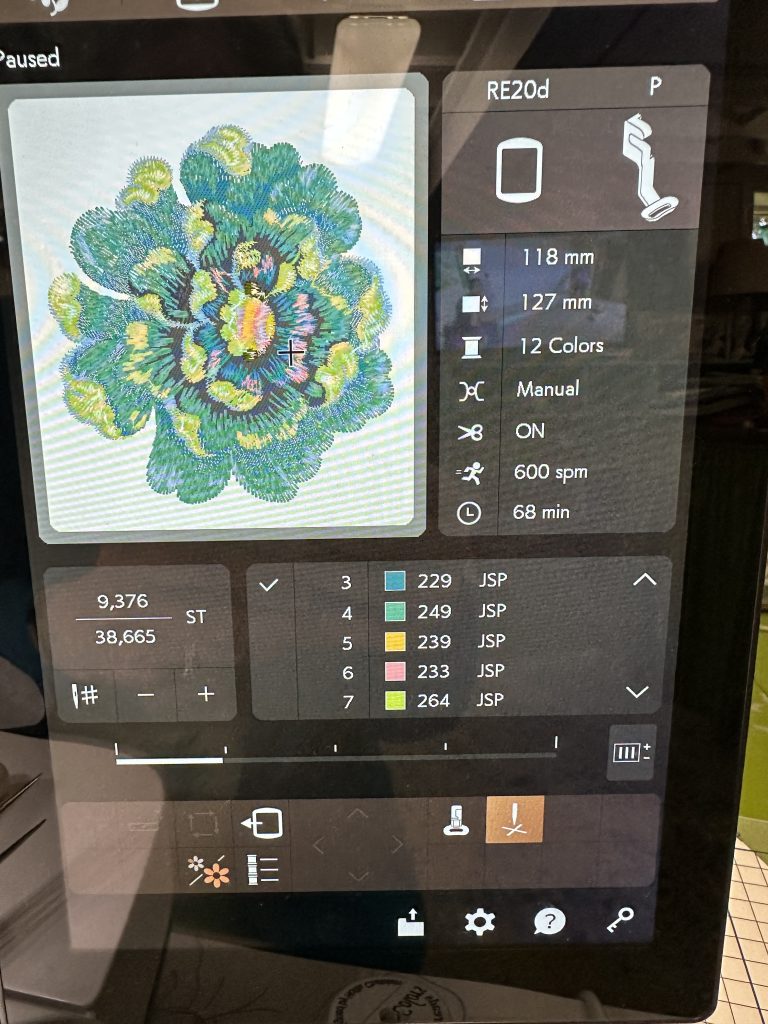
The Janome software now works with both Apple and pc-based platforms.  You can use the Janome software to digitize your own designs and such on the computer, buy designs etc., then air-drop / send by wifi to your tablet AND to the SEWING MACHINE!  No thumb drives!  No compatibility hassles!  Just boom–you input your WiFi info into the sewing machine, and it talks to your iPad, which you can carry around the house with you as the design stitches!   There are also several free Janome apps for sketching, monitoring, accessing manuals and other helpful info.  Anyway…. here’s the screen

From top to bottom you can see

  • the recommended hoop size for the design
  • the proper embroidery foot
  • the dimensions of the design ( I think you can also change the settings so it displays in inches, not cm, but that may be a function of the design)
  • that tension is adjusted to manual
  • automatic cutting is on
  • speed of stitching is set to 600 stitches per minute (you get tension issues sometimes if you go too fast depending on the design)
  • minutes remaining until stitching is complete
  • Below the image, you see how many stitches have been sewn out of the total of 38,665 stitches.   The + and – sign are helpful–if the thread breaks or bobbin thread runs out, you can back up a few stitches so there aren’t any gaps in stitching!
  • To the right of that section, are the thread color (sequenced) and the thread color number if you are using a color supported in the software.  It is displaying the Janome thread colors but also supports major embroidery thread brands (but not alas the Superior Threads trilobal poly of which I have hundreds of colors, so I just winged it and chose colors, marking out which color corresponded)
  • A progress bar for stitching is below that.
  • In the very bottom you can see a square with arrows–that is to baste near the outside of the hoop to secure the stabilizer and fabric before stitching, and the brown box with a needle pointed at an X is to help you precisely position the design within the hoop.

Yes, as a total newbie to embroidery, I had to learn what all those things were, how to adjust this and that, but the fact that *I* could do it successfully on my first outing is a testament to good planning and design on Janome’s part.  Here are some photos from the embroidery process:

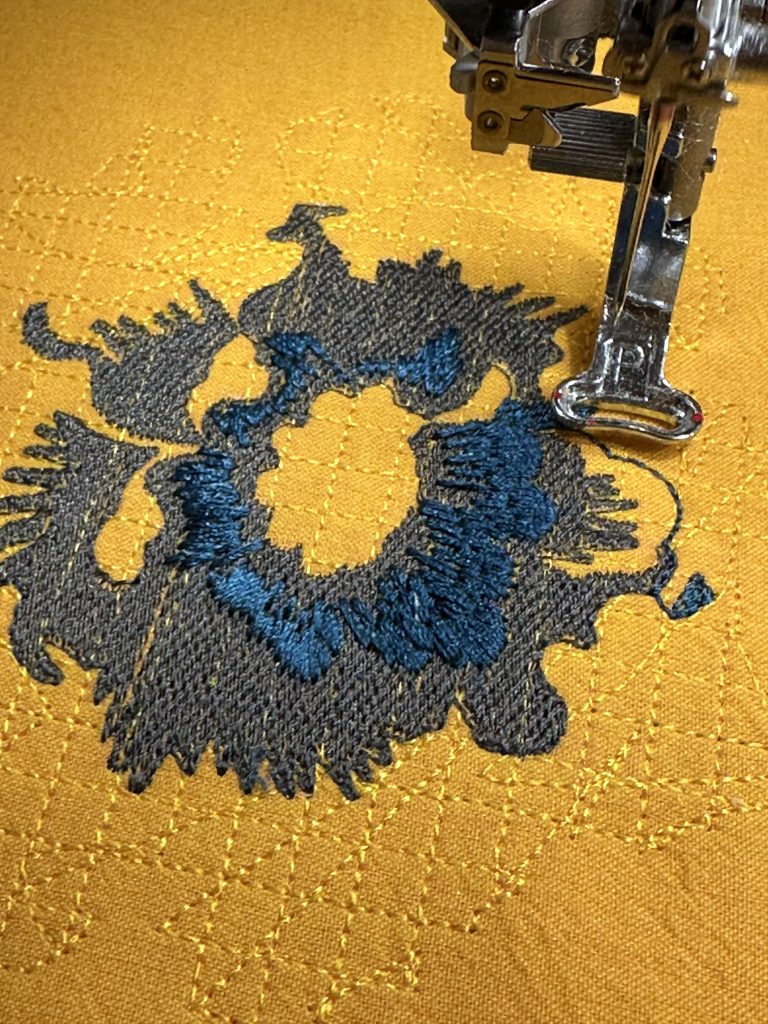
First, the design stitches a grid in a thread color to match the background fabric.  I am assuming this is to stabilize the fabric and prevent directional distortion from the way the stitches are programmed.   The first two layers were the dark gray, which is a pebble texture, then the darker blue in an extra long satin stitch that looks oh so lovely when all is done.

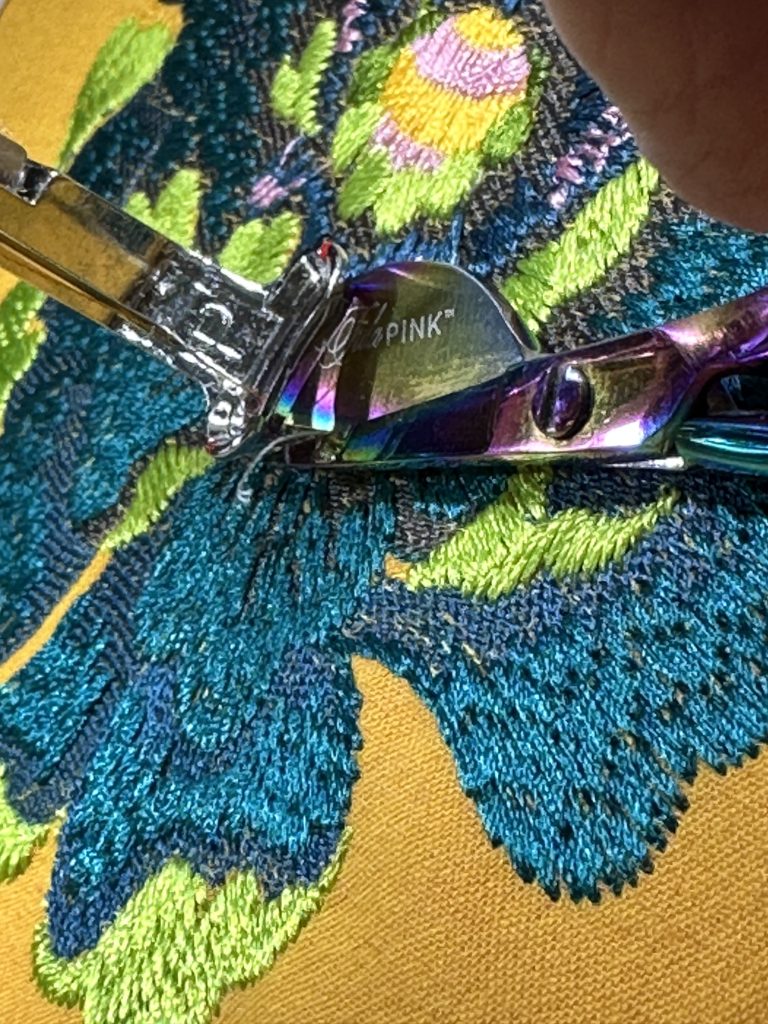
A lot of the stitching is now complete.  Having offset, duckbilled scissors (these were a gift from my dear friend Marie Z) helps a LOT when trimming threads close to the surface while still in the hoop).

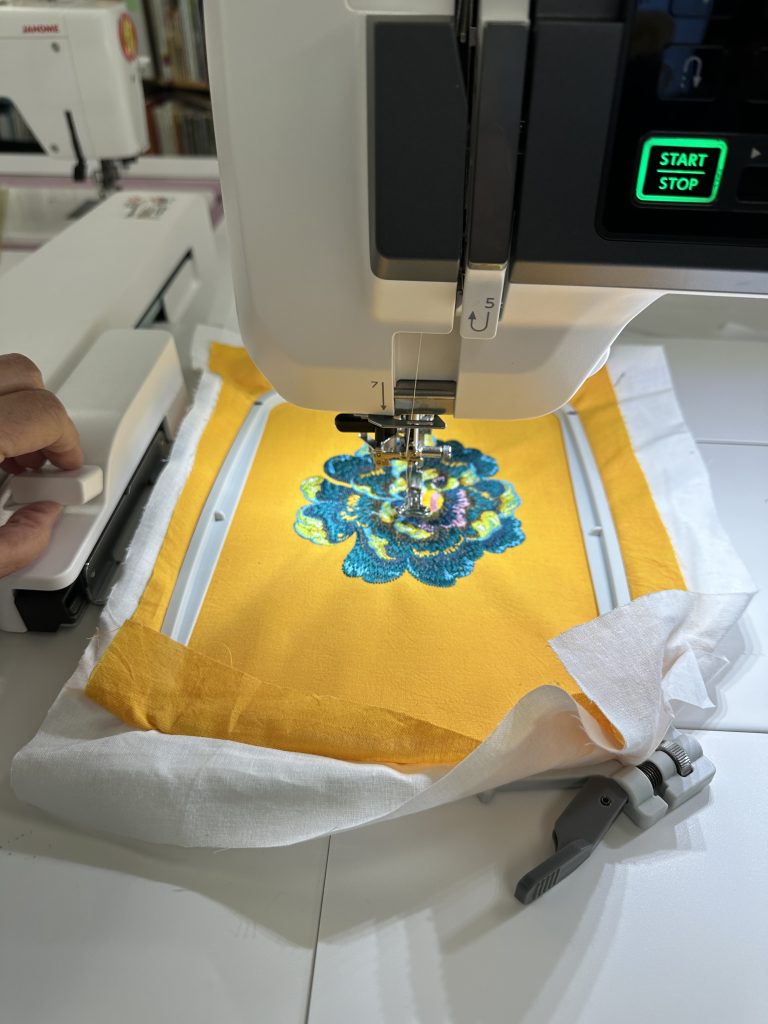
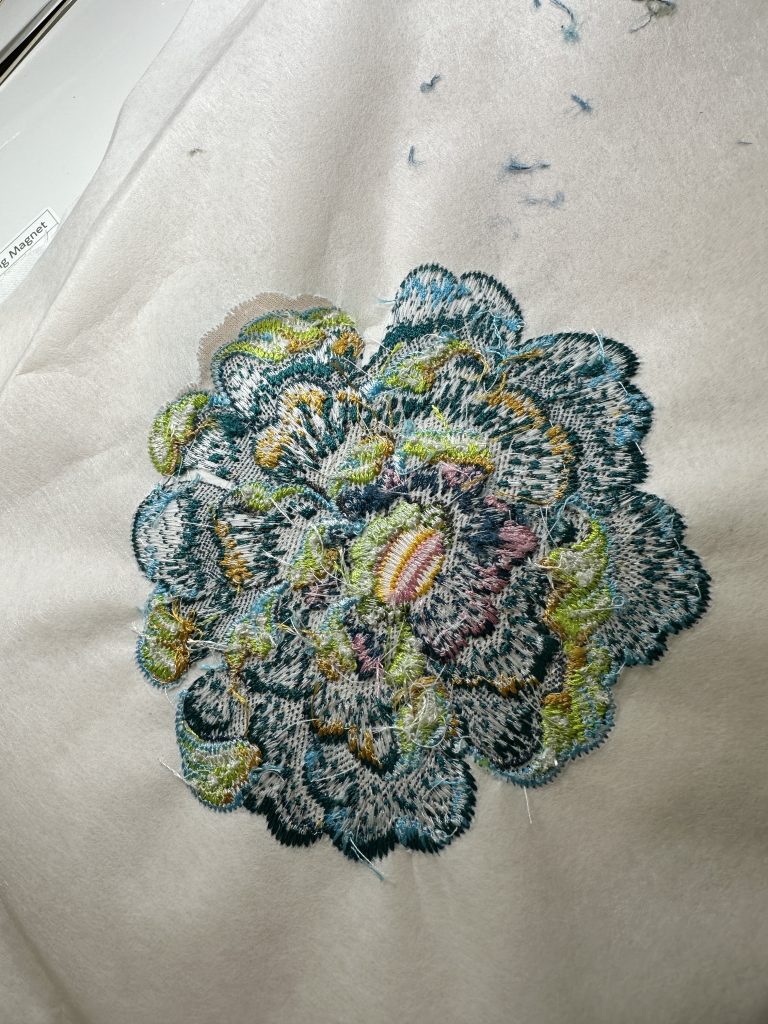
The design is now completely stitched out and I am releasing the hoop from the carriage (on the left).

This is the back of the design… which frankly I think looks pretty good.  I used a soft shot-cotton plus one layer of sturdy stabilizer. I was a little concerned at some buckling despite hooping very snugly, but it pressed flat very nicely.  However, on a design as large as this one, about 4×5 inches, I might add a second layer of stabilizer next time.  I used the triple-stretch stitch to decorate the rest of the pocket background–this is a common utility stitch on many machines.

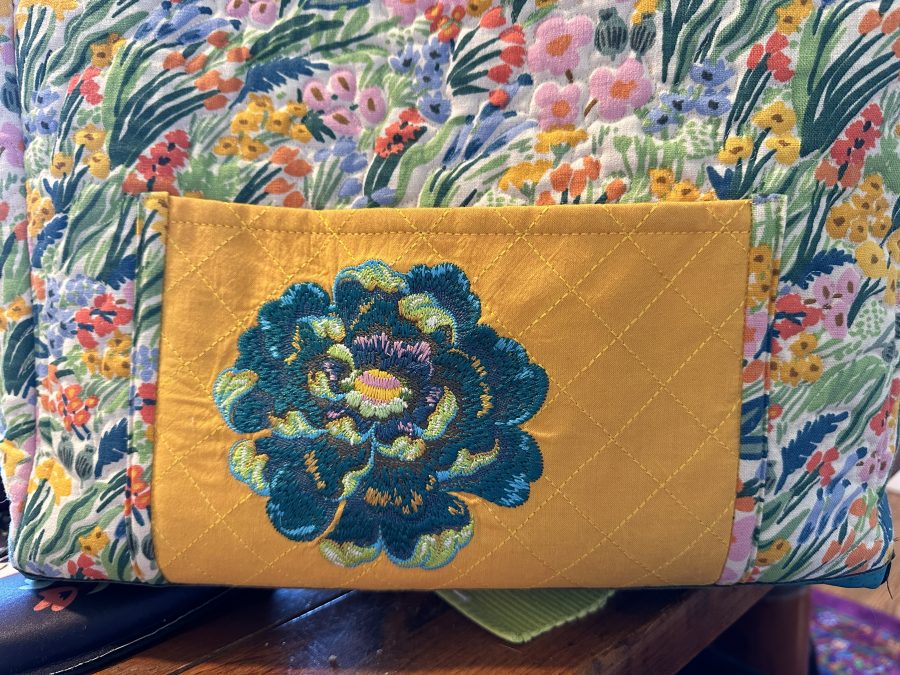
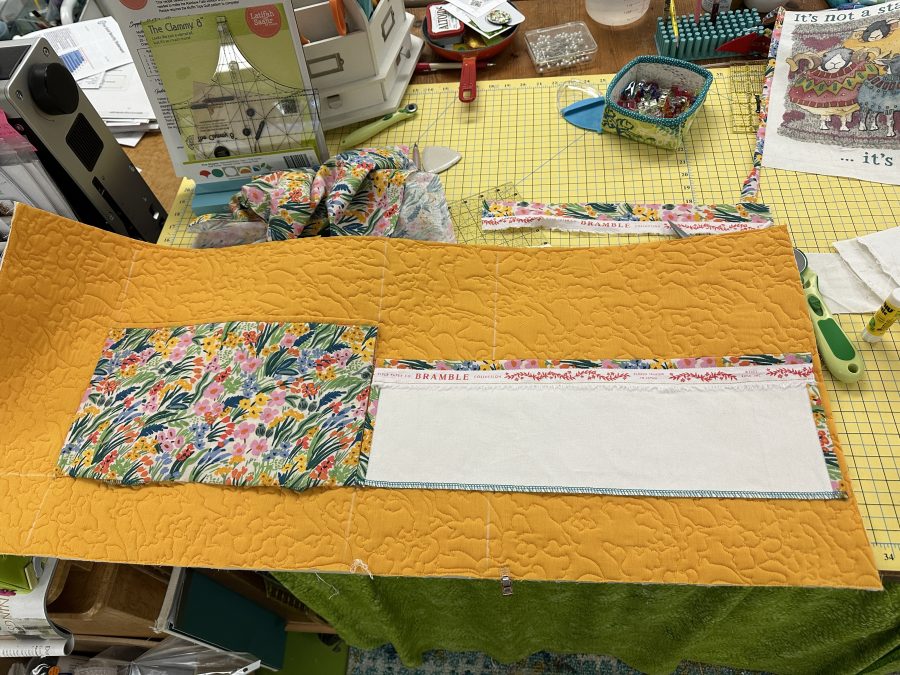
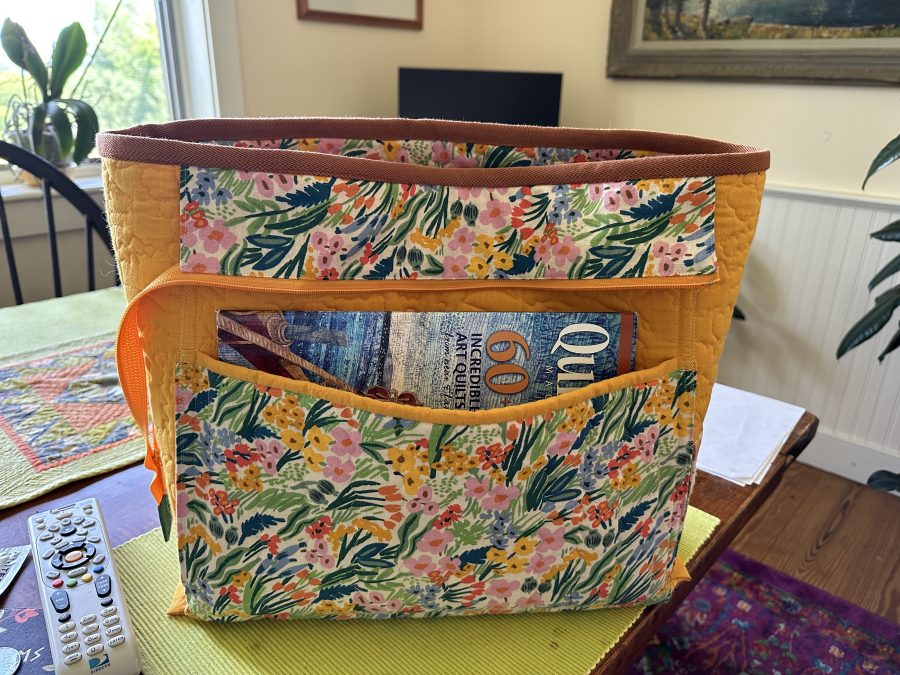
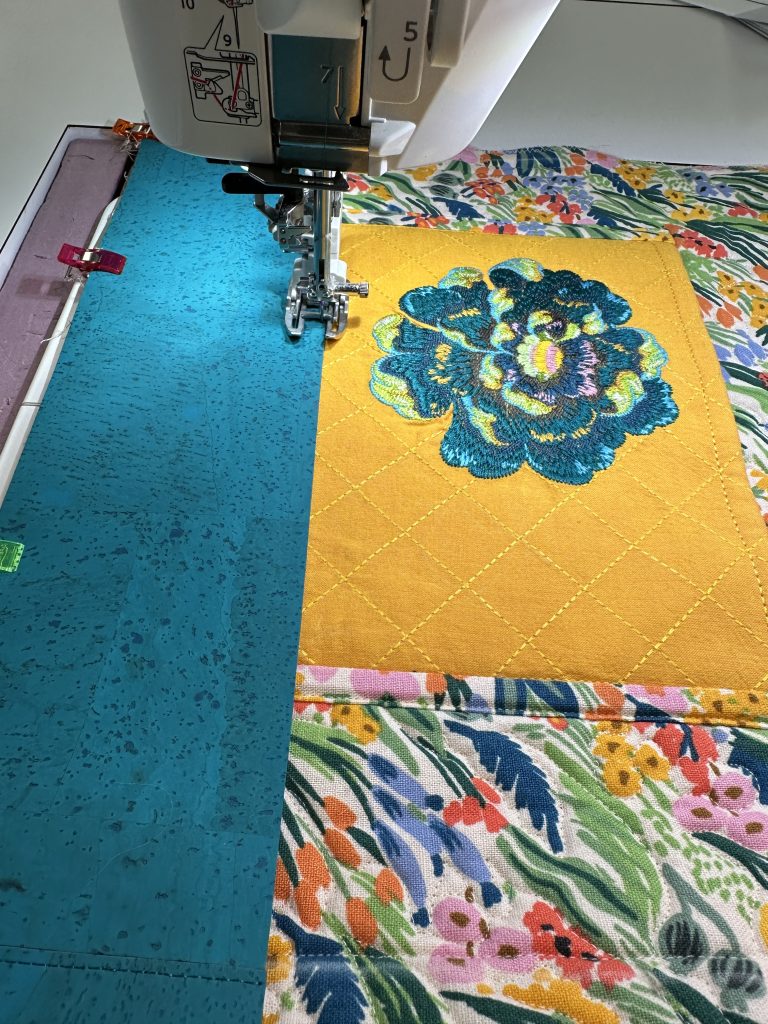
Next was assemble the parts.  In the photo above, you can see that I used a strip of print fabric cut 1″ wide, with edges folded to the center, to appliqué the Tula pocket (and also the front of the original totebag to the front of the bag).  The Tula Moon Garden Flower 3 (link at the end) embroidered pocket is on the side that faces my body…sized to hold my cell phone and safe from pickpockets by being on the inside.  I like the idea of a wipe-clean base for my bags–there is a lot of scuzzy, icky stuff out in the world.  AND by having something sturdy cover the bottom 1/2-1″ of the sides, it protects the corners from wearing out.  I used cork fabric from FabricFunhouse (a wholesaler, but they also sell retail–click on the link in the name).  The inside pockets were sewn on first (see photo below).  There is a single patch pocket behind the sheep-in-sweaters that is slightly narrower, so the stitching doesn’t show on the outside.  On the other part of the interior, I used leftover canvas from the original bag and the pretty selvage as a trim.  You can see my chalk-,asked guidelines.

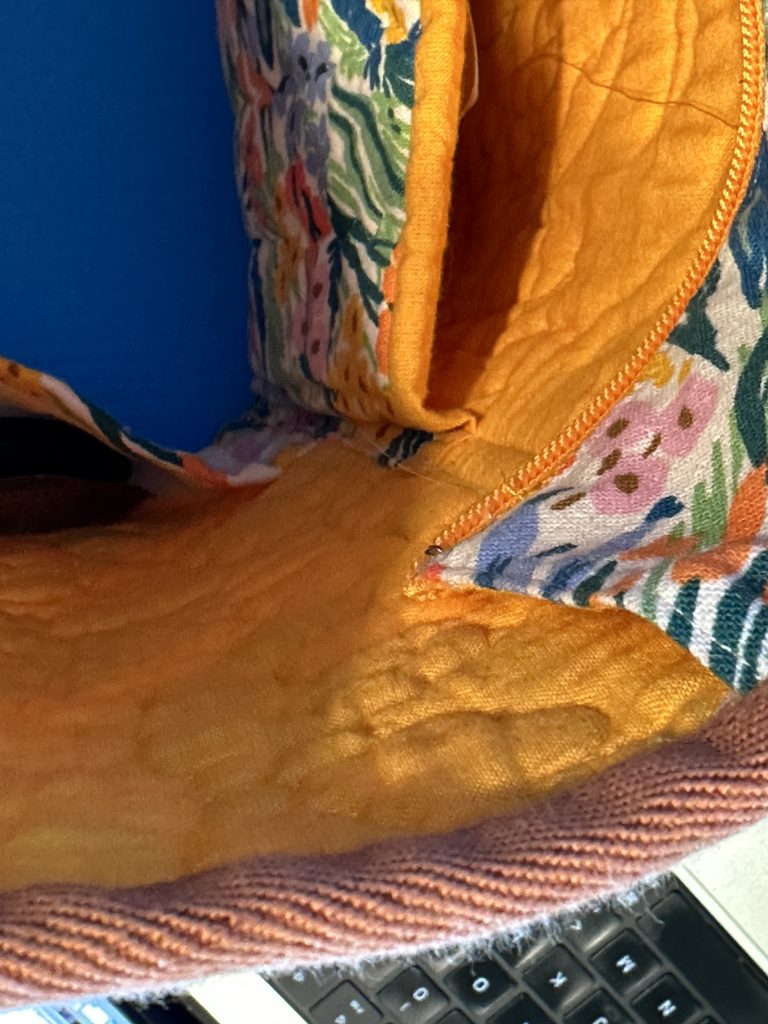
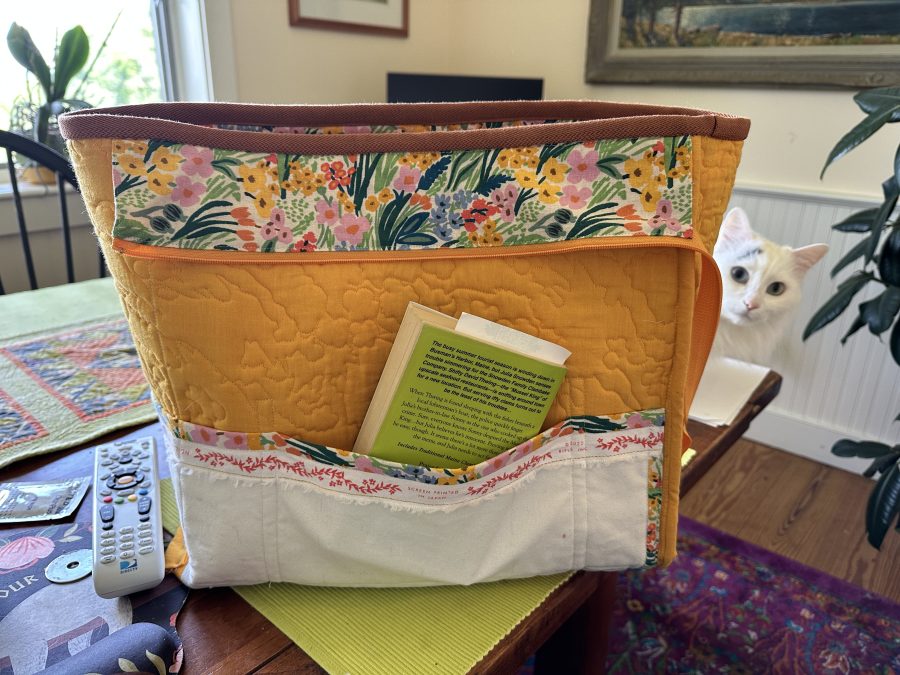
It was on the printed pocket that I had my brainstorm!  I wanted the pocket to stand up and not flop, but if I had used the Soft And Stable all the way to the edges of the pocket it would have been way too thick and lumpy and hard to sew.  SO!  I cut the Soft and Stable about 2″ narrower than the full width of the pocket!  That meant I would have just the fabric on the edges, allowing me to sew the pocket in place, making a little pleat on either side.  Easier to sew and lets me slide my iPad inside without bulging. Mo’ bettah! (see second photo)

Here’s that side of the bag after it was completed:

Then I added the outside pockets.  The Tula flower pocket was sewn on so that the stitching created divisions in the interior pocket.  Here’s what it looked like when done.

Once the pockets were sewn it was time to add the cork on the outside/base and close up the bottom.
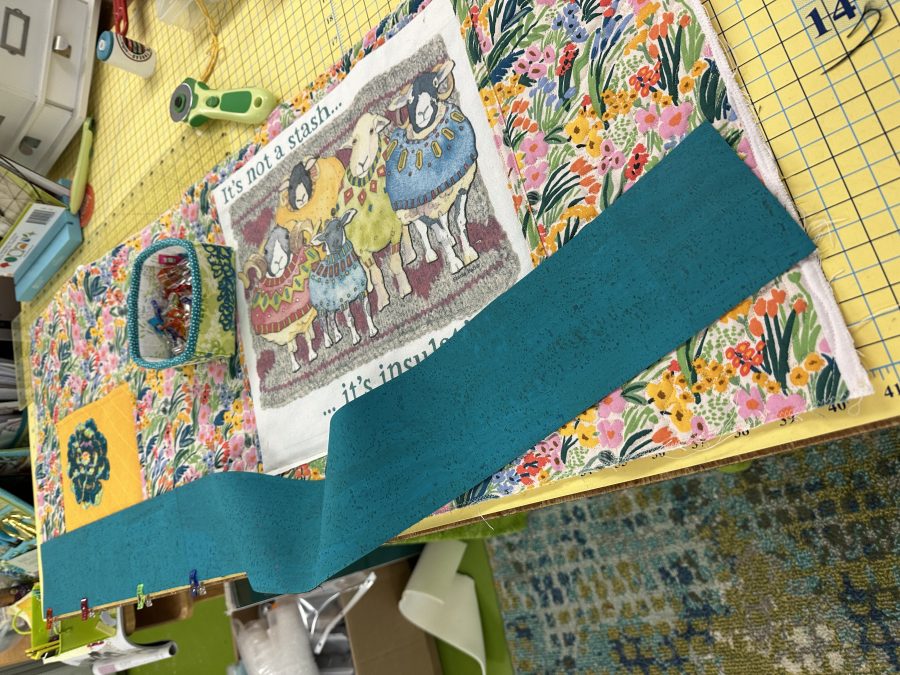
All these layers on the bottom made an extremely thick base, but a good sturdy machine like the HD9 from Janome (does only straight stitch, reasonably priced) or models like the 6600, M7 and so on, are all plenty strong enough.  See some caveats below though for safe sewing!

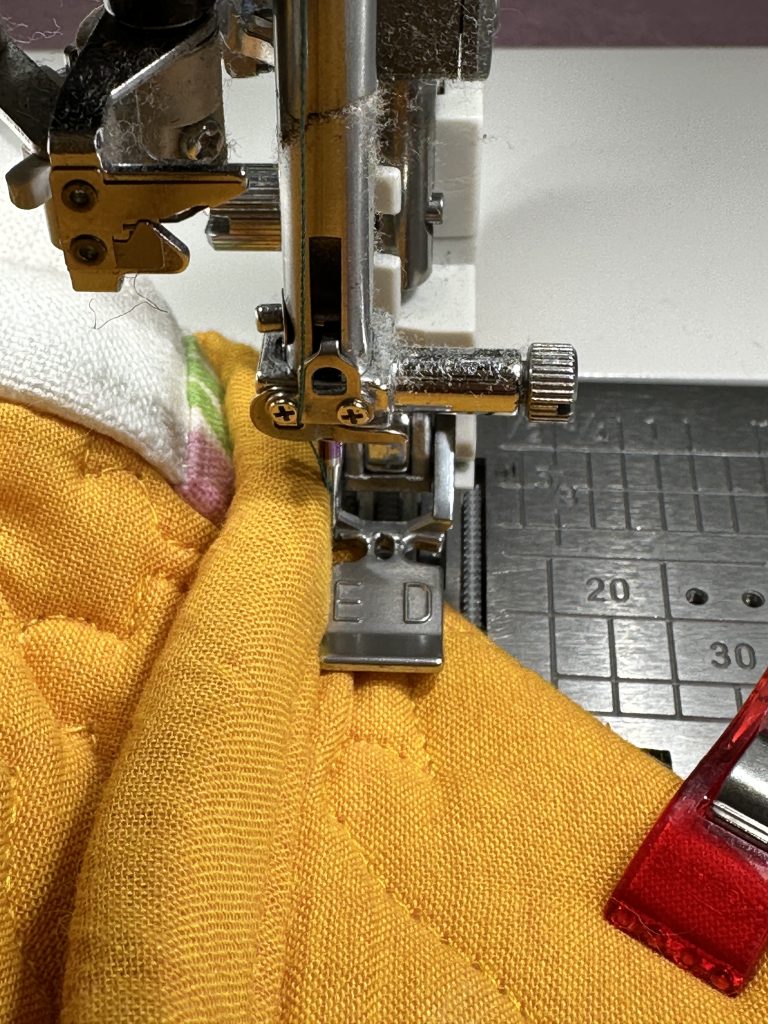
When sewing on cork, use a longer stitch. If you use a short stitch, it can perforate the fabric and it will tear like paper in a spiral notebook!  I think I used 3.5 length.  Notice that the right side of the Acufeed (Janome’s integrated dual-feed “walking” foot) is just OFF the cork.  I am using the inside edge of the foot and the precise positioning possible by moving the needle to one of the 19 positions to get perfect stitching alignment along the edge of the cork.

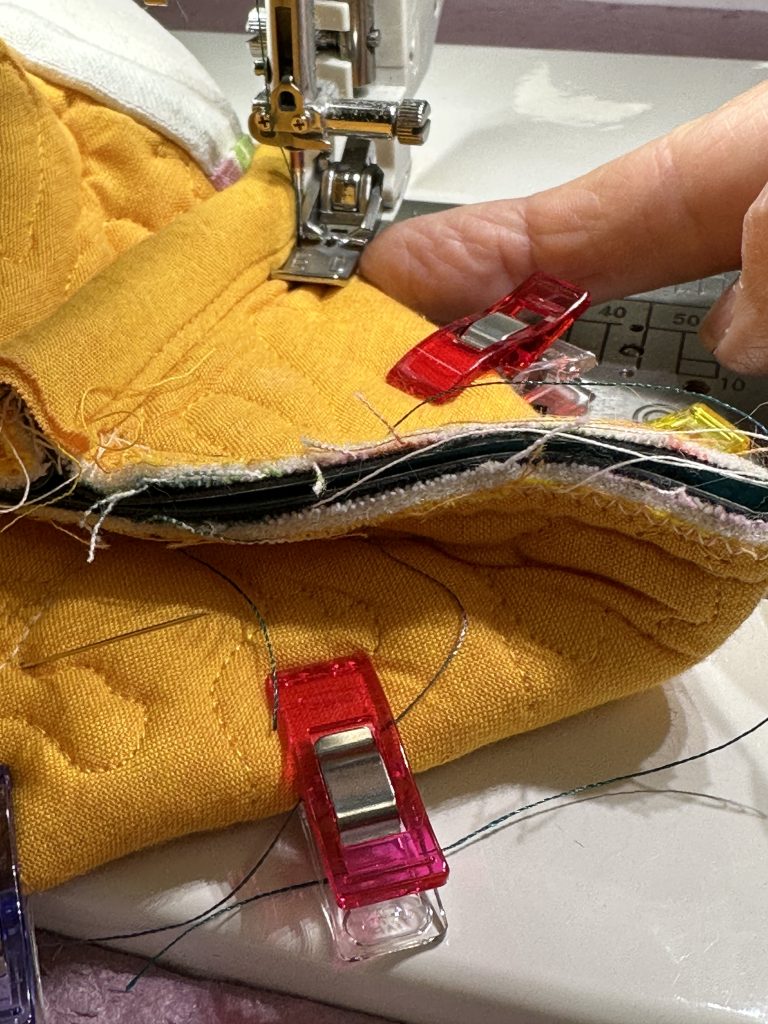
Once the cork is applied, I folded the bag so the vertical seam was in a corner. Boxing the corners is a bit of a heart-stopping effort for me.  I folded the corners to “box” it, making sure everything was squared up correctly.  That is a crazy thick amount of fabric on those corner triangles:   two of lining, two of the Soft and Stable, two of the linen-cotton light-canvas print, two of cork).

Here I am starting to sew from the outside edge to the center at the corner with the vertical seam (which extends to the center of the bottom of the bag).  I like to put something like a needle case or folded fabric about where my finger is pointing to get over the thick hump.  Clover Wonder Clips hold things way better than pins and don’t bend and distort.   I work from the outside to the center on each side of each triangle to avoid having to sew through the impossibly thick center seam.  Just sew up to the seam, HAND WALKING THE NEEDLE as you approach the center seam.  The machine is plenty strong enough to send the needle through, but needles are actually flexible and can BEND and “deflect” (get pushed sideways) just going through all those layers.  If that happens, then they hit the throat plate, break, yada yada–you don’t want that to happen!   So just hand walk those last stitches, then push reverse and hand walk going backwards.

PHEW… always exhale when this part is done.

A close up to show how snugly I have the foot up against the seam.  Gulp. Onward to finishing!

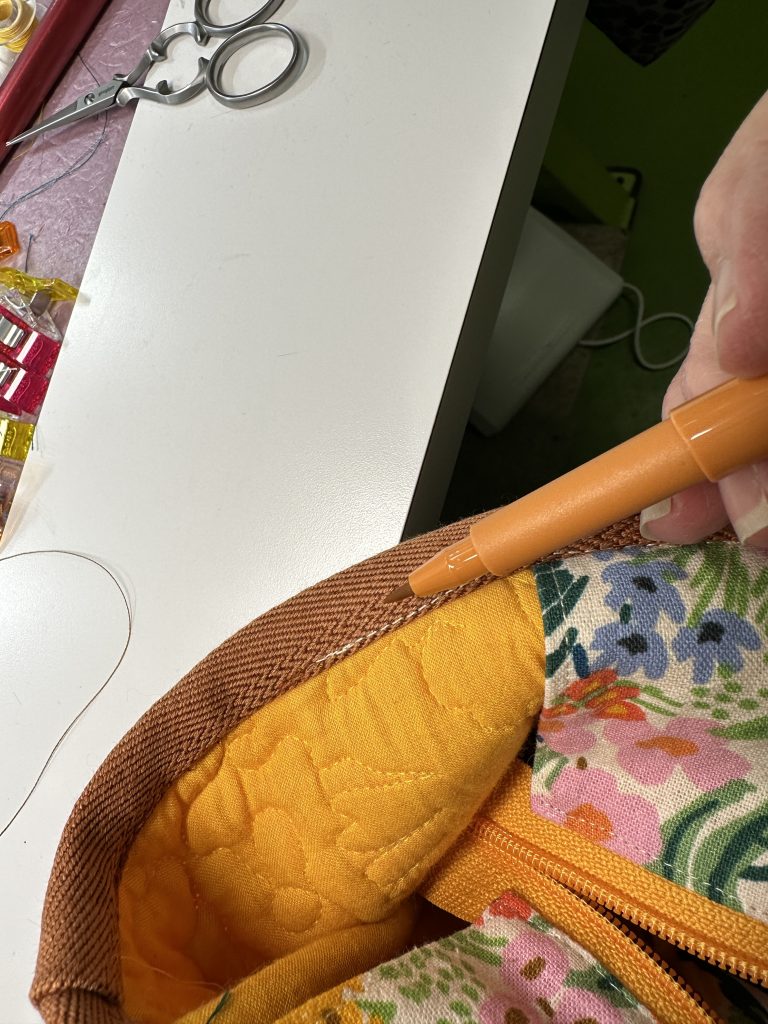
I trimmed away about 1/4″ of the carpet binding tape and put that raw edge next to the top of the bag on the inside and stitched it in place. I turned the tape to the outside and sewed it down using a cream colored thread which matched the zipper flaps.  But looked awful elsewhere.  Pitt Artist Pens (like Pigma but more colors–I get mine at Dick Blick online or at Fiddlehead) to the rescue!

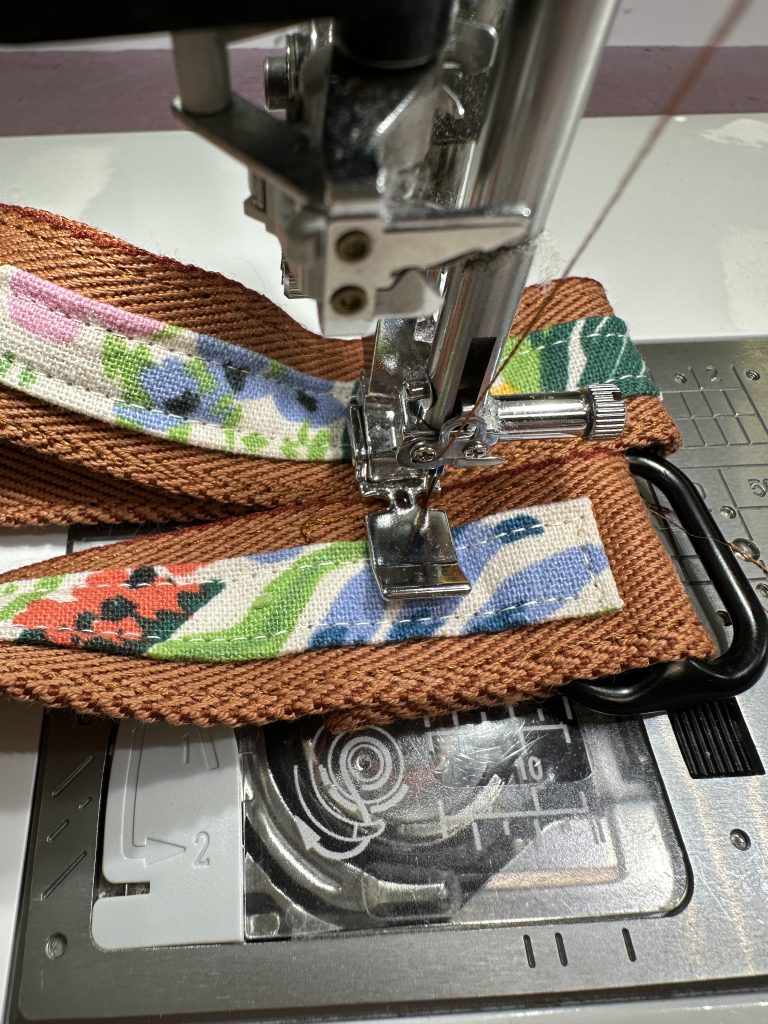
Once again I used that carpet binding tape (think for rug hookers and such) as the straps.  I had the fun idea to use a strip of the print, just as I had used to appliqué the pockets in place, down the center of the handles, which otherwise were very brown and kinda overwhelmed the bag (no other color available at the time worked as well).  I LOVE the final look of them.  I stopped the strip up above the hardware to make it easier to sew.  In the photo above, I am using the other end of the handle to hold up the back of the presser foot and level it out, making it easier to sew to the very edges of the straps.  I used folded print fabric to make the tab that holds the hardware in place.  I could have sewn the straps directly to the bag, but if anything is going to wear out, it would be the handles.  This way I can replace the straps easily.  AND they hang down nice and flat by being attached with hardware instead of being sewn directly to the bag–that may not matter to you.  Do what works for you!

And Sorry this is SO LONG–want to get it all into ONE post.

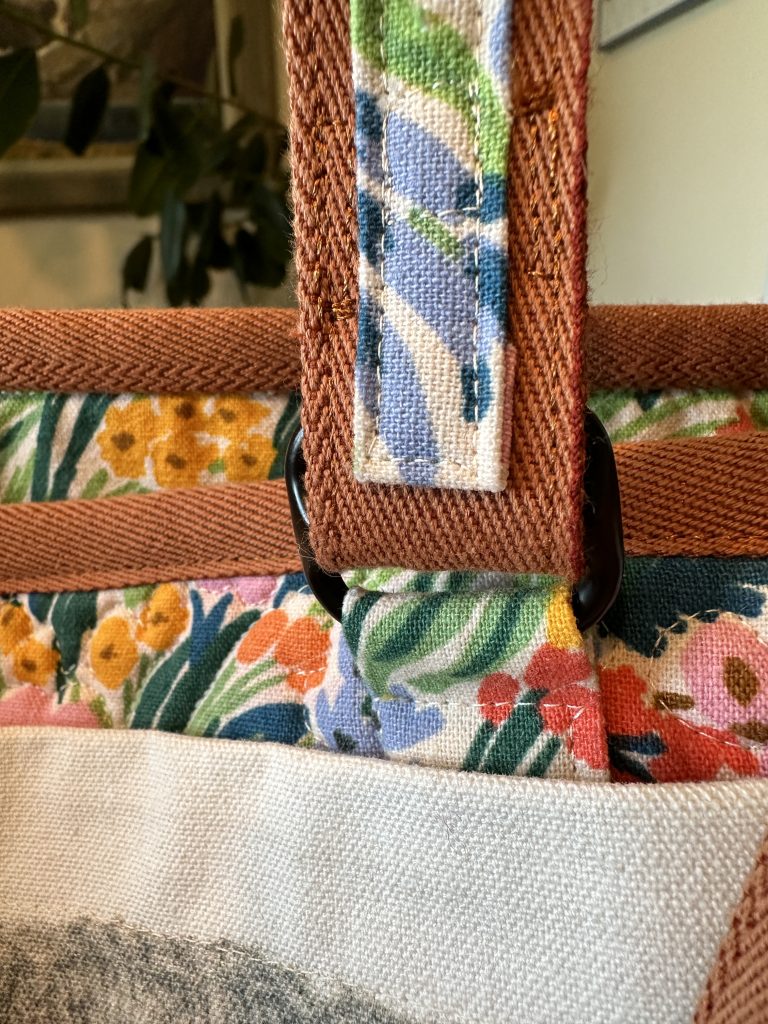
You can see how I stitched the handle to the hardware, and the hardware to the cloth tab to the bag.  The cloth tab is partly hidden by the large outside pocket.  The top of the pocket gapped, so I used magnets again just at the center top of the bag.

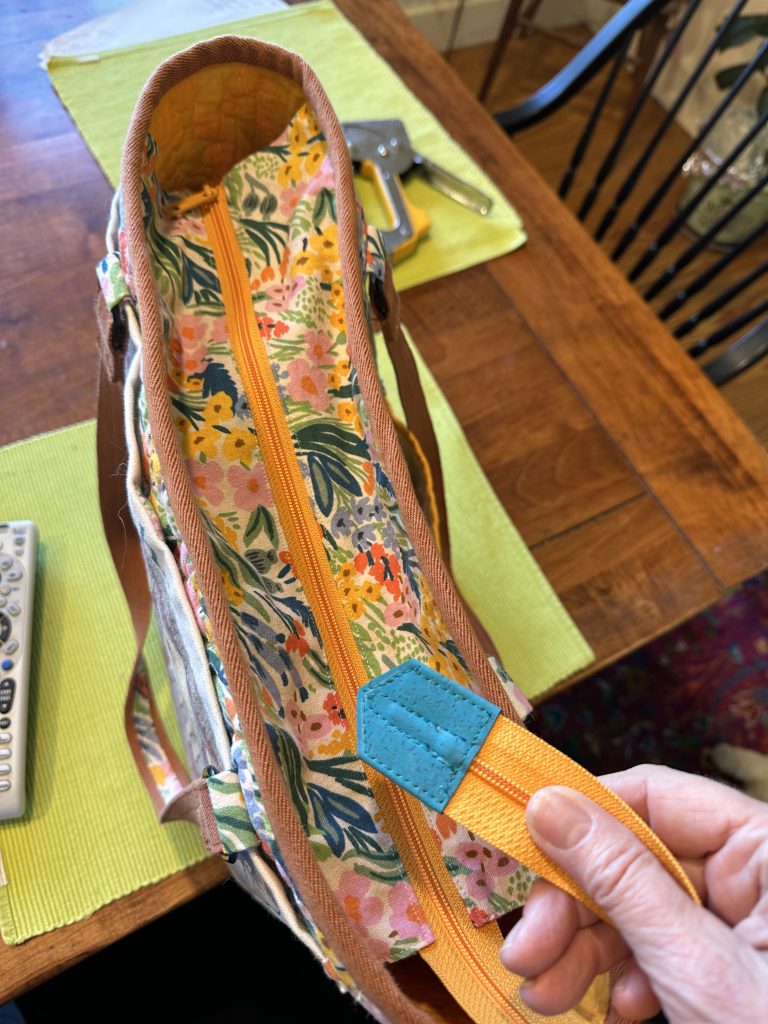
For the closure I only had one yellow zipper and wanted to finish the bag in time for a trip, so instead of the double-zip I opted for this:

The ends, unlike the turquoise bag, are open.  I left the zipper tail LONG so that when full unzipped the flaps fold flat inside the bag and the tail hangs down out of the way (look at the pocket photos above).  I used a scrap of the cork to cover the end of the zipper.  Lesson:  it is good to have a stash of zippers on hand!  Time to order more from byAnnie— by the way Annie Unrein is one of my favorite people in the industry.  I love her patterns and the quality of the items she sells is top notch.

Final thoughts:  I still prefer the East-West orientation of the turquoise tote–the overall size and shape I like better.  But this tote size was dictated by the fabric and original tote, and it works also.  I LOVE the variation on the pockets on the sheep-in-sweaters totebag and will definitely use that un-padded edge trick again.  I prefer the two-zipper closing because …well… CATS chewing yarn is not fun.  Or healthy for them.  But for most folks the simple version I used on the sheep tote is just fine and dandy.

THANK YOU if you actually read all of this marathon of a post.  I hope you got some good ideas! If you design your own tote, do send me pictures!

SUPPLIES AND LINKS:

I used the following supplies–note, you can find hotlinks to some of these products on Amazon by going here:

  • Fabric from Rifle Paper Company and purchased totebag
  • Cork fabric for the base from Funhouse Fabrics
  • byAnnie Soft and Stable for the “batting”–it is a foam with a peached (softly fuzzed) fabric that looks like nylon tricot but soft and grippy
  • Polyester and cotton threads
  • Carpet binding tape–I folded this in half, sewed at the edge and presto, nearly perfect handles that are soft, sturdy and comfortable.  Purchased at Fiddlehead Artisan Supply but not on their website alas.
  • Bag rings/rectangles–I bought mine from byAnnie but Sallie Tomato also has a good selection
  • Zippers from byAnnie –these zippers have wider tape and sturdy teeth that are perfect for bag-making
  • Magnets from byAnnie
  • OESD Tula Pink Moon Garden Flower 3
  • Corrugated plastic:  looks like cardboard but made of plastic, available at art and/or craft stores.  Cut to size to make a base for the bag.  Cover in a tube of fabric or leave as is.  Fabric is nicer, but…..life happens and sometimes that tube happens later!  Makes a fairly sturdy base, inexpensive, easily found.  You could also use cardboard or mat board, but they are more likely to bend eventually.

Perfecting the Tote Bag–Part 1, the Turquoise Onion Tote

Tuesday, September 26th, 2023

Confession:  I love boxes, bags, baskets….   the more, the merrier.  I still wonder what happened to that plaid and a little bit of leather bag I had when I was six!  And I love having my bags work for me, offering the perfect combination of color, print and cloth, and function.

Over the years I have learned that I HATE rummaging around in the pitch dark bottom of a deep bag.  I think of those as North-South bags, taller than they are wide.  I vastly prefer East-West–where I can actually FIND stuff inside.  It also means black and other dark linings are a big Nope.  I also like a bag that stands up on its own–no having to fight collapsing sides!

When in England in 2014 on a once-in-a-lifetime trip with younger son Eli, then 16, we stopped at a grocery store.  The store-brand totes were fun, sturdy, not bulky to pack, and inexpensive so I bought one for grocery shopping on the trip (he learned about frugal AND the occasional splurge method of travel, where I alternate thrifty lodgings and take-and-make meals with comfy hotels with hearty breakfasts).  That is the Waitrose tote bag you see in the photo above.  Once we got home, I decided it was just about the PERFECT shape:  wide, not too deep, a sturdy removable base so I can wash the bag but have structure to hold the stuff in it.  The Waitrose bag collapses though, so I vowed to make one that checked off my must-have items:

  • sturdy base
  • stands up by itself
  • comfortable handles
  • pockets, inside and out, including one large enough for knitting pattern, magazine or ipad
  • washable
  • base that is easily spot cleaned and more durable than woven fabric (I made an all cotton tote once, spent eons quilting it beautifully, and then the corners wore out in nothing flat and spill out white batting… BUMMERS)

Fast forward eight (OMG…gulp) years and I finally made the Turquoise Onion Tote.  Why turquoise onion?  Those round circles on the fabric were made from printing with an onion!  By late 2022, COVID had happened, things were starting to open up, and I wanted to pitch my ideas to fabric companies (alas that didn’t succeed, at least not at this point and likely not ever), so I printed some of my own designs at Spoonflower and made the turquoise and lime bag to carry and show off my fabric while meeting with company reps at Quilt Market.  The tote is pretty close to PERFECT. Alas, I apparently did not blog about it, just the ever-vanishing social media posts.  That means this post just turned into two parts, this one about the turquoise and the next about the sheep in sweaters!

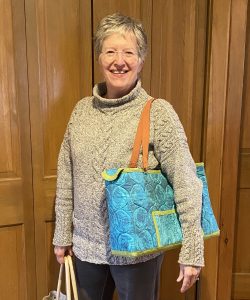
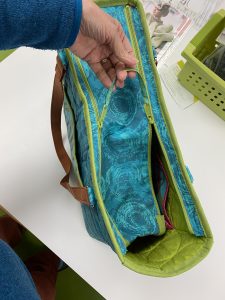
The turquoise bag is the same width as the Waitrose bag, but not quite as tall.  It has two flat outer pockets of different sizes (for readily grabbing the cell phone or business cards), assorted interior pockets, a removable base, and a zippered top that completely encases the contents, meaning cats and puppies cannot access and chew a knitting project inside of it!

I used the following supplies–note, you can find hotlines to some of these products on Amazon by going here:

  • Fabric from Spoonflower (my designs, not currently available but maybe someday) and commercial fabric
  • Synthetic suede for the base
  • byAnnie Soft and Stable for the “batting”–it is a foam with a peached (softly fuzzed) fabric that looks like nylon tricot but soft and grippy
  • Polyester and cotton threads
  • Carpet binding tape–I folded this in half, sewed at the edge and presto, nearly perfect handles that are soft, sturdy and comfortable
  • Bag rings/rectangles–I bought mine from byAnnie but Sallie Tomato also has a good selection
  • Zippers from byAnnie –these zippers have wider tape and sturdy teeth that are perfect for bag-making
  • Magnets from byAnnie
  • Corrugated plastic:  looks like cardboard but made of plastic, available at art and/or craft stores.  Cut to size to make a base for the bag.  Cover in a tube of fabric or leave as is.  Fabric is nicer, but…..life happens and sometimes that tube happens later!  Makes a fairly sturdy base, inexpensive, easily found.  You could also use cardboard or mat board, but they are more likely to bend eventually.
I started by measuring my desired size. I quilted the main body (and base) of the bag–the linen blend with the onion print (darker turquoise) is an extra wide fabric, which meant I needed only one vertical seam which I placed on the corner.

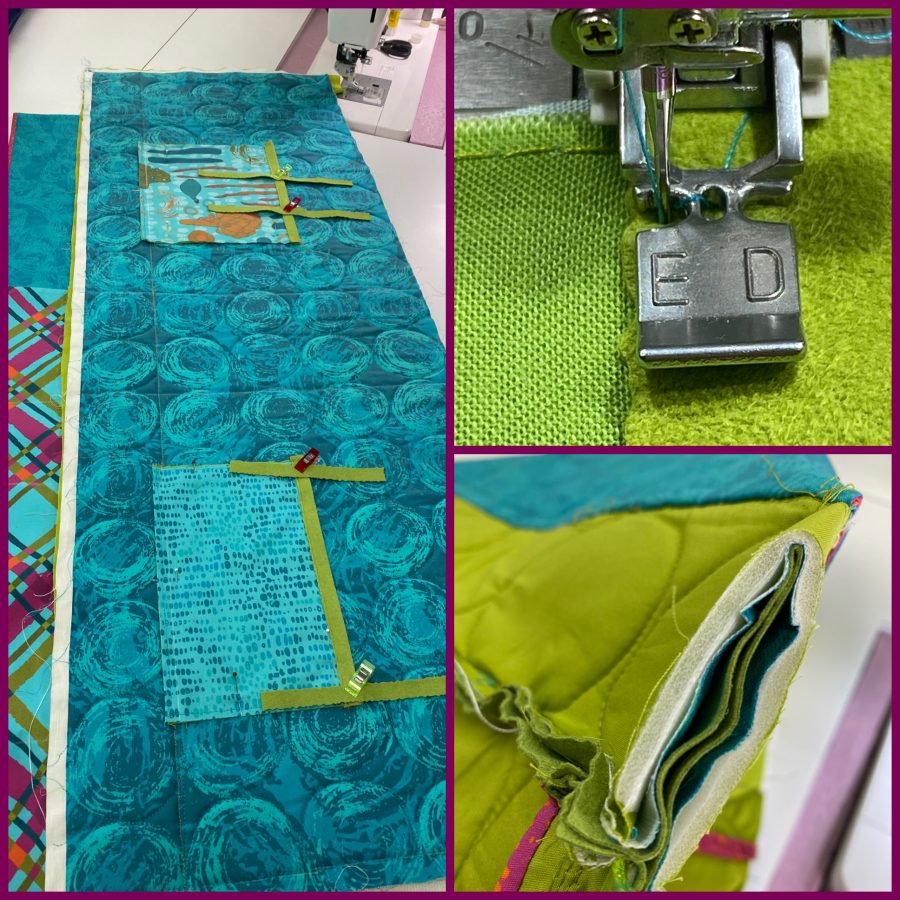
Left photo, above: I made and placed the pockets on the outside and stitched them in place first. Then I put the plaid inner pockets inside and created separate pockets avoiding sewing through the outer pockets.
Top right, above: I used my AcuFeed zipper foot for edge stitching
Bottom right, above: boxing the corner: after sewing up the vertical side seam, I sewed the bottom edge together, then boxed the corners making sure to get the seam exactly in the center (which gets you perfect 90 degree corners).

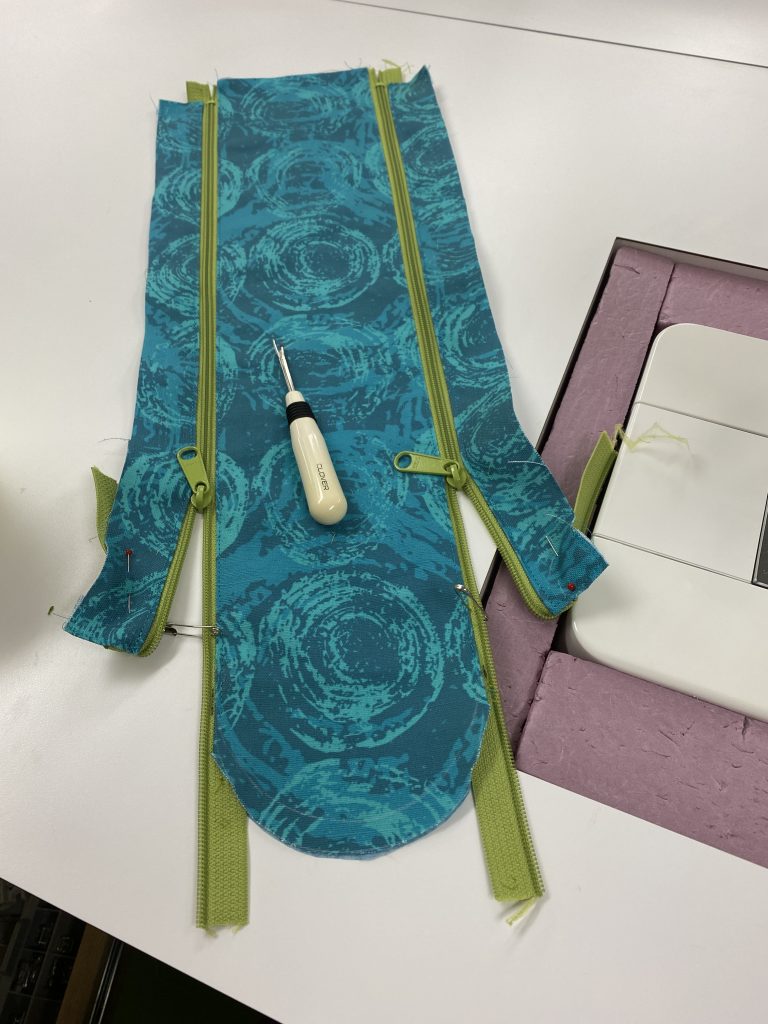
I made the top zipper panel so that three sides would be sewn to the top of the bag and subsequently covered by the synthetic suede (purchased EONS ago and wish I could find a source for fun colored ultra suede now!).  The curved end will wrap up over the end of the bag and hold together with magnets sewn to the under side of the rounded end and the inside of the bag.

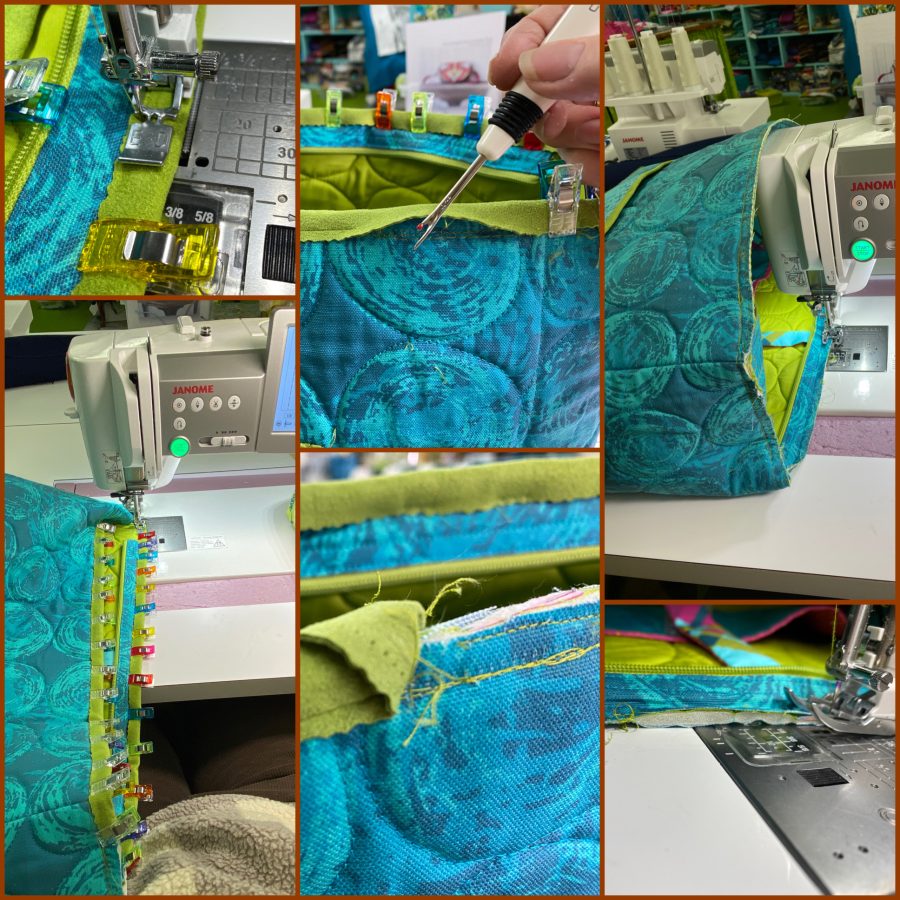
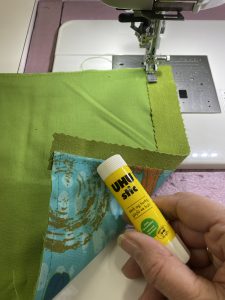
There was a lot of sewing, and some ripping out, to get it all together.  Glue stick and WonderClips are my friends!  The UHU brand glue stick (link will be on store page soon) is archival, acid free, and washes out.  Makes life SO MUCH EASIER.  Top right photo shows sewing the narrow side strips of the zipper panel to the bag.  Bottom right shows that I zigzagged over the raw edges to compress the foam (USE a WALKING FOOT or AcuFeed in my case) before adding the binding.

Oh UHU, how do I love thee, let me count the ways!

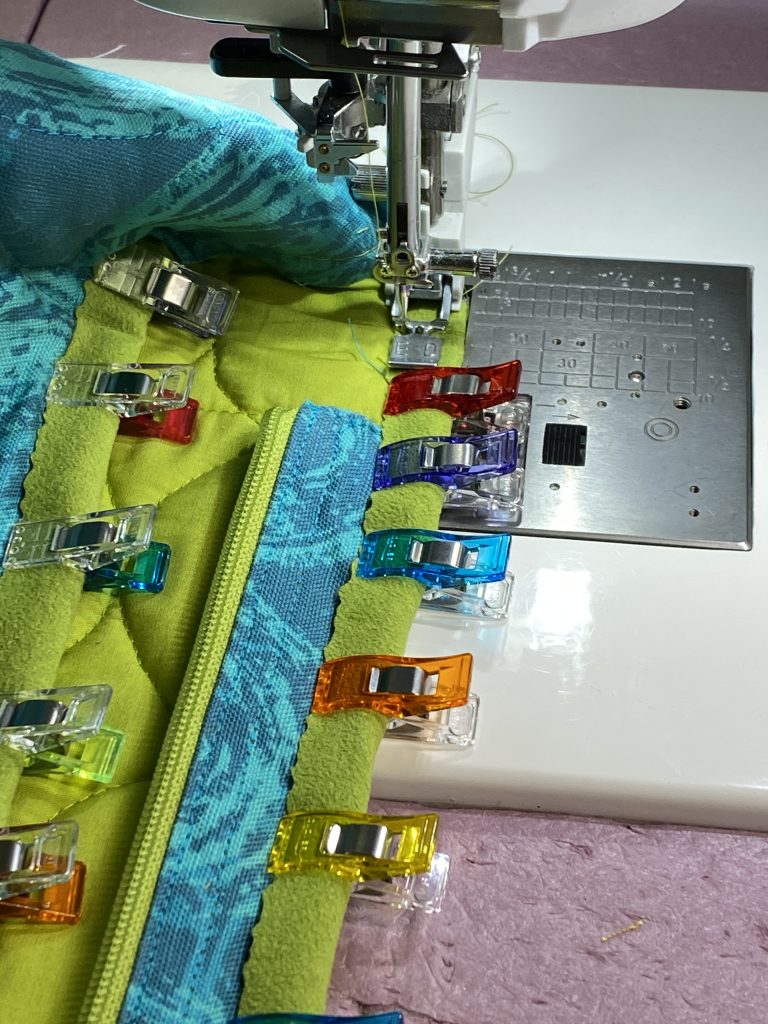
A large close up of sewing the synthetic suede binding to cover the raw edges. More durable than cotton!  Getting the edges on top and underneath lined up perfectly is a tad fiddly–using the UHU glue really helps.  And that deckle edge is from a Fishers scrapbookers blade that fits in my Olfa cutter.  Sometimes these blades are hard to find and stupid expensive… straight or pinking blade also work well.

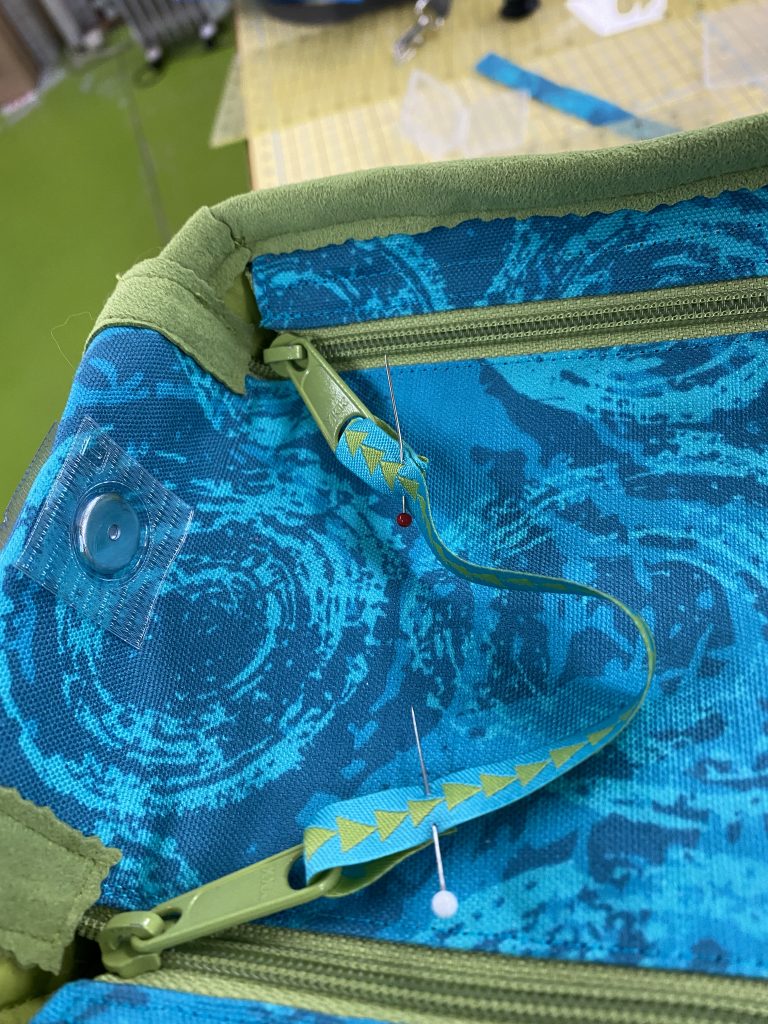
Close up of the bag top.  I used ribbon to create a handle to pull both zippers open at the same time.  The center flap tucks nicely into the end of the bag if you want to leave it open.  On the left you can see the magnets (still in plastic) as I was testing to see if they are strong enough to hold through all the thicknesses: they are!  I used small squares of scraps to create an appliquéd shape under the round tab and on the corresponding spot on the side end of the bag.  I sewed three sides, slipped the magnets in—with the correct orientation to grab and not repel the other magnet!–and sewed them shut. I’ve used this bag a ton in the past year and it is still working brilliantly.
And the zipper pull in action.

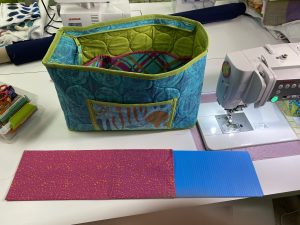
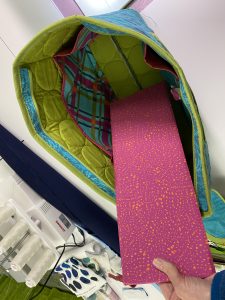
Here’s the piece of corrugated plastic I cut–note the rounded corners.  I got the idea from Joan Hawley of Lazy Girl Designs who used to (maybe still does?) manufacture plexiglass bases for her bag patterns.  But those are expensive, getting one custom made even more so, and hard to find.  I made a tube that is about 1″ too long out of the pink fabric, then tuck the open ends over the short end of the plastic to enclose it.  Below:  tucks right into the bottom of the bag!


AND that brings us to the new “Sheep in Sweaters” tote bag!   Come back in a day or two for Part 2!

Plaid Top Tutorial: Lesson 9-hems, a bonus scarf and wrap-up

Friday, March 17th, 2023

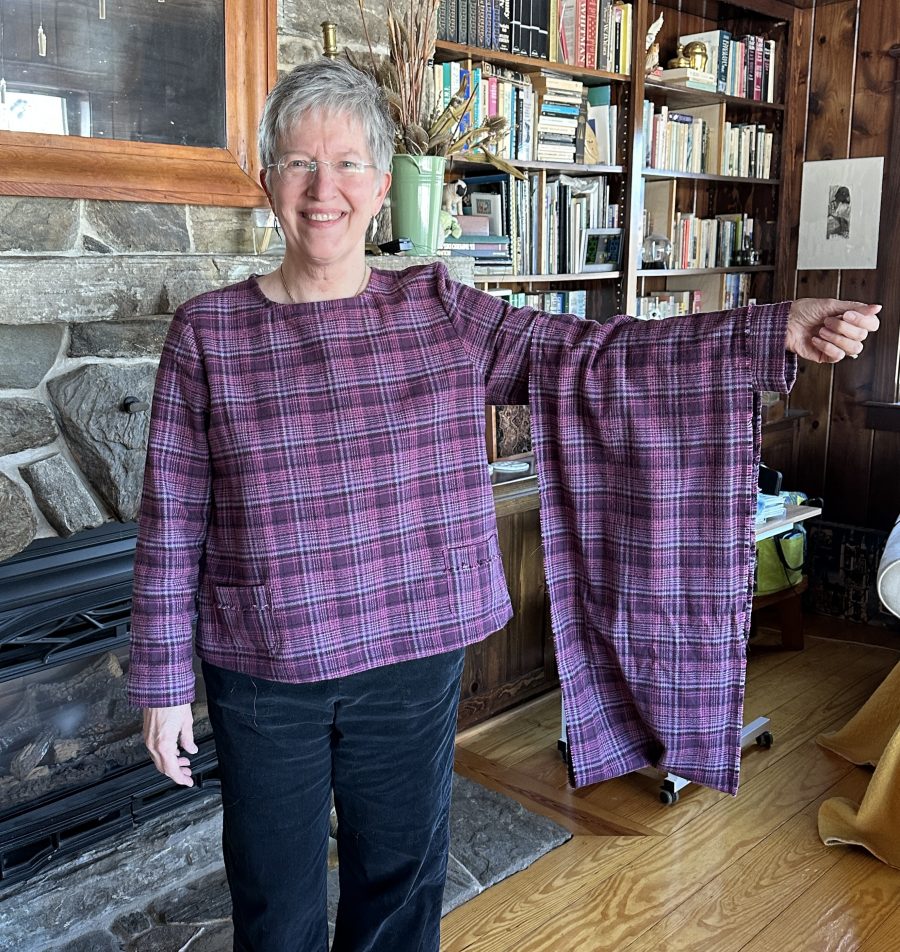
Hard to believe the ninth and final lesson is here already!  Thank you for following along.  Links to all nine of the posts in this series are now listed at the bottom of each lesson and on my Resources page!  If you remember this down the line, the fastest way to find it is put “Plaid” in the search box at right on the blog OR look for a link to the Plaid Top Tutorials on my Resources page, here.


To recap, we have:

Please note:  I am affiliated with Janome as a Janome Artisan and am compensated.  However, my reviews are honest and I would say what I say whether affiliated or not.  I’ve also chosen to be affiliated with Janome since 2003 (!!!) because their machines are so good and they are so responsive to the interests and needs of their customers.

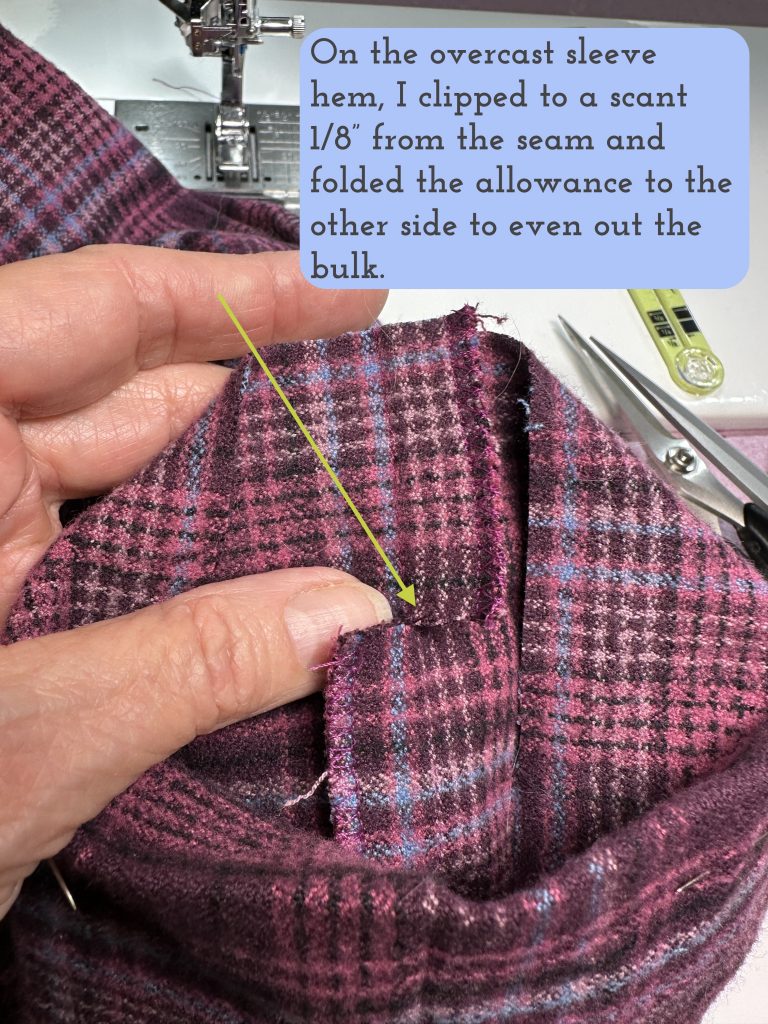
Hems!  We are nearing the finish!  For the side seams, I opted to use a flat felled seam on the body, but on the arms instead I sewed the seam, press toward the back and use the overcast edge from Lesson 4.  That means that when you fold the hem up, turn under the raw edge, you would have 3 thicknesses (outside plus two seams) times THREE all stacked up in a big wad.  Ick!  So you can, carefully, clip the seam allowance where the hem folds up and press the seam allowance on the turned-up hem portion the other way to distribute the bulk.

My thread matches so well it is challenging to see, but on the bottom the seam allowance is to the left of the seam and above the bottom edge/fold, the seam allowance is to the right of the seam. The arrow shows where I clipped the seam.  You will also need to finish the raw edge in some way–overcast, Hong Kong finish, hem tape, of just press under 1/4″ (for the quilters, think “like an appliqué”) as I did here.

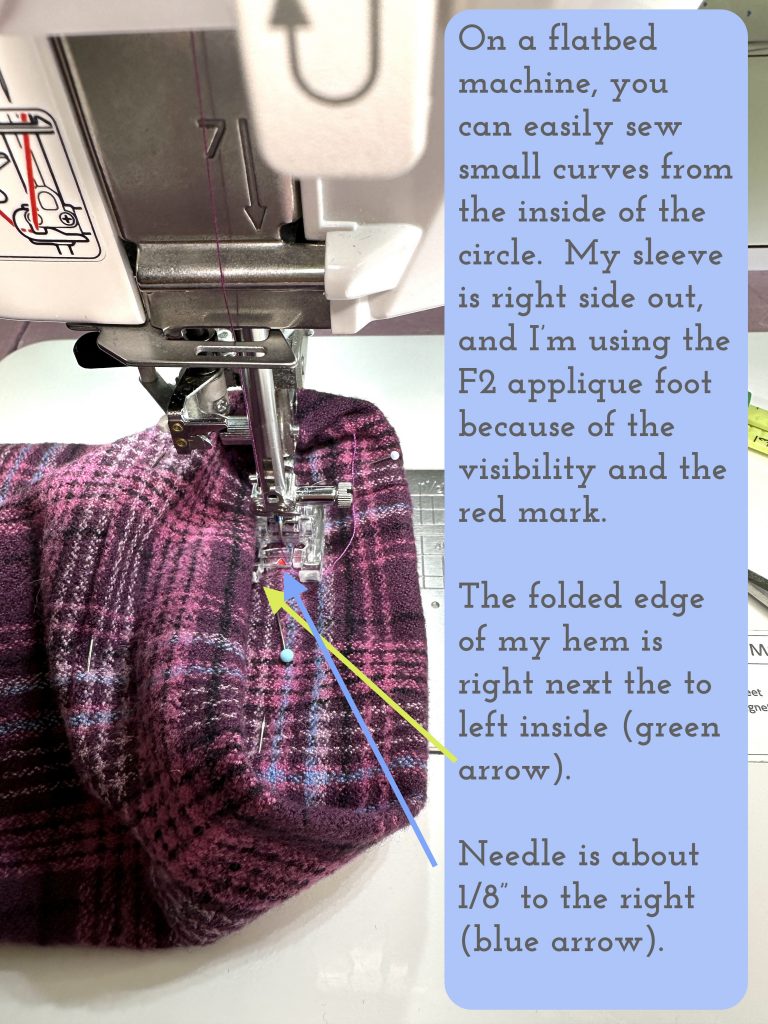
If you have a free-arm sewing machine, you can choose to remove the extension table and run the sleeve or pants leg around the free-arm.  With a narrow sleeve or a child’s garment, though, that is tricky if not impossible. The old-school way is just as easy and works on everything:  you sew “inside the circle.”  That means just what it says.  You can turn the sleeve inside out and sew on the outside of the garment (if using a twin needle to get parallel stitching lines you’d do this) or, as I have done here, sew the hem on the inside.  I chose that option so I could keep my stitching on the hem (!) and at a consistent distance from the folded hem edge.

I use my various presser feet in many different ways.  The F2 is designed for appliqué and satin stitch, but with the bazillion needle positions and good visibility I use it for many other things. I like to place the folded edge of the hem just to the right of the left arm of the foot, which then acts as a seam guide.  I’ll position the needle so it drops into the hem about 1/8″ to the right.  Then just sew all the way around, overlapping by about 4 stitches.  You can knot and bury the threads or just trim the tails and live dangerously LOL! 

Maybe I shoulda bought a lottery ticket that day…

SCARF:

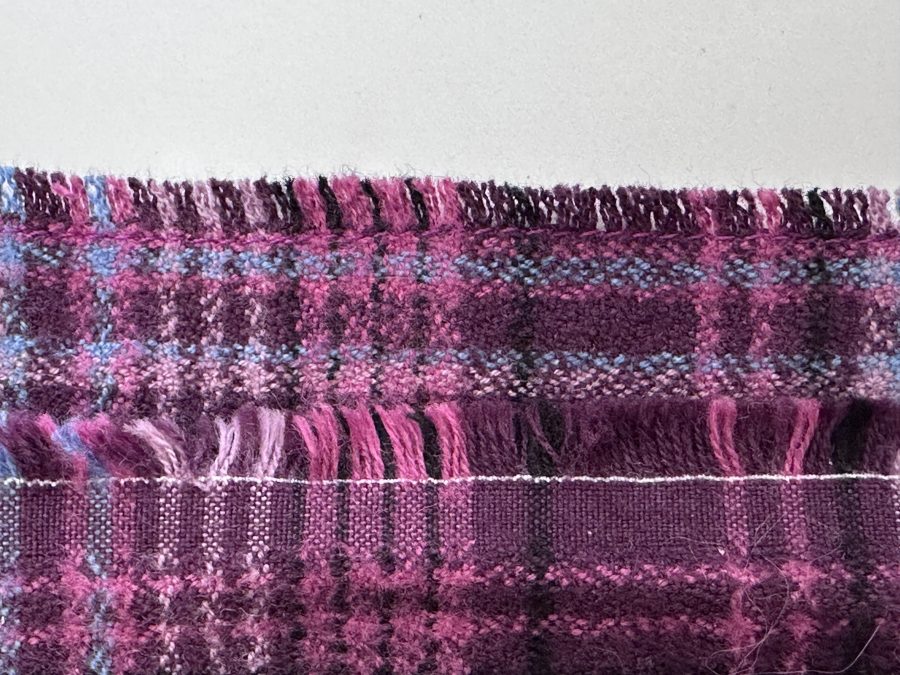
As luck would have it, I was able to lay out the pattern in a way that left me with a long strip about 12 inches wide.  Because I like the fringed selvage (the edge with the white line), I left that side as it was.  On the other side I straight-stitched a line 1/4″ from the long cut edge using a short stitch length.  Then I unraveled the lengthwise threads up to the straight stitch (which prevents it from unravelling further). I use a pin to tease the threads out and remove.

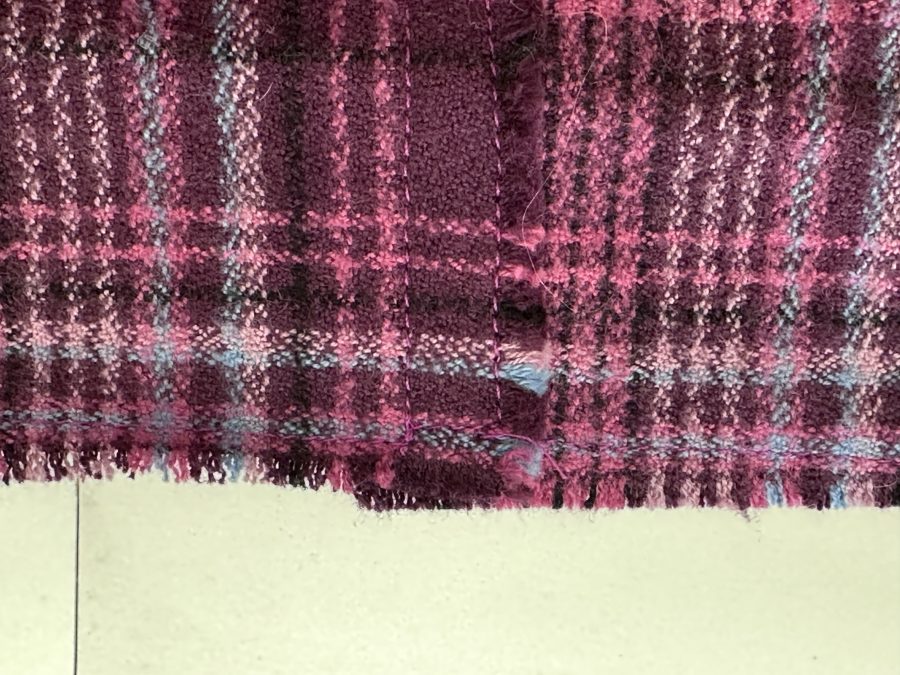
Then I overlapped the ends and ran two lines of stitching from edge to edge.  Sometimes an infinity scarf looks lovely if you put one twist in it lengthwise, but with the thickness of the flannel, I just kept mine flat. Then I fringed the edges of the seam, also.

Above you can see the overlapped seam and the side of the scarf with the nearly invisible “stop it from fraying more” line stitching. After washing, this frayed bit is likely to curl bit, but I’m fine with that.

And there you have it!  I hope you’ve enjoyed this series of lessons that can be applied to virtually any garment and many home dec projects.   Let me know what you’d like to learn and see here on the blog.  Cheers and thanks, Sarah

Lesson 1:   Choosing a Pattern and Starting Tips

Lesson 2:   Making a Muslin, Fitting and Sleeves

Lesson 3:   Matching Plaids, Cutting out Your Garment Pieces

Lesson 4:  Overcast Seams, just like Serged Seams

Lesson 5:   French Seams

Lesson 6:  Lapped and Flat-felled Seams

Lesson 7:  Hong Kong Finish for Seams

Lesson 8:  Lined Patch Pocket Tutorial

Lesson 9:  Hems and Scarf


Plaid Top Tutorial: Lesson 8–Lined Patch Pocket

Tuesday, March 14th, 2023

Today we move on to another fun technique:  a lined patch pocket.  I kinda made this up along the way (my first photos are not included because I figured out a better way…this is the revised and improved method!). The flannel is SO soft and comfy–in part because the weave is dense but not terribly tight. That means I might be able to wear holes in the bottom of the pockets, so I decided to give them some strength and structure by adding a lining.  The hand-dyed blue was in my stash and worked well enough  I also really liked the frayed selvage edge of the fabric so decided to use that as a decorative element.  I cut the pockets with the  the upper edge of the pocket on the selvage (lengthwise edge of the fabric) instead of the usual orientation.

Here’s what we are doing today–pockets!

Please note:  I am affiliated with Janome as a Janome Artisan and am compensated.  However, my reviews are honest and I would say what I say whether affiliated or not.  I’ve also chosen to be affiliated with Janome since 2003 (!!!) because their machines are so good and they are so responsive to the interests and needs of their customers.

Let’s dive into the details!  First cut out your pocket including either a turn back (flap that will turn toward the garment or, as I did, a flap that will fold down over the front of the pocket.  In the next photo, I’m preparing the cut pocket piece by sewing a basting stitch to make it easier to get a consistent turned-under seam allowance.

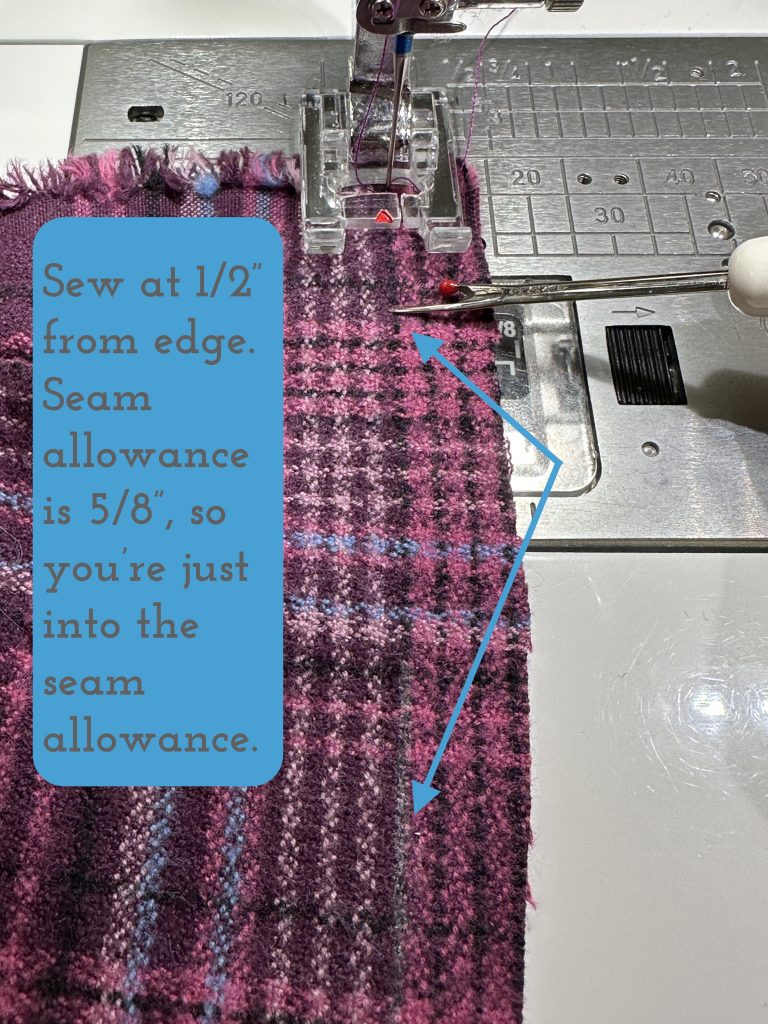
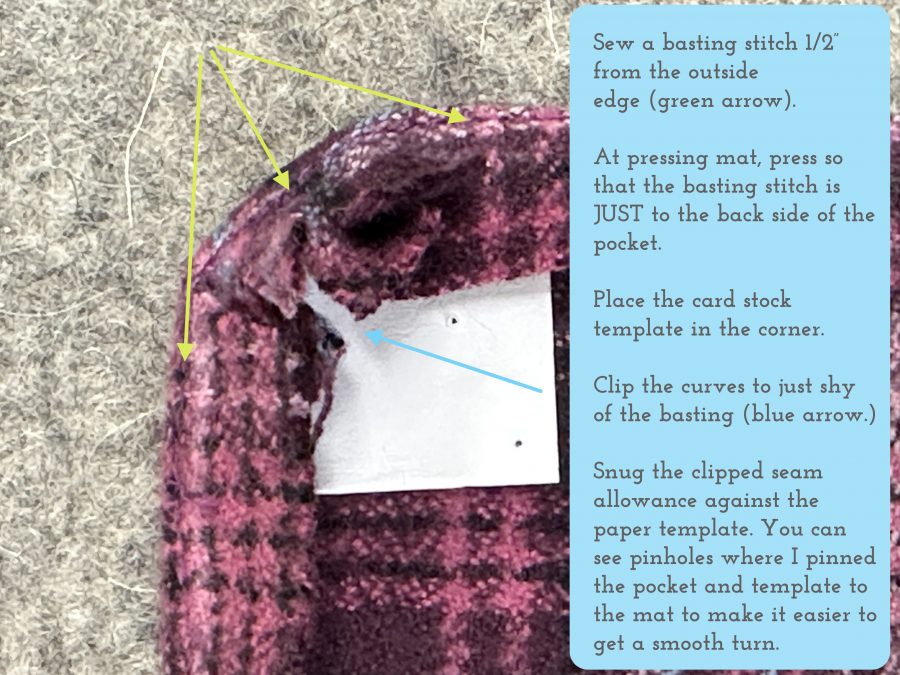
Sometimes taking an extra step makes things easier, not harder. This is one of those times. Sew with a basting stitch–I used about a 3.5 stitch length–1/2″ from the raw edge. This leaves 1/8″ between the basting and the turned edge line. The basting won’t show when the pocket is turned right side out, but the stitched line makes is SO much easier to turn accurately!

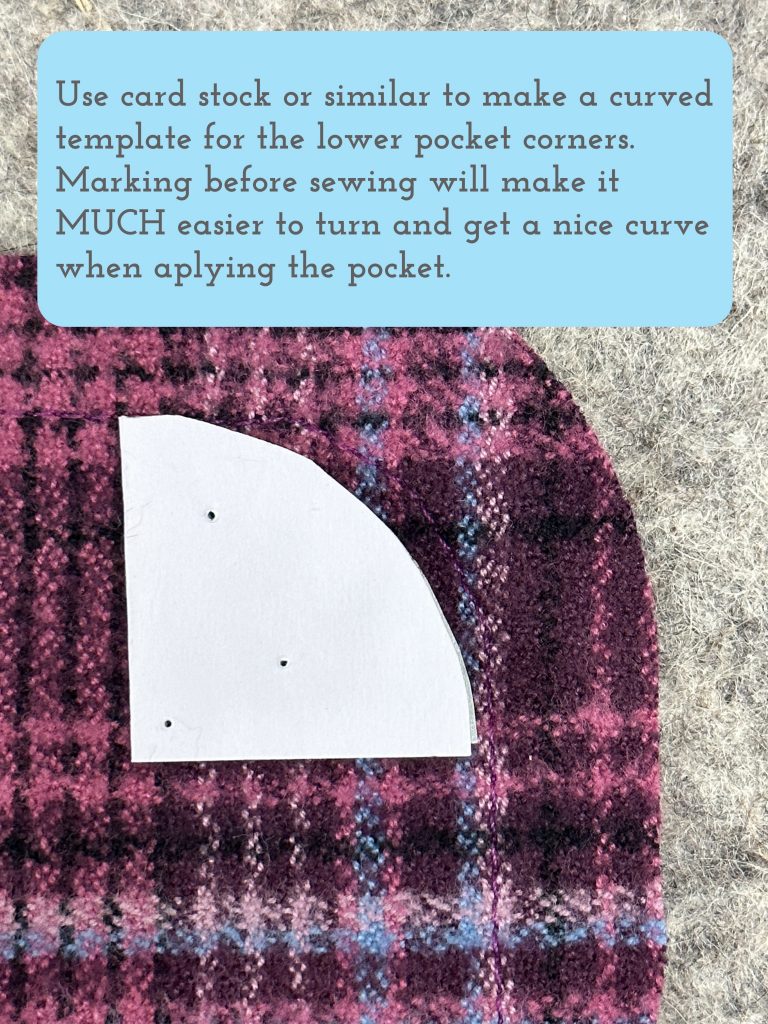
Using something firm like card stock, index card, or a cereal box, cut a quarter circle. I folded a sorta-square piece of cardstock into quarters, marked a set distance (an inch), then used a round item (think jar, pepper mill base, even (!!) a quilting template) that has a curve shape that  you like. Be sure the curve intersects the distance marks so it curves symmetrically round the corner.

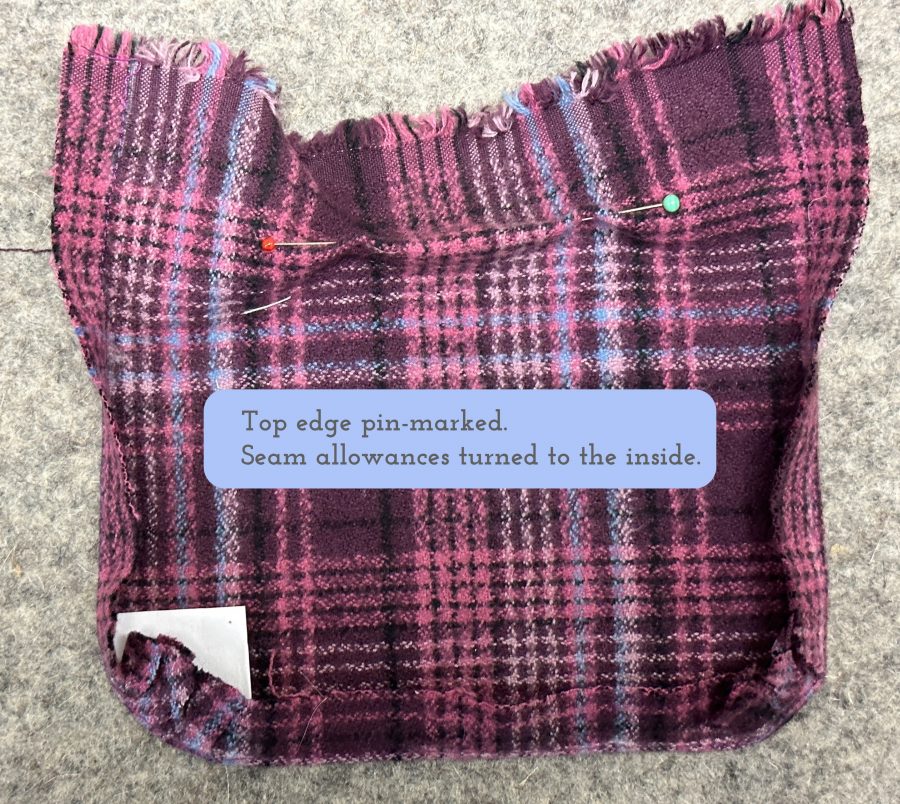
Notice that the top edge, with the fringed selvage, is pin marked where it will fold over to the outside of the pocket.

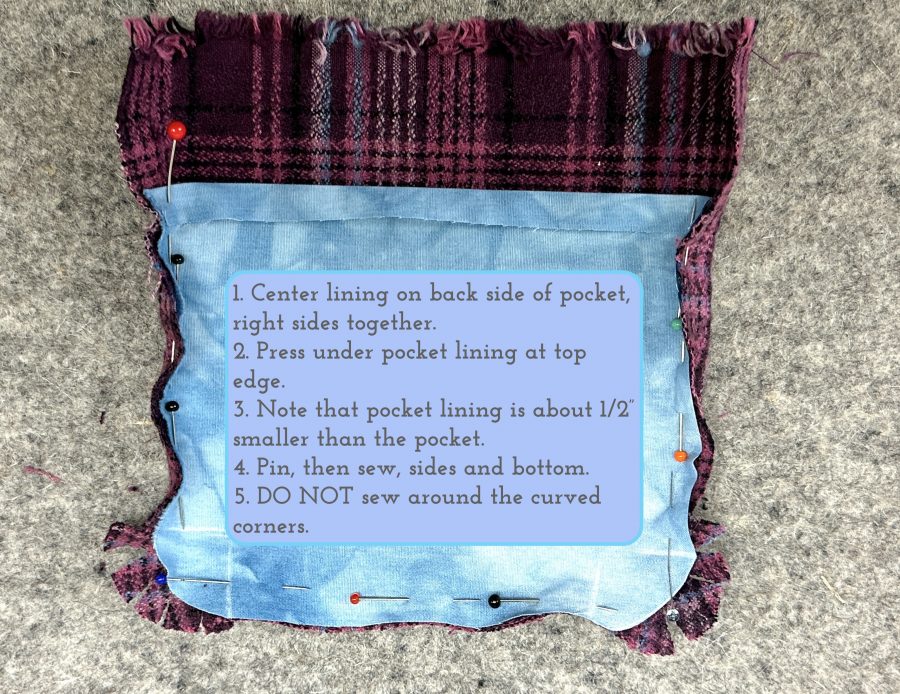
If your finished pocket is 6×6″ (honestly I’m not sure what size I cut mine, just using this to make the math simple!), you’ll have cut it 5/8″ seam allowance + 6″ + 5/8″ seam allowance = 7 1/4″.  Now, you’ll want to cut your lining smaller so that it is nicely hidden.  That means the lining would be cut at 6×6″ or a perhaps 6″ wide by 6 1/4″ long (to allow you an extra bit to tuck under at the top.  You will sew it to the pocket exterior with 1/4″ seams allowance, NOT 5/8″!

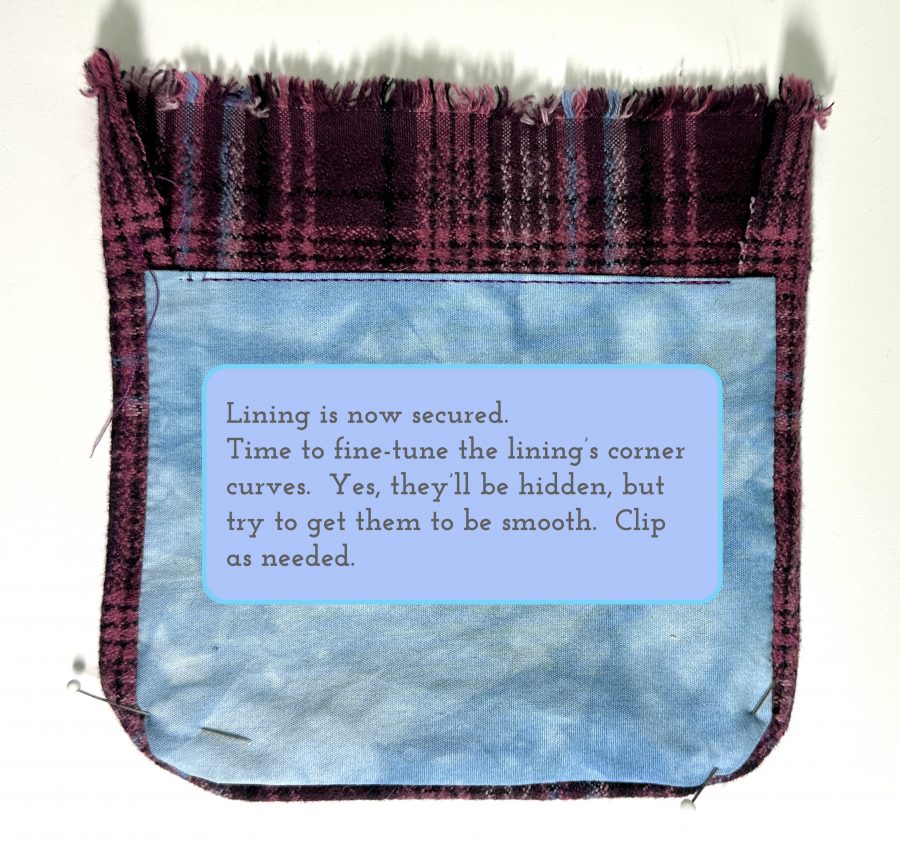
Press under 1/4-1/2″ at the top (see photo). Sew the lining to the exterior of the pocket with 1/4″ seams, right sides together, on the sides and bottom ONLY, but SKIP sewing those fiddly curves at the bottom.

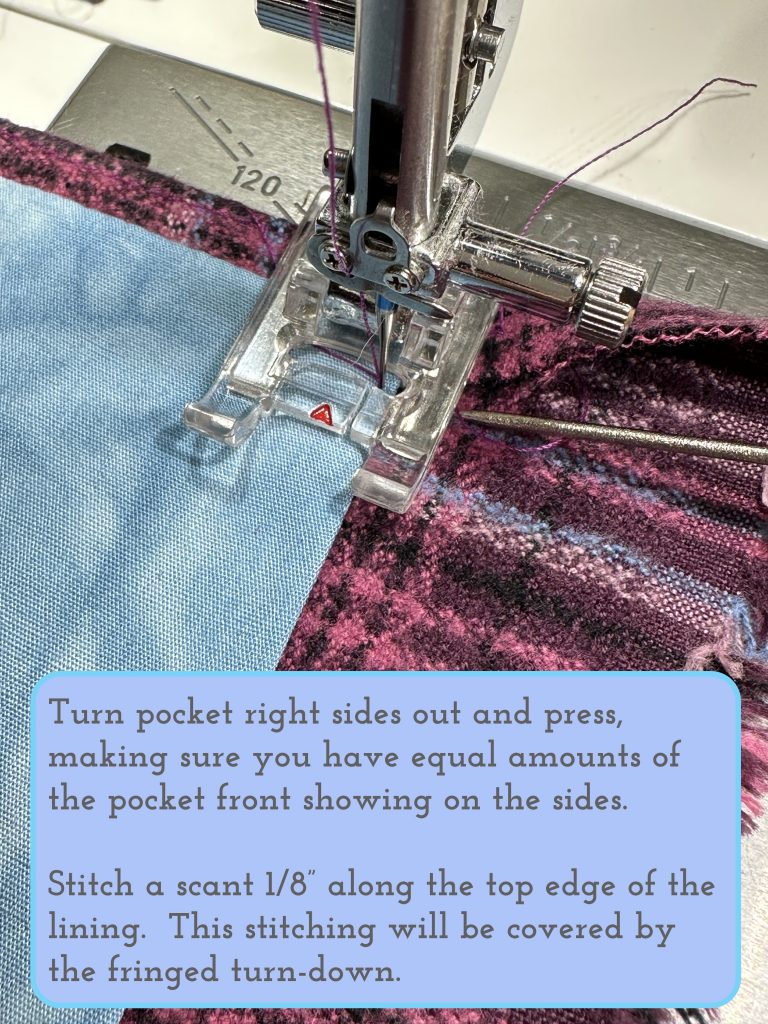
Turn the pocket right sides out and press so that the lining is centered and you see about 3/8″ of the fashion fabric on the edges.

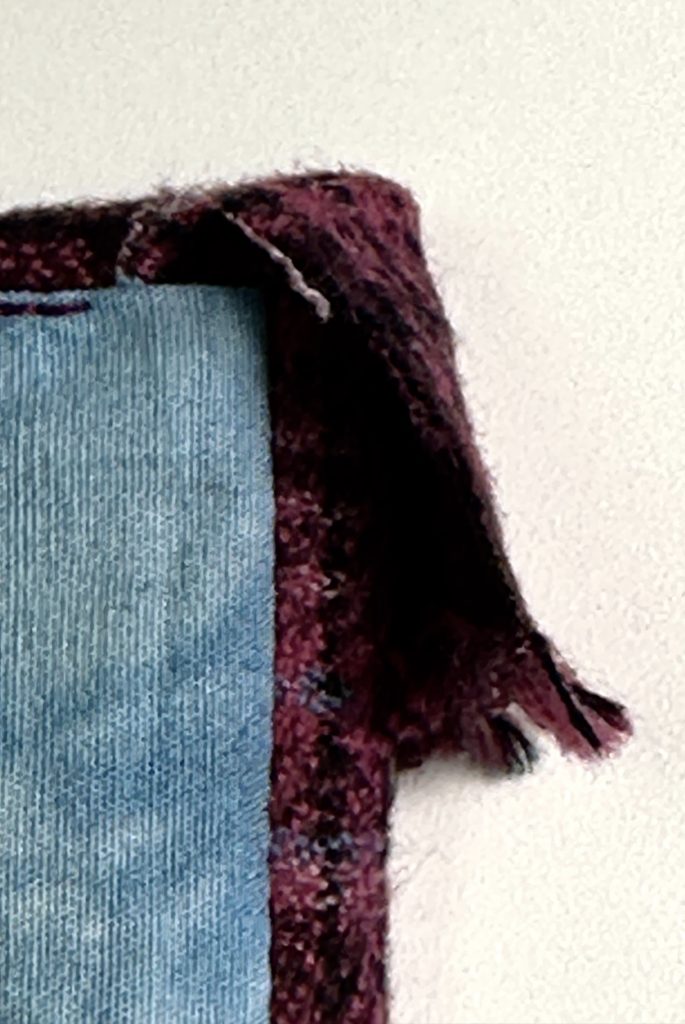
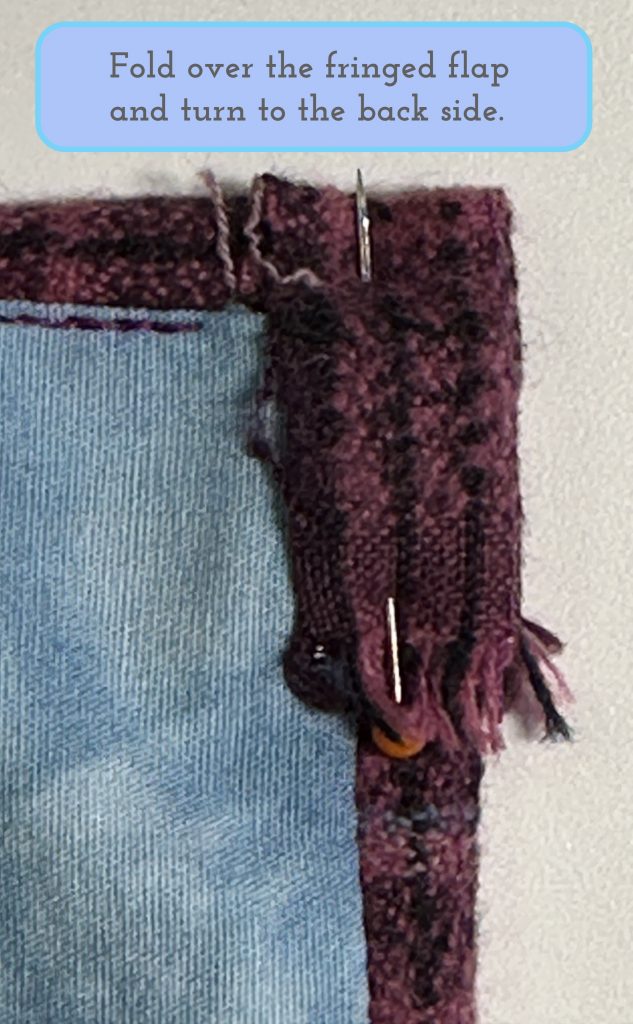
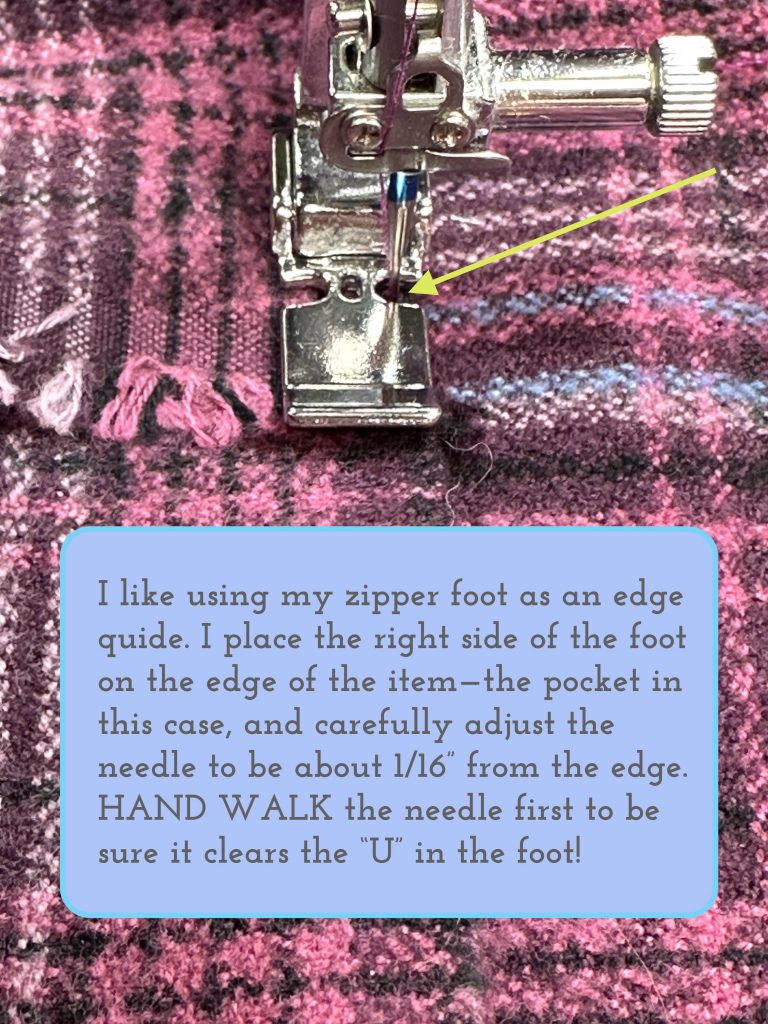
For my fringe-flap, I just tugged it out of the way.  Then I edge-stitched the top (turned under) edge of the lining started about 1/2″ away from the outer edges of the pocket — this allows you some leeway when you deal with hiding that flap. Clarification to caption above:  the turn-down is on the outside and doesn’t cover the lining, but the lining stitching is hidden by / covered by the turned down flap.
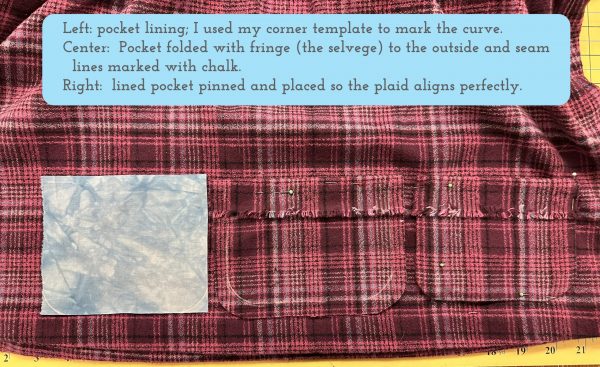
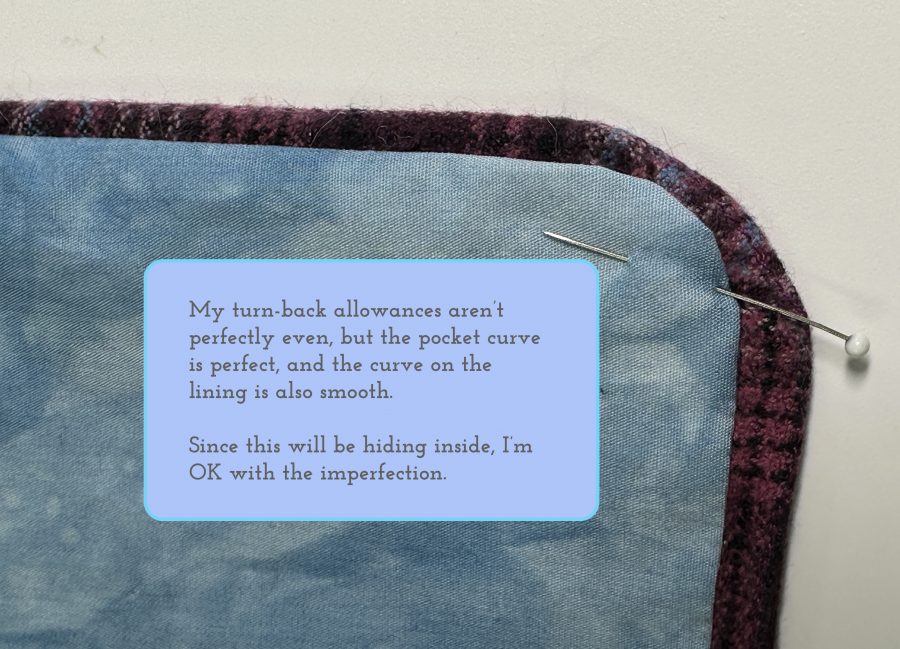
The corners are, honestly, a bit of a nuisance, but you can do it!  Just tuck them inside, clip into the seam allowance as needed to facilitate turning and press the daylights out of them.  I have become a fan of–don’t faint–washable glue stick.  It works and is easier than pins, clips and whatnot.  Just use a toothpick or the tip of your seam ripper to dab some between the seam allowances of the lining and fashion fabric to hold them together.  The glue will wash out in the first laundering!  I prefer glue stick to dots of white glue because it is already sorta dry and doesn’t soak through the fabric or require extra drying time.

Here’s the lined and pressed pocket from the front side.

Next I needed to deal with that flap detail.

This is another spot where a dab of washable glue stick between each of the layers can help.

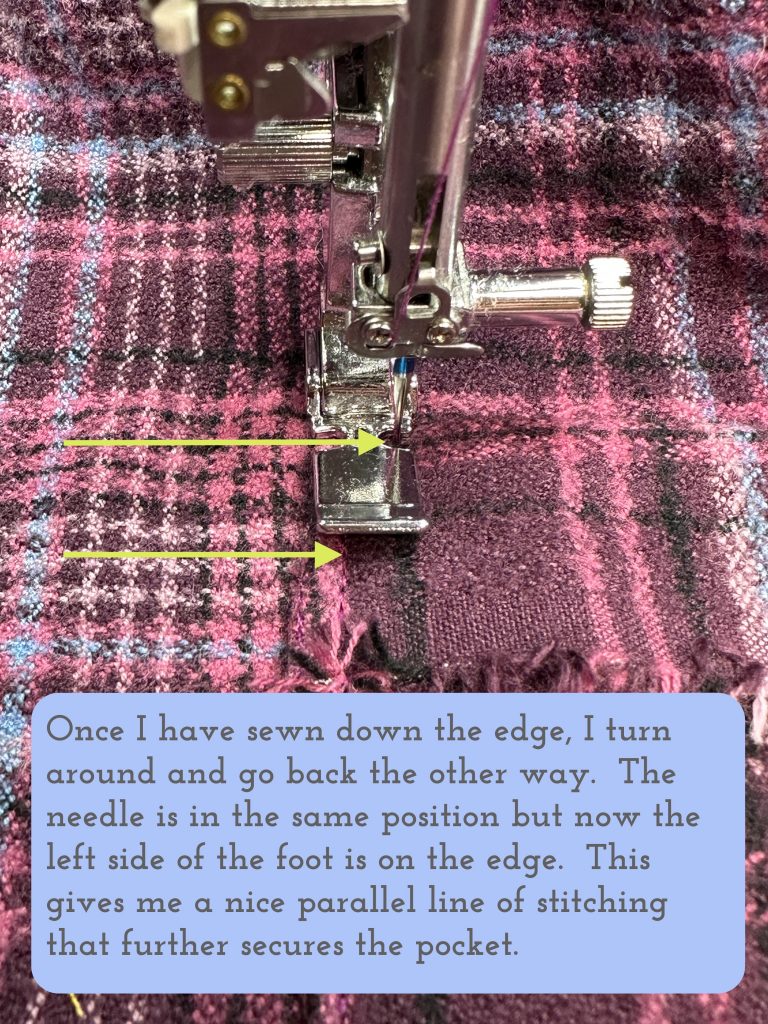
The second line of stitching, above, means that those unstitched rounded corners on the lining are trapped between the two lines of stitching and won’t go anywhere.

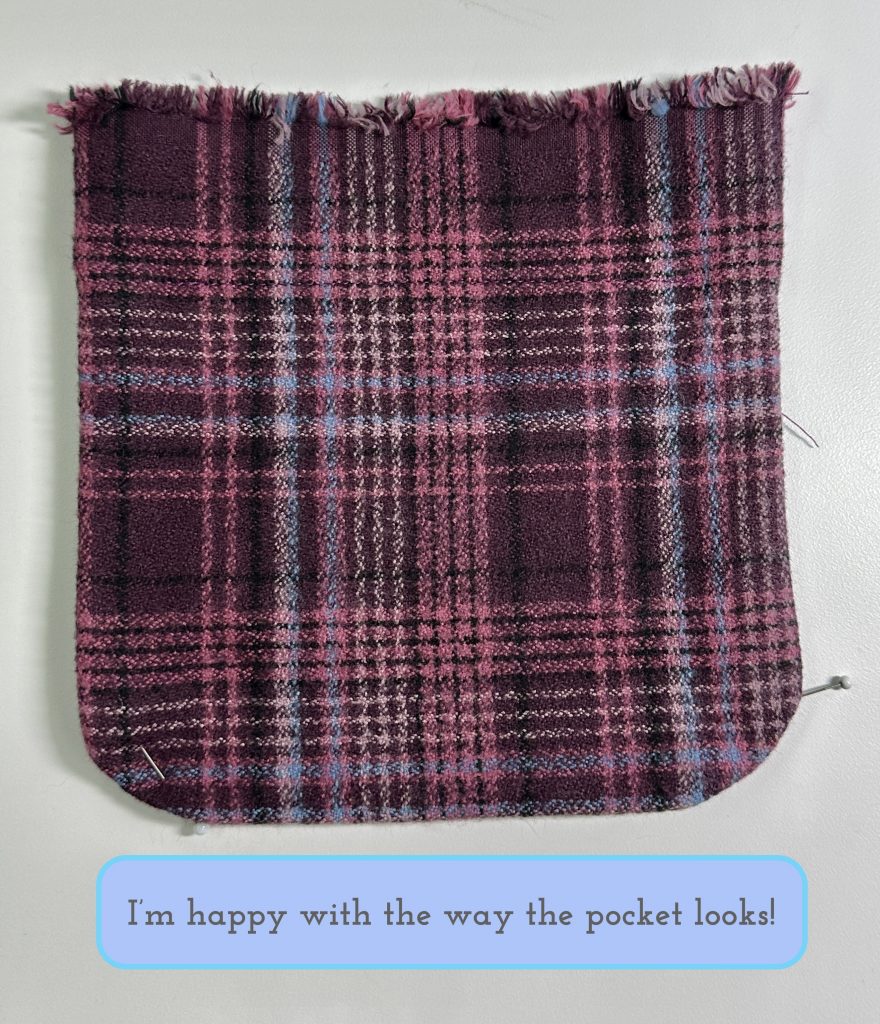
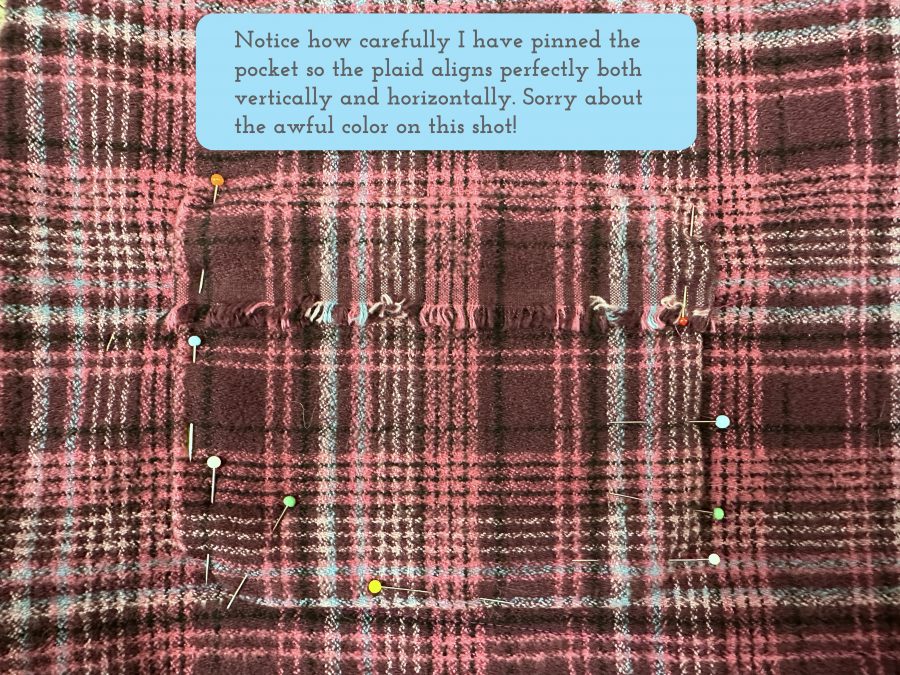
And there we go–pretty lined plaid pockets, perfectly matched, ready to use: kleenex, keys, doggie treats!

The next post will be the last in this series with hem finishing and the easy-peasy scarf!  See you then!

Here are the links to all the posts in this series of lessons, techniques that can be applied to virtually any garment and many home dec projects.   Let me know what you’d like to learn and see here on the blog.  Cheers and thanks, Sarah

Lesson 1:   Choosing a Pattern and Starting Tips

Lesson 2:   Making a Muslin, Fitting and Sleeves

Lesson 3:   Matching Plaids, Cutting out Your Garment Pieces

Lesson 4:  Overcast Seams, just like Serged Seams

Lesson 5:   French Seams

Lesson 6:  Lapped and Flat-felled Seams

Lesson 7:  Hong Kong Finish for Seams

Lesson 8:  Lined Patch Pocket Tutorial

Lesson 9:  Hems and Scarf

Plaid Top Tutorial: Lesson 7-Hong Kong Finish Seams

Friday, March 10th, 2023

Hong Kong seams are a thing of beauty–a little extra work but a secret delight!  So even though I didn’t use them in this plaid top, I’m including them with all the seam lessons in this series of technique posts.  I did use them on both my Simplicity S8883  top, full blogpost here, and the Brumby Skirt.   I also used this finish on a jacket I made for my daughter-in-law some years ago that I swear I wish she could wear inside out LOL!

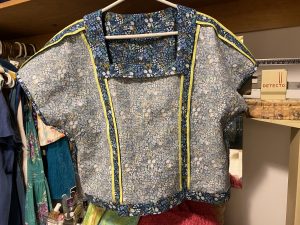
That lime green on the shoulder and princess seams is a Hong Kong finish.

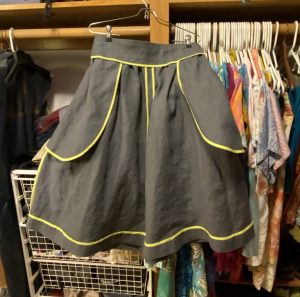
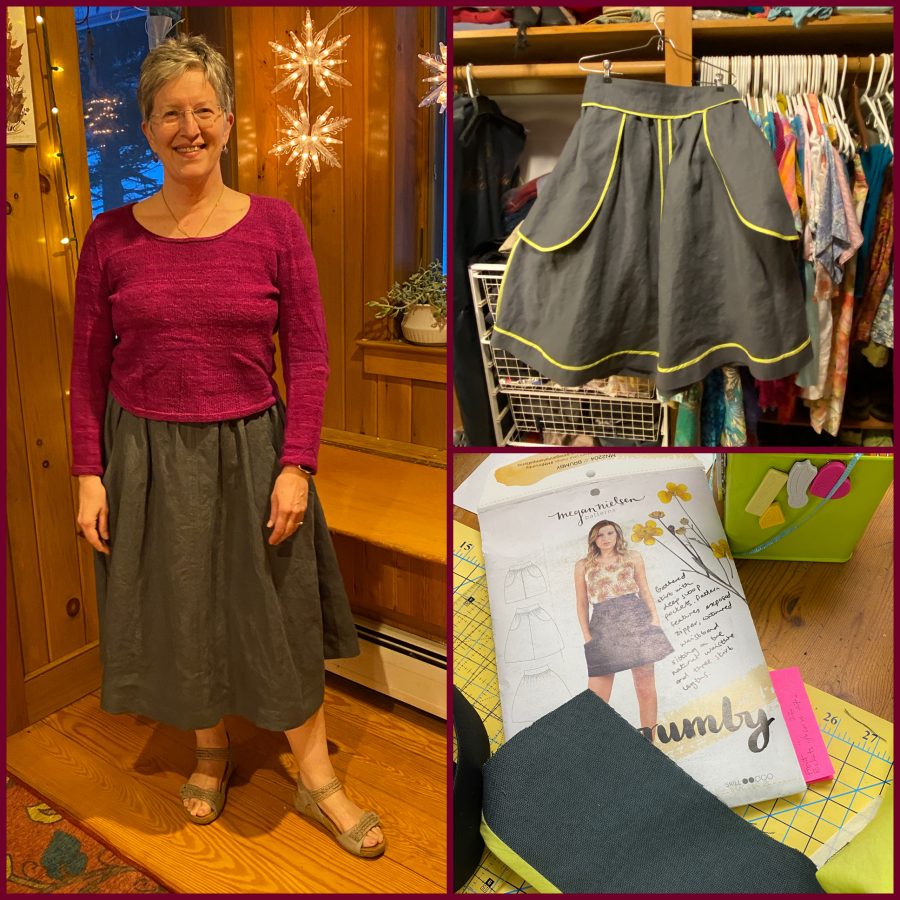
And the Brumby Skirt from Megan Nielsen, inside out! Same lime green (I bought several yards of it, a cotton lawn) for Hong Kong finishes. Such a pretty Pop!

Please note:  I am affiliated with Janome as a Janome Artisan and am compensated.  However, my reviews are honest and I would say what I say whether affiliated or not.  I’ve also chosen to be affiliated with Janome since 2003 (!!!) because their machines are so good and they are so responsive to the interests and needs of their customers.


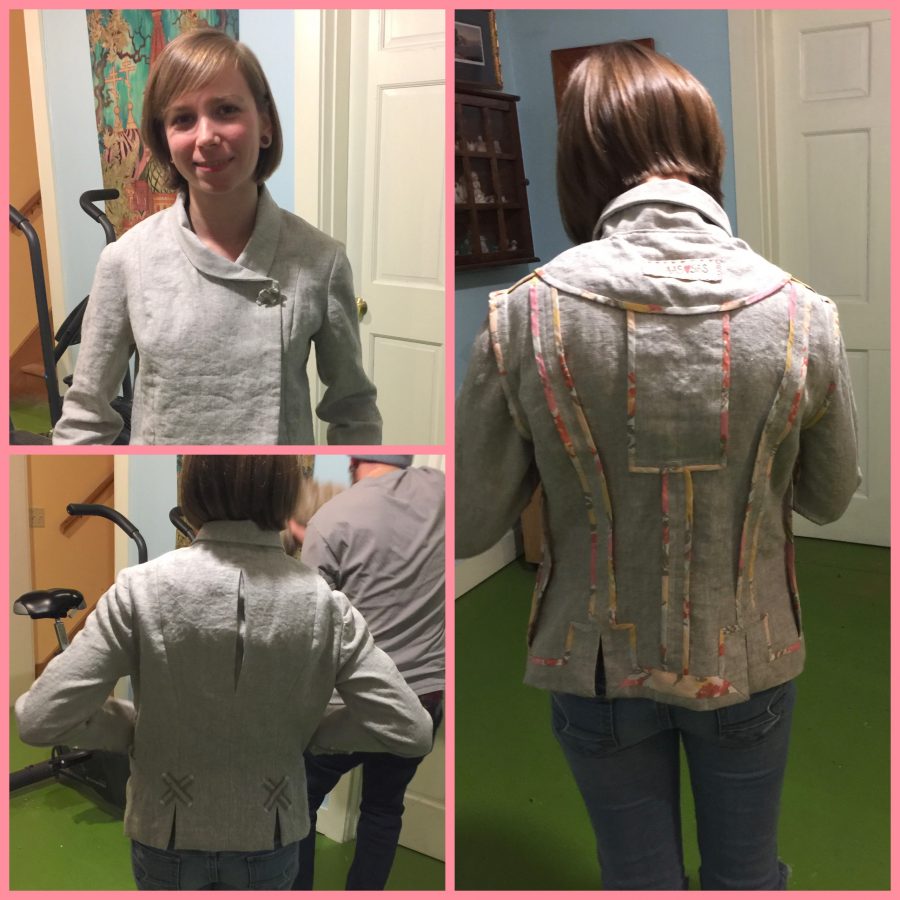
And here is one of my all time favorite in my life insides of a garment, the jacket for Ashley:

Top left:  front.  Bottom left, back.  Right side:  all those beautifully finished seams.  I had gone looking for a lightweight fabric and found the print and thought Oh YES!  This is a heavily modified pattern…changed it from hip length single breasted to double breasted jacket, Peter Pan collar changed to roll collar, added vents at the bottom rear, a box pleat for movement / ease in the center back…you get the picture.

But aren’t these seams pretty?????   So here is how you do it.  This process is VERY similar to putting a binding on a quilt for those of you who know how to do that, except that the back side–the one between the seam allowance and the body of the garment, is a raw edge and is not turned under.  This minimizes bulk. Because it is cut on the bias it doesn’t pose a fraying problem!

    1. We will assume a 5/8″ seam allowance.

    2. To cover 1/4″ on the side of the seam allowance that you see, you will cut a strip on the bias that is about 1″ wide.

    3.  Choose a very lightweight fabric that is not bulky.  Cotton lawn is an excellent choice — it is significantly lighter in weight than quilting cottons, handles well, and is soft against the skin.  You can choose to match colors or, as I did, pick something zingy and pretty! You could also use a super soft jersey knit, and decades ago they used to sell nylon tricot (ick!  felt like plastic) in strips for just this purpose. For garments that won’t be laundered you could also use a fine silk. ***Be sure to pre-shrink / pre-wash any fabric just as you did with your main garment fabric.  You don’t want it to shrink after you’ve completed the garment and have it distort things.

4. Sew the bias to the seam allowance with a 1/4″ seam allowance.  Be careful not to stretch the bias strip.  Trim the ends even with the end of the seam.  If part of the seam will be covered by a hem, and therefore enclosed, you only need to extend the finish to the point where the bottom 1/4 – 1/2 inch will be covered.

5. Press the bias away from the seam.

6. Gently fold the bias around the seam allowance so it snugs up against the raw edge.  Pin or glue-stick in place.

7. Stitch in the ditch with a thread to match the fashion fabric to secure the finish.  If you have cut your strips at 1″, about a scant 1/4″ will extend from the ditch-stitching towards the seam.  You can leave it or trim it down to 1/8″.

8. Press, and stand back and enjoy the beauty.

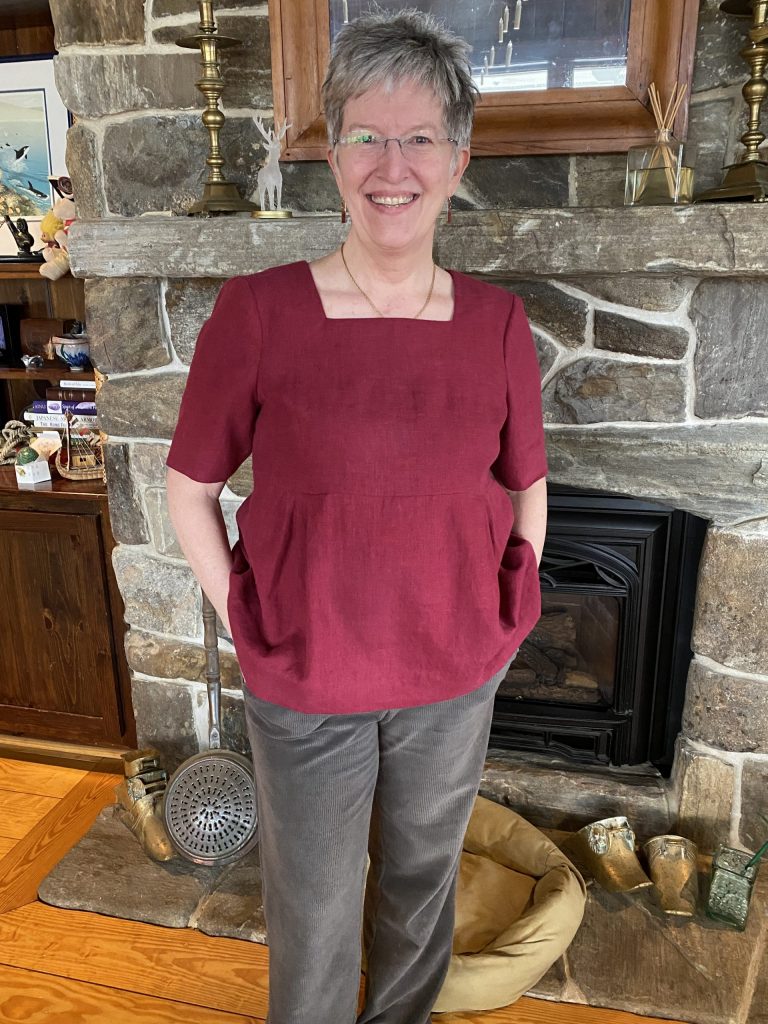
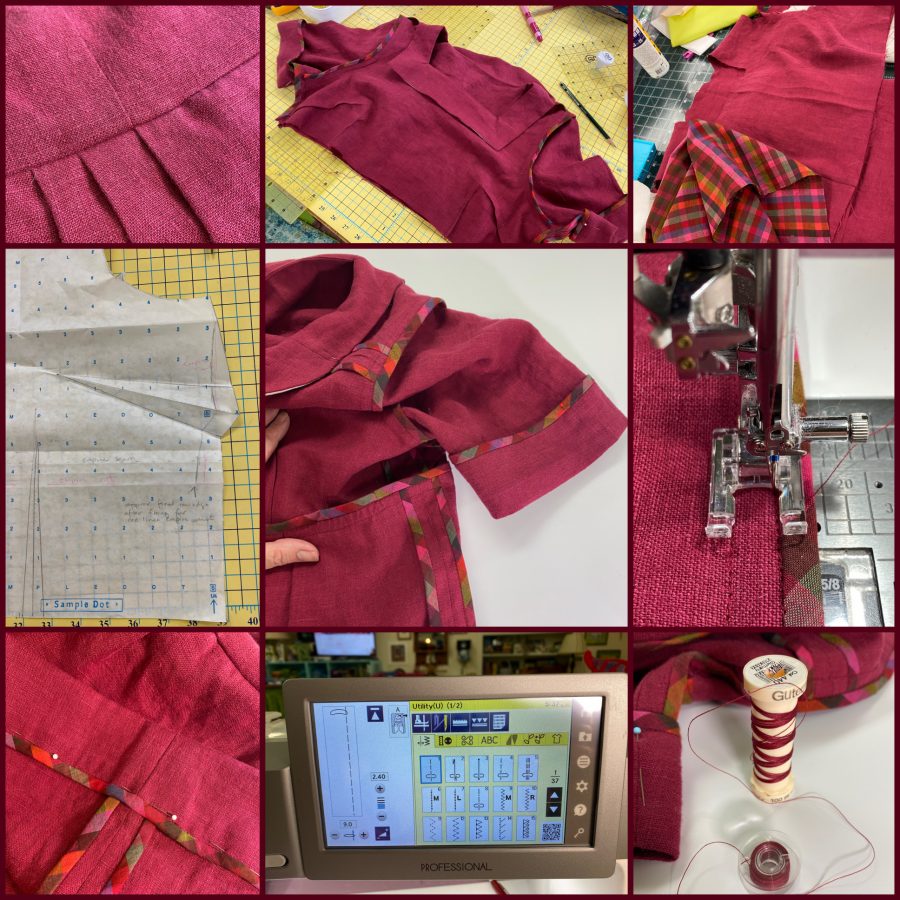
The first lesson / project for Garment Maker’s Question Time is a shift dress (with or without a waistline seam), something that I would Never, EVER wear.  And I already knew how to do an invisible zipper.  So I bought a pattern for a fitted dress with a waist seam, center back zip and very short sleeves.  I did the muslin / toile (the fitting garment where you figure out your needed alterations) as a dress, then totally hacked the dress into a square (not rounded) neck, longer sleeves, moved the waistline up to empire height, eliminated the center back seam since I could get into the top without a zip because of my modifications, and converted gathers into pleats.  I LOVE this linen (from Fabrics-Store.com linens, I used the IL-19 Softened in Beet) and found the perfect Kaffe Fassett shot cotton plaid (heavier than lawn but lighter than quilting cotton) to be the Hong Kong Finishes.  I like it so much I may use the leftover linen and find some more of the plaid and make a tank with the plaid visible!

Here’s a collage of the construction process.  Apparently I posted about this on social media (circa February 2021) but never did blog about it! oooops.  I am sure I also put it in my newsletter–if you’d like to receive the monthly newsletter, sign up at the bottom of every page or in the right sidebar on my blog!

Here’s another collage that shows the Brumby skirt (I SO want to make one in denim like the pattern, but at a length suitable to my age and legs!), the inside and the pattern cover.  AND, just this week I bought the denim–100 percent cotton denim no less.  Now, to finish Eli’s quilt so I can get some garment making done!

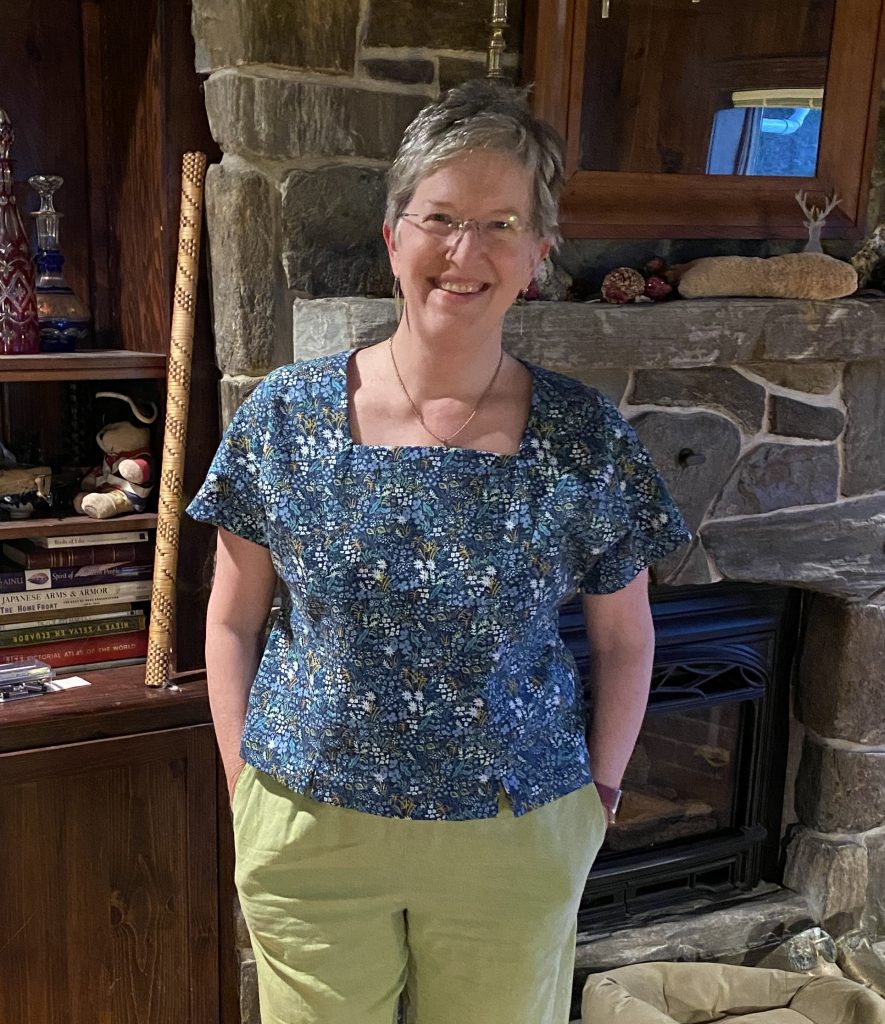
Last but not least, here’s the right side of the Simplicity S8883 top.  You can’t see that it has princess seams–this is one of the patterns that actually has cup sizes built into the pattern—wonderful!  It is made from a Rifle Paper Co. print (a quilting cotton) and I just love wearing it!

So that’s a wrap up and samples of Hong Kong finish.  I think I will do my denim Brumby with this finish…stay tuned!

Here are the links to all the posts in this series of lessons, techniques that can be applied to virtually any garment and many home dec projects.   Let me know what you’d like to learn and see here on the blog.  Cheers and thanks, Sarah

Lesson 1:   Choosing a Pattern and Starting Tips

Lesson 2:   Making a Muslin, Fitting and Sleeves

Lesson 3:   Matching Plaids, Cutting out Your Garment Pieces

Lesson 4:  Overcast Seams, just like Serged Seams

Lesson 5:   French Seams

Lesson 6:  Lapped and Flat-felled Seams

Lesson 7:  Hong Kong Finish for Seams

Lesson 8:  Lined Patch Pocket Tutorial

Lesson 9:  Hems and Scarf