email Youtube

Home
Galleries
Blog
Workshops & Calendar
Store
Resources
About
Contact

Archive for the ‘Uncategorized’ Category

HOW many techniques? Christmas Tableau

Friday, June 23rd, 2006

When I started totting up what techniques and materials I used, I could hardly believe how long the list became:

The quilt is constructed as most traditional quilts: a top (both pieced and appliquéd), cotton batting in the middle, and a backing are sandwiched together and quilted, then bound. But the quilt uses a wide range of techniques and materials:

Invisible machine appliqué
Fusible appliqué
Raw-edge appliqué by machine
Hand appliqué
Machine piecing
Hand-dyed fabrics
–the ground is cotton dyed with Procion MX fiber-reactive dyes
–Mary’s blue cloak is silk dyed with steam-set acid dyes
Commercial cottons and silks
Synthetic tulle, mesh and sheer fabrics
Threads: trilobal polyester, 60-wt. embroidery cotton, nylon monofilament, metallic, and
holographic
Inking (faces and Mary’s hands) with Tsukinenko inks
Drawing with Prismacolor artists’ pencils with artists’ spray fixative to set the color
Painting using textile paints and artists’ acrylics with textile medium
Shiva Oil Paintstiks to do the rubbings of the plaque at San Domenico with the
dates and locations of the Dominican schools in California
Sequins
Beads

To look at the quilt, it hardly seems possible, but they are all there. I guess that’s why I keep trying things out? Just add the technique to the arsenal, and when you need it, you have the skill and materials available. If anyone has any particular questions about one thing or the other, do ask!

Sources of the Imagery, Christmas Tableau

Thursday, June 22nd, 2006

This post is a continuation of a series begun on June 21 about my nativity quilt for my school. If you’re really curious scroll down to get to the beginning, or just start here! Thanks for surfing in!

Fra Angelico’s paintings and altarpieces form the basis of the scenes presented in my school’s Christmas program, and the show is called “Tableaux” after the “tableau” or “scenes” from Fra Angelico’s paintings. To begin at the center, my madonna is a composite of a seated Madonna (position and face) and Madonna della Stella (click on the hotlinks to see the original images on the internet…I just love the web!). In the latter, I absolutely LOVED the way the baby schlumps against his mama, just like a true newborn would. Instead of having the baby Jesus in the manger, I wanted Mary to be holding him just like new moms do.

I was torn as to how to show the people. I really wanted to picture the people the way the would have looked in the time of Jesus: middle Eastern! But Fra (also known as Beato) Angelico’s paintings are peopled with folks that (not surprisingly) look like they stepped out of early 1400s Italy. In the end, I chose to remain true to his works, and I’ll just have to do another nativity piece with more eastern Mediterranean looking folks another time.

Joseph, standing behind Mary and the manger, and the kings (on the right) are taken from various figures in Angelico’s works. The kneeling king is directly taken from a painting with Saint Lawrence.

The two kings on the right are from adoration of the magi paintings here (dark-haired king in black garment, and here (the white-haired king) ,

while Joseph is modelled after the figure of Jospeh in The Presentation at the Temple.

The donkey came from a wonderful piece, Armadio degli Argenti. If you look at the bottom left corner, you’ll see Mary holding her baby, seated on a donkey. I just turned the donkey around so I could place him next to the kings.

The shepherds are composites from Fra Angelico’s paintings and photos of my sons. The shepherds would have been dressed in humble garments, much like the brothers in the Coronation of the Virgin. Since this also made my life easier in terms of creating the figures, I dressed my shepherds in cloaks. The older boy to the far left, and the man behind him, are modelled after my son Joshua, now a (gasp!) 7th grader (or should I say shudder? teen-hood looms….or is here even if the calendar says he’s still 12 1/2). I darkened his hair from its usual sandy blond-brown, and also aged him and gave him a beard for the older figure. The young boy playing a flute or recorder for the Holy family is modeled after my son Eli. Here’s the picture of him in his karate ghee (he’s the one standing on the left):

and some of my initial sketches of both Joshua and Eli:

And that picture of me over in the sidebar, on the right of your screen…that thing I’m holding up by my face is one of the sheep! I was visiting with one friend at Marriner’s, in town, for a coffee and mom’s escape morning, when another friend (Kathy from Studio in the Woods blog!) popped in and took my picture. I was glueing down the seam allowances on the underside of the sheep while I sipped and yakked …grin!

That’s plenty for today!

Christmas Tableau…(nearly) DONE!

Wednesday, June 21st, 2006

And the front is finished! I took photos on Monday and mailed my entry to Houston on Tuesday! The only things left to do (as usual) are sew down the bottom side of the hanging sleeve, add the label (half-done on the computer) and sew it on, and add the documentation pocket (more about that when it is done).

So, here it is:

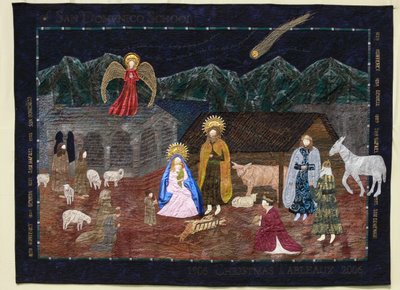
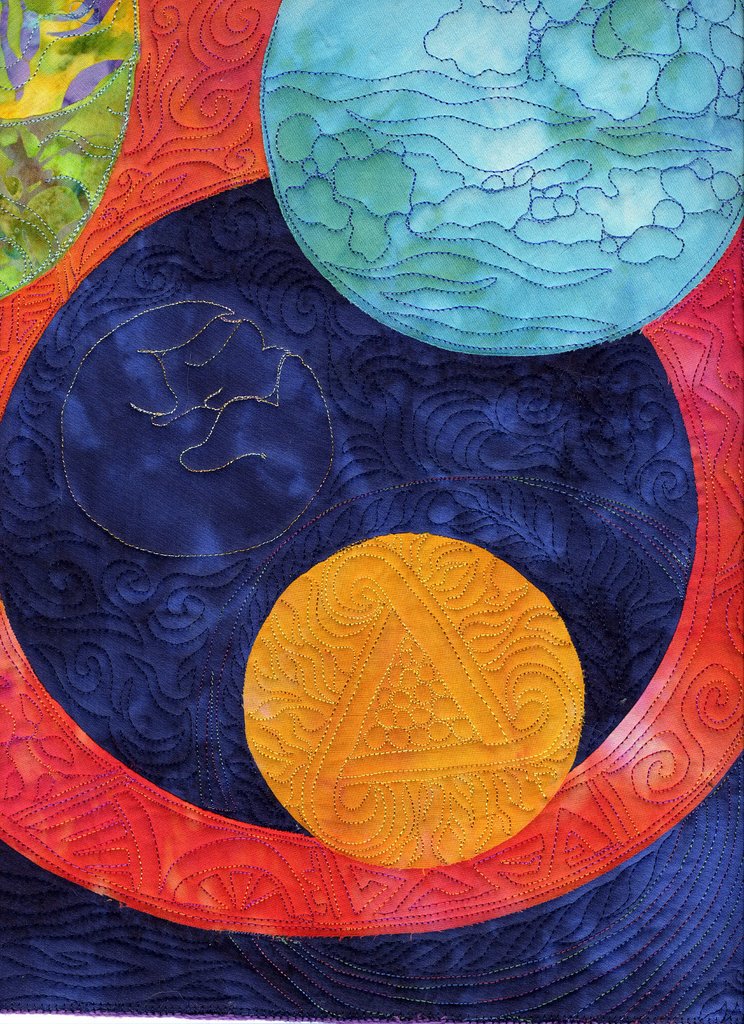
For several years I had wondered what I could do in the way of an art quilt as a gift to San Domenico School, where I attended 7th to 12th grades (1969-75). When the Alumnae Bulletin arrived in Fall 2005, and I saw that year was to be the 100th consecutive performance of Christmas Tableaux, I knew I had my subject matter. I immediately set to work researching images of Fra Angelico’s paintings on the internet, as well as collecting images and scripts and songs from the program itself (with help from Beth O’Hara and Sister Gervaise). Then I began sketching. Other influences on the quilt were motherhood, a favorite book: They Followed a Bright Star, a favorite Christmas recording that I have listened to almost every Christmas eve since I was a young child called “The Night the Animals Talked,” and the show “The Little Drummer Boy.” By the time the quilt was finished it had grown in completed size (69 inches wide by 51 inches tall), and is packed with symbolic images and words.

The overall feel of the quilt, I hope, is reminiscent of the settings and scenery of Fra Angelico’s paintings, and individual figures are taken from his paintings (please refer to the Image Sources list) and my family life. First I sketched the figures, then roughed out the background of the quilt. I placed the dark blue batik for the night sky and my brown hand-dyed fabric for the ground on the design wall, then disassembled two plaid winter uniforms (thanks again to Beth, who found some old uniforms in the uniform closet that were too tatty to be re-used) to create the mountain range. Finally, I added the buildings.

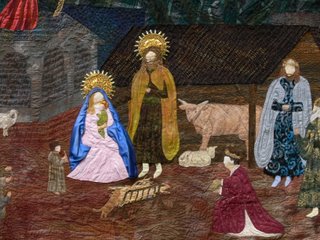
Once the background was stitched together, I began work on the figures. I tackled the hardest part first: the faces. I began using Tsukinenko inks, but found that in this scale I couldn’t get the detail I wanted with the tools I had available to use with the inks. So I created the details on the faces using artist’s Prismacolor pencils and “set” the images with spray fixative. Next, I placed the fabric in an embroidery hoop to do free-motion machine embroidery to create the hair. Finally, I cut out the faces.

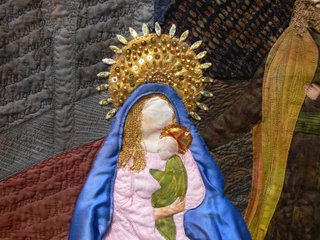
For the bodies of the people and animals, I used a firm interfacing, fusible side up, and cut out shapes reminiscent of paper doll forms. I fused the fabrics to the top, turning the edges to the back side. Fra Angelico’s paintings show people dressed the way people did when he was alive, in early 15th century Italy. The magi and saints and priests are all dressed as the nobility and priests did in those days, so I used the shin-length pleated garments for my models and pleated the fabric onto the interfacing “base”.

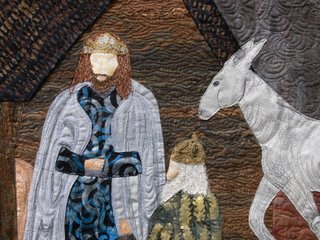
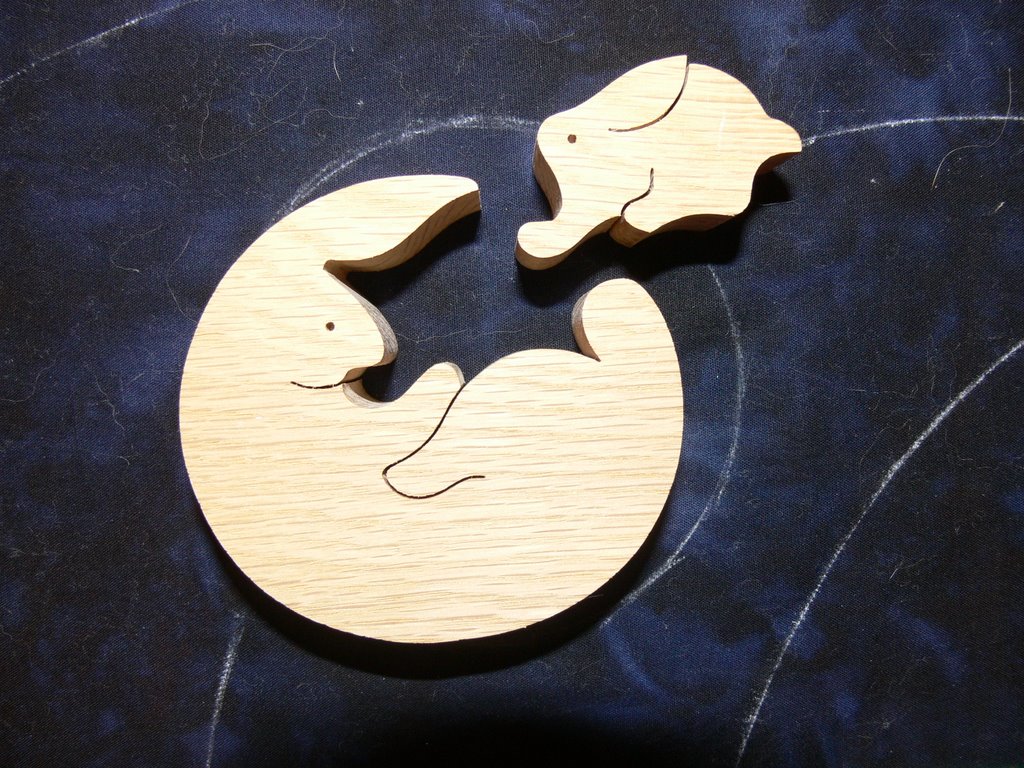
My second, oops, make that now-third-grader, Eli, likes mousies, and asked me to add one to the quilt. Since he has a book called the Mouse in the Manger, and since my cat Tyger is getting ready to jump into the warm spot in the manger, I thought that would be a great place for a mouse. Eli drew one for me, and I added him –if you right-click to open this picture in a separate window look smack-dab in the center for a spot of gray…that’s Eli’s mouse!

And I’ll add more about the quilt, the words quilted into it, the individual paintings that inspired the figures and more as the week progresses.


Circle Templates

Monday, June 19th, 2006

Elaine asked a great question–where did I get my circle templates, and I thought others might enjoy the info, so here you go. In a small miracle, I actually have the info on the makers of all three sets. In a nutshell, I used to have a sort-of-retail-shop where I used to live on San Juan Island, Wash. We didn’t have a quilt store on the island, so I set up a wholesale account and sold thread (literally out of the back of my car!) so we didn’t have to wait two months to go to the mainland to buy thread to quilt the quilt. That led to doing special orders for folks from the wholesaler (nice small income for me, a small discount off retail for them), and I got to troll through the wholesale catalog. Which meant I got to see all SORTS of cool stuff … like circular templates!

Here’s the picture from an earlier blog entry that happens to show all three varieties that I have:

The “solid” ones (that don’t have a hole in the center) are from Creative Grids. They come in 2 1/2 to 6 1/2 inch sizes (one inch increments), and have the Creative Grids “grippy” sanded area on the bottom. Here’s a link to the company’s site and product list; they do not sell to the public. As far as I know, Checker Distributors still have an exclusive contract with Creative Grids to sell these tools in the US, so your quilt shop would need to order from Checker, or you’d need to find a catalog that carries them. I didn’t find a google link (a quick search!) for a company I know, so will let you do your own searches. I like these a lot.

The skinny circles are from Quilters Rule. They are a set of 12 nested circle templates ranging from 1 inch to 12 inches. The tan color you see is the paper on the clear plexiglas that I just haven’t peeled off. They are marked in 1/8 th’s around the circle, and have the inch size staped/cut into the under side of the ring. According to the paper strip, mine are the 1/8″ acryic, but they are also available in 1/4 and 3/8 inch acrylic–I’m guessing those are designed for long-armers to use. Here’s a useful review of them at this link. And here’s a link to the Quilters Rule website where you can buy them.

I actually like these the best, I think, because I can use the circle as a “frame” and see clearly what will be in the “picture” when the circle is cut out. I can use the one-size-larger circle to frame the area I want to cut out, then I place the next-size-down circle inside it. I remove the larger circle, and cut on the outside edge.

The dayglo yellow-green circles are from The Gadget Girls and are called “Remarkable Circles”. These rings (nested also) are 1 inch thick, so the largest one is 12″ diameter on the outside of the ring and 10″ on the inside. I’m guessing I bought the Quilters’ Rule set after I bought these, because that gave me the intermediate 7-9-11 inch sizes.

MARKING AND CUTTING:

I usually just cut around the template with my 18 mm Olfa cutter…that’s the itty bitty one with a blade the size of a dime. I put off buying it forever, thinking sheesh.. how many rotary cutters can you need? Well.. the answer was one more. I LOVE this little baby–it’s great on curves, especially tight ones, and greast for free-form cutting because it is so maneuverable.

If I mark around the template, a chalk pencil works best, but I manage to make the Chaco-liner (seen in the picture above) work, too. Check out that link above (ok…here it is again: Link) to the review of the Quilters Rule nested templates. It has some great hints and tips!

The final hint…I’ll bet there are LOTS of cool templates out there…really useful, versatile ones, sold to the long-arm crowd. Those of us who quilt on home machines could do well to learn from them!

And stay tuned…. if I can get photos today, the nativity quilt is almost DONE! All I have left is to sew down the bottom half of the hanging sleeve, add the documentation pocket and label, and it is DONE! Hope to have pictures up in a couple days.

Cheers, Sarah (and sorry this got so long!)

Marking quilts, part 4 (4?!!!!)

Friday, June 16th, 2006

Sheesh I get verbose. OK, marking quilts part four. You can also use things like cookie cutters, puzzle parts and whatever for templates. In Part 1, I shared pictures from Circular Paradox, including the “moon rabbit.” The Japanese believe there is a rabbit in the moon, not a man. Once you look at the moon and find the rabbit, you wonder how you ever saw a person’s face there because it looks MUCH more like a rabbit.

When I visited Japan in 1996 with mom, I fell in love with this 2-piece “puzzle” of a mama and baby rabbit (my oldest, and then only, son was 3 at the time).

I traced around the outside edge of the puzzle using a marking pencil (the Clover or Roxannes would be ideal for this on the dark fabric). Then quilt.

Well, I think that’s enough for now. If you have any questions about specific marking issues, problems, or things you’d like to do, but aren’t sure how to start, ask away! Brainstorming together comes up with the best solutions!