Hmm…wonder what unsuspecting visitors will arrive via Google searches for koi ponds based on that title? As all my great regular readers know, I’m working on a koi quilt. The good news is that it is going well (bless fusibles!). Over the past four or five days, I have managed to make good headway on the background for the front of the quilt.
Here’s a tease…the fused fabrics laid out and draped over my big-board:
At first, I had planned to cut gently curving strips as I did for my journal quilt, from last year (this one is still touring with the 2006 Journals exhibit … not sure where it is due to go next, but they usually “come home” in about September):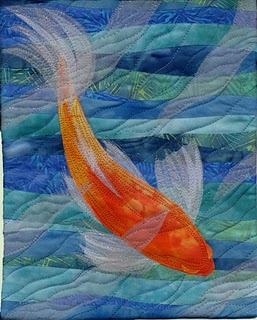
Then I decided that I wanted to get that rippled-y look from a gentle breeze skimming over the surface of the water. I remembered Pauline Burbidge‘s water pieces, and snagged her book off my shelf, but it didn’t quite have what I wanted. So, I taped two long strips of paper together, since they were almost as wide as my desired size (I m shooting for a finished piece 40 inches wide…if it is 39, I can’t enter it in Paducah!). Then, I sketched “ripples” in pencil. When I had them more or less where I wanted, I used a black felt tip to make them easier to see, then colored in every other one to keep from getting too confused during construction. Here it is with just the outlines:
Then I started with the cloth. I fused up a whole bunch of cloth … either 12 or 18 inch full width pieces (picture at the top of this post). I picked the one I wanted to be a dominant color, one of my hand-dyes with little visual “busy-ness” (in the center of the board). Instead of making a whole bunch of pattern pieces (can you say boring and tedious?), I placed the fused cloth on my work table, put Saral Transfer paper on top of that, then the big pattern piece on top of that. Using a plain old pencil, I traced over the outlines of the section I wanted, which transfers a chalk-like substance from the Saral to the cloth (it brushes off easily). Then, out comes my trusty 18mm rotary cutter (the little one, with the blade the size of a dime…maybe 1 cm. across the whole thing for those of you not in the US) to cut along the lines on the top edge, and just below the lines on the bottom edge.
Here are the first few pieces cut and up on the wall–at the very bottom of the photo, you’ll see the big pattern draped over the edge of the table where I’m doing the tracings:
As you can see, I started from the middle and worked up and down from there. In the next photo, I’ve added some more pieces:
Then I decided I’d better test the whole thing by placing the koi on it and making sure this idea for rippled water would “work”:

Thankfully, it does! So, back to more cutting. In the photo at the top, you’ll notice two of the batiks are more multicolored than monochromatic. I had intended to use them to accent the rippled edges, but once I got things going, I decided that they would be “too much.” So they won’t be on the front. The back, maybe…. stay tuned. I still don’t know what’s going to happen entirely on the back (that’s a tease!).
The next post about the quilt will be in a few days…also want to post a book review AND get a whole bunch of work done. So, off to the studio.


