email Youtube

Home
Galleries
Blog
Workshops & Calendar
Store
Resources
About
Contact

Archive for the ‘Uncategorized’ Category

Out of the blue…

Saturday, June 2nd, 2007


or more accurately, down Route 17 from Augusta, Maine. So here I am on Weds., working out after errands, and the phone rings with an unknown number on caller ID…well out of state, didn’t even know the area code. Female voice: is this Sarah Smith? yes. The quilter? yes. Sarah Maleady Smith? (??? She knows my maiden name???) yes. Hi! This is Susan Clayworth! YES!!!!!!!!!!!

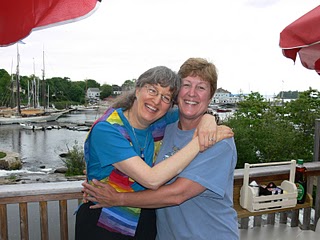
Susan was my absolute best friend and life saver in high school, and she was in Maine! Said she and her boyfriend had rented an RV to go to Acadia, but she couldn’t be so close and not try to reach me. So, we agreed to meet in 30 minutes in town!

We had lunch at Marriners, on the deck (which became a tad cool in the breeze) that overlooks Camden Harbor, and it was like 32 years evaporated. HUGE GRIN! Gotta run now to an Art Quilts Maine meeting, and still need to blog about last weekend with the Frayed Edges, and the progress on the koi quilt (slow but good), but just had to post this photo of us (above).

I’ve only seen Susan once since 1975, at our 25th reunion. What is amazing is that apart from both of us being a tad thicker in the waist, we look the same…. Susan’s hair is a little bit shorter, but we could still share clothes! I used to call her Mom “Mumsie 2” since she was like my second mom and I spent so much time at their house. I can remember one night when my dad was really getting on me and making me insane…it was summer in late high school. Well, after getting off the phone maybe 10 minutes later, Susan shows up, in baby doll pj’s under a coat in their ancient Nash Rambler (white, with aqua interior with wool carpeting that smelled, well, wooly, when wet in winter) and said “you’re coming to my house, NOW”. So I did. That’s a friend!

Now, to manage to keep up with each other in this insanely hectic era in which we live.

Oh yeah…how did she find me? She called a local quilt shop, the one nearest to Camden where I live, and asked them if they knew me. They had my teaching brochure, so they gave her my number! QUILTERS ROCK! and so does Quilting Divas shop in Rockland. WooohooO!

Marie’s bag, or Art-to-Go–and Happy B-day!

Thursday, May 31st, 2007

I collect Geminis. My hubby is one. My beloved sister-in-law, who is like a sister to me, was born on the exact same date as hubby seven years earlier. Best friend Marie was born in between the two (in years), but two days later. It’s odd how that happens…. I have a friend who collects Libras… has at least four good friends whose birthdays are all early October! Anyway, that means May is time to shop and sew. And today it is time to join in a rousing chorus of Hippo Birdie, Two Ewes! for Miss Marie, aka zquilts!

Last year when we went on the Disney cruise, I put together a small travelling pouch of art supplies to keep me content (the magenta LL Bean pencil case above): a notebook (mine was a Moleskine, but any one you like will do), a small set of Staedler pencils in a box (the tin keeps the points sharp and from soiling the bag), an eraser, a washable glue stick (for gluing in boarding passes, ticket stubs and such), a pencil sharpener, blunt-tipped (as in OK to take on planes) kindergarten scissors, some watercolor pencils (colored pencils that, when wet, turn into a watercolor), and a Japanese water-brush — just to the right of the pencil case, with an aqua handle (next to the bag it came in), with the Mars Lumograph pencil box to the right of it. Instead of taking out the pencils, tho, I put my mini-box of Caran d’Ache Neocolor II water-soluble crayon-pastels (same idea as the pencils, different form) in the photo.

These water brushes are totally cool gizies: the tip is like a felt-tip brush pen or a small sumi brush, but the barrel is a plastic tube that you can fill with water (or probably some inks or watercolors, depending on the size of the pigment particles). I bought mine at the local art store, but you can get them online at Dick Blick here. They can be used not only with the water color pencils, but also regular watercolors and things like the Neopaque II pastel crayons. Jane Davila (who has a great new book out, co-authored with Elin Waterston, which I’ll review soon) did an article recently (past two months or so) in Quilting Arts magazine about using the Neopaque IIs on cloth.

SO…. I made Marie a birthday package for art-on-the-go. My bag last summer was a perfectly serviceable pencil case, but I couldn’t send wonderful Marie a plain ol’ pencil case! So I whipped out some whimsical cat fabric (she loves cats at least as much as I do!) and whipped up a quick and easy bag. Of course, why make just one? So I made two… one for her, one for me. Since her’s is intended to be a travelling bag, it is narrower on the base so it will pack flat inside a suitcase or tote. Mine has a wider base since I decided I’d use mine to tote show-and-tell stuff to classes (lots nicer and more quilty than a ziploc baggie!).

I’ve been impressed with how easy Joan Hawley makes it for people to sew bags–no wonder her line of Lazy Girl Patterns is so successful! So I thought I’d learn from her and try to make something simple (for once!). I cut rectangles of two fabrics and batting. Placed fabric right sides together, and batting on the side with the outside fabric. Sew about 1/4″ around all edges, leaving an opening on what will be one of the top/zipper edge for turning. Turn right side out. Hand-sew (!) or fuse (yep) opening closed. Quilt quickly and simply…in this case, in matching blue thread amongst the kitties…think of an unwinding ball of yarn; do not quilt withing 1/2 inch of edges.

Sew a zipper to one side, topstitch. Sew the other side of the zipper to the other edge, topstitch. Sew side seams using 1/2″ with seam allowances opening to the outside (so the contrasting lining fabric shows. Decided how wide you want the base; align side seam with imaginary center-bottom line, make a triangle and sew across it. By leaving the flaps and seams on the outside of the bag, it is cute, shows of the lining fabric, and I think the flaps give the base a little bit more stability. Sew tabs on either end of the zipper (my zippers were too long and needed to be shortened). I LOVE scraps of ultrasuede for this sort of thing…sturdy, don’t soil as quickly as cottons, and raw edges are very tidy, but you can also wrap with cotton, too. Here’s what the end of the bag looks like:

Fill bag with wrapped goodies and send it off! Or fill bag with goodies and use! Here is the inside of the bag, minus the goodies:
From Photos to Fiber

Tuesday, May 29th, 2007

That is the name of my friend’s new company and soon-to-be website! Jan P. is a local quilter who, when I met her almost 3 years ago, was a budding art quilter. She has taken lots of classes (a lot at www.quiltuniversity.com) and worked to improve her technique and eye. Her husband is a fabuloso photographer, too. Jan has interpreted several of his photos (including two so far of her three sons… the third one is up next!) in cloth. So…. From Photos to Fiber.

Well, all of a sudden, with short notice and out of the blue, she and her husband got the chance to have a small show at the Lincolnville General Store at the junction of Routes 52 and 173 in Lincolnville Center, the town just north of where I live. Here’s the store,

And here is the cool door handle, which reads Golden Heart Refrigerated Bread

As luck would have it, their artists’ reception was right about the time I would be heading home from Frayed Edges at Kathy’s house, and if I took the back route, I’d drive right by!

Jan hung the show on Sunday afternoon, and the opening was yesterday. By the time I got there, 90 minutes after the opening began, Dwight had sold two photos and Jan had her very first professional art quilt sale! YEAH! Here a shot of folks looking at the photos and art quilts:

Here’s a picture of several quilts, including the one that Jan sold (still didn’t have sold written on it! the blue one with the fish…she painted it and it’s wonderful):

And a picture of Jan in front of her husband’s photos, with his lighthouse photo on her right and, to the right of that, the quilt she made based on the photo:

I couldn’t resist taking more photos on the way out… of the stained glass hanging over the antique wood stove:

And once again finding inspiration for quilting designs everywhere… the side of the old wood stove:

And the trivet built into the stove…what a cool idea (literally!) to get your pot up off the hot stovetop: A couple of months ago, Jan and I scheduled for the three of us (with her hubby, that is) to have a small group show at Zoot, a splendiferous coffee house here in Camden in October, so look for more of their work on view in public in just a few months (eeek! We need to get sewing!!!!). I’ll let you know when their website goes live in a few weeks. Cheers, Sarah

Koi Update #6, the back

Monday, May 28th, 2007

Just back from a glorious weekend away..2 days feels like 2 weeks of refreshing! Have to download over 150 photos and write up blogs, tho…so one more about the Koi quilt, then will take a breather from that. Until then..here you go… the quilt is turning out great! more soon…

About a thousand years ago when I started writing about this quilt (if you’re not sick of it yet), I mentioned that I needed to get this done in a short time frame. But, I wanted it to be really cool, too. I have found that two places are really good for creative musing: the shower and working out. Well, this time I was working out at the YMCA on the rowing machine, where you are nearly sitting on the floor. As I looked up at the high, high ceiling and the lights, I thought about what it is like to look up from underwater and see the sunlight blinking through the water. The appearance of the surface of the water is completely different than from underneath.

So, I took the leftovers from fusing the top, and made a back! I used the two “rejected because they were too busy” batiks and used them here because (a) the “piecing” was simpler, and (b) you can see overhanging trees and vegetation from underneath the water. Here it is:

Remember that long ironing board with all the fused pieces of fabric on it ready to use? Well, I fused up another yard of fabric in addition to that, then a 1 1/4 yard piece of my hand-dyeds. Here is all that is left after doing the background of the front and the back:

Then I thought: wouldn’t it be cool to show the under side of the fish on the back. Ahem. So, I’m going to do that! I need to make the three fish and two fish-portions from the underneath view and quilt them. I’ll then position them on the bottom and stitch in place by machine. The outline of that stitching will then be the outline of the fish on top. I’ll applique the tops of the fishies in place and fuse up the fins and tails, then (finally) quilt the fins and tails (on both sides) at the same time! Sound convoluted? Yeah, to me too…… at least it sounds convoluted when I write it out. But I promise it’s gonna be really cool! More soon!

Koi update #5–Fins and tails

Saturday, May 26th, 2007

The fish I was so smitten by were the ones known as butterfly koi. While surfing the web recently, I learned that some koi collectors look down their noses at the butterfly, not considering them “pure, true koi.” Oh well…. I think they are glorious! But even the regular ones are wonderful, too. I’m not as wild about the red/white combinations, or the nearly-all black ones that seem to be prized in koi circles… I love the yellow and the gold and the ones with the feathery white fins. So that is what mine are!

I took this photo last summer, when we were in Sarasota visiting Paul’s Aunt and Uncle on vacation. The hotel had a pond as well as the beach… I think there may be more than just this one quilt… when I have more lead-time, I want to do another one with the reflections of the overhanging palms…..

I LOVE Misty Fuse, a fusible web developed by quilt artist Esterita Austin and sold by her at her website (tho that store is temporarily closed), through Keepsake Quilting (among other places), eQuilter.com and your local quilt shop. Misty Fuse is an incredibly fine, light fusible web that leaves a soft hand to the fabric and can be used at low enough temperature that you can fuse sheers, tulle and other cool stuff without melting the sheer fabrics.

I searched through my stash of sheers (sales at Joann’s are a good time to stock up). I used mostly these:

I made some highlights for the water with the blue, then used the cream and bright white for the fins, with a little bit of the matte gray, too.

Here is the selection of sheers I used for the koi after I fused them up. That red/orange stuff was truly vile…and I knew it would be perfect for flames; it is also perfect for koi! I’ve overlapped some so you can see the layering and transparencies. For the “regular” koi, I used the copper on top of the vile red/orange print. For the butterfly koi, I used the white, cream and pale gray. I ended up not using the gold or red at all, and used the aqua only for the water highlights.

Because I am a wicked tease, I’m only going to show you one of the koi right now! I plan on quilting the water, then doing something on the back (more on that soon enough), appliqueing the fish on the top, and fusing and stitching the fins last of all. So imagine this handsome fishie with some fun threadwork on the fins: