email Youtube

Home
Galleries
Blog
Workshops & Calendar
Store
Resources
About
Contact

Author Archive

Plaid Top Tutorial: Lesson 8–Lined Patch Pocket

Tuesday, March 14th, 2023

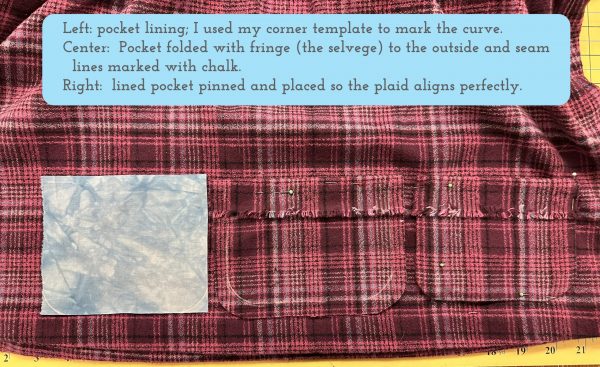
Today we move on to another fun technique:  a lined patch pocket.  I kinda made this up along the way (my first photos are not included because I figured out a better way…this is the revised and improved method!). The flannel is SO soft and comfy–in part because the weave is dense but not terribly tight. That means I might be able to wear holes in the bottom of the pockets, so I decided to give them some strength and structure by adding a lining.  The hand-dyed blue was in my stash and worked well enough  I also really liked the frayed selvage edge of the fabric so decided to use that as a decorative element.  I cut the pockets with the  the upper edge of the pocket on the selvage (lengthwise edge of the fabric) instead of the usual orientation.

Here’s what we are doing today–pockets!

Please note:  I am affiliated with Janome as a Janome Artisan and am compensated.  However, my reviews are honest and I would say what I say whether affiliated or not.  I’ve also chosen to be affiliated with Janome since 2003 (!!!) because their machines are so good and they are so responsive to the interests and needs of their customers.

Let’s dive into the details!  First cut out your pocket including either a turn back (flap that will turn toward the garment or, as I did, a flap that will fold down over the front of the pocket.  In the next photo, I’m preparing the cut pocket piece by sewing a basting stitch to make it easier to get a consistent turned-under seam allowance.

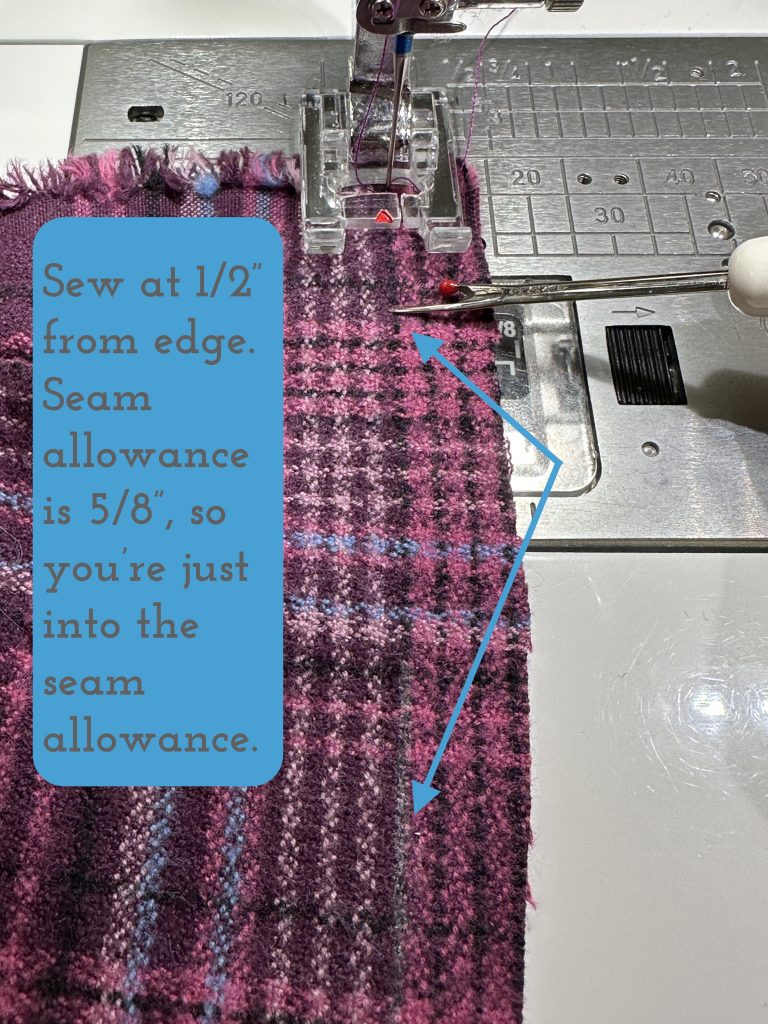
Sometimes taking an extra step makes things easier, not harder. This is one of those times. Sew with a basting stitch–I used about a 3.5 stitch length–1/2″ from the raw edge. This leaves 1/8″ between the basting and the turned edge line. The basting won’t show when the pocket is turned right side out, but the stitched line makes is SO much easier to turn accurately!

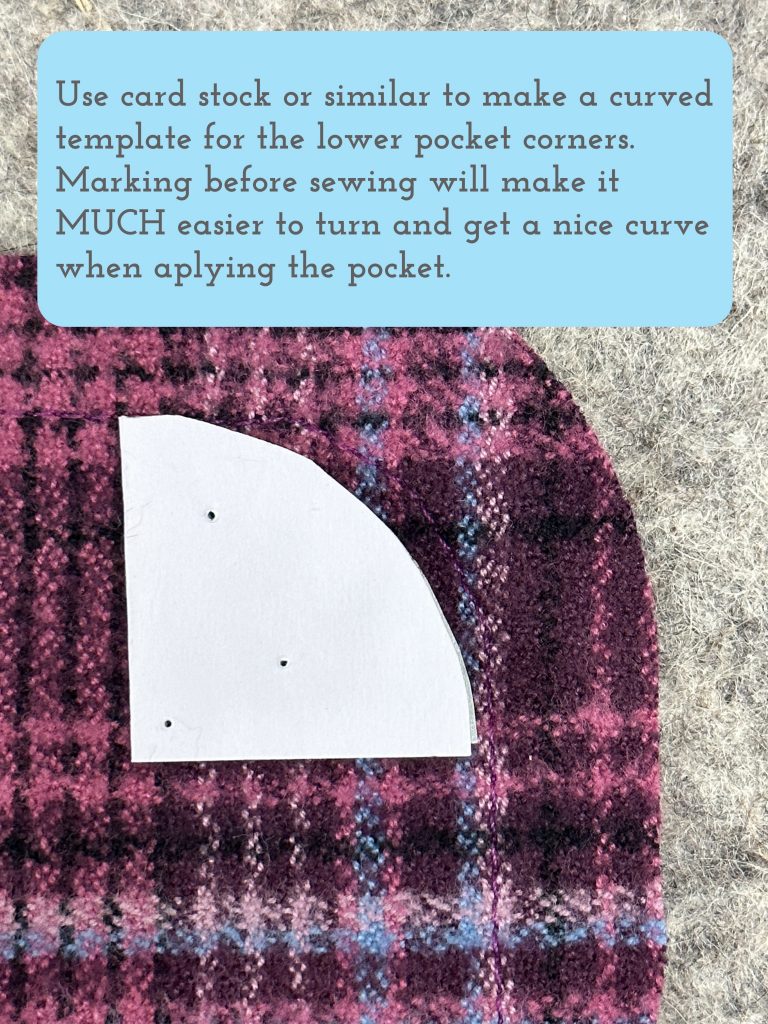
Using something firm like card stock, index card, or a cereal box, cut a quarter circle. I folded a sorta-square piece of cardstock into quarters, marked a set distance (an inch), then used a round item (think jar, pepper mill base, even (!!) a quilting template) that has a curve shape that  you like. Be sure the curve intersects the distance marks so it curves symmetrically round the corner.

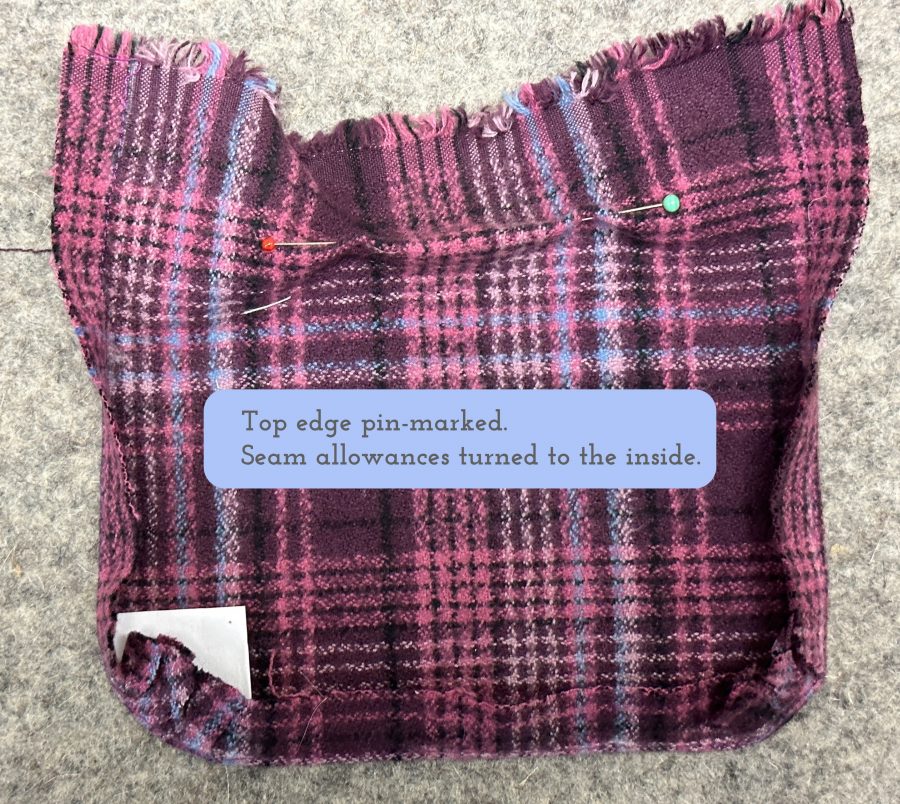
Notice that the top edge, with the fringed selvage, is pin marked where it will fold over to the outside of the pocket.

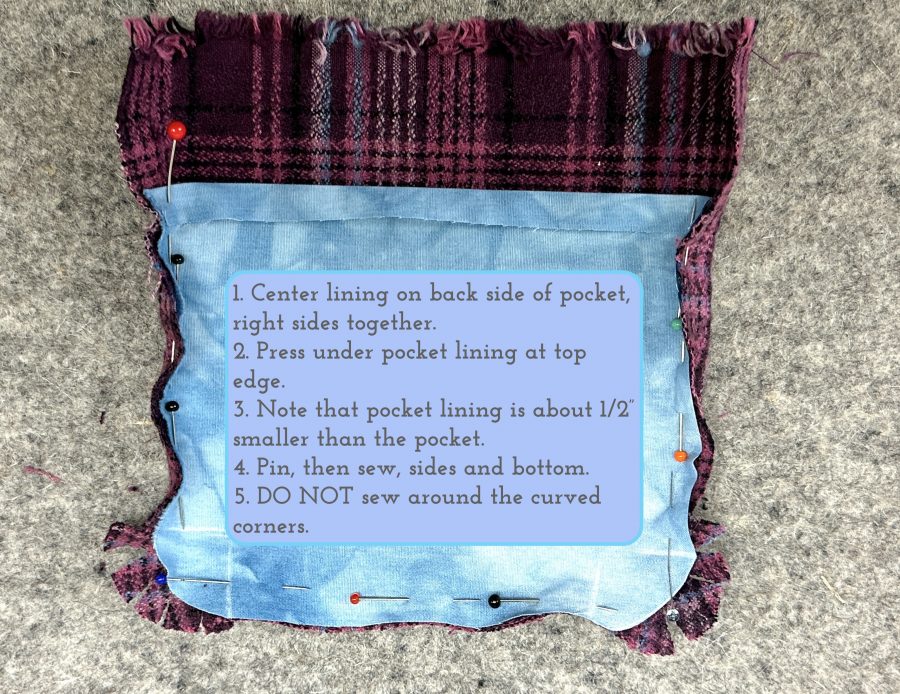
If your finished pocket is 6×6″ (honestly I’m not sure what size I cut mine, just using this to make the math simple!), you’ll have cut it 5/8″ seam allowance + 6″ + 5/8″ seam allowance = 7 1/4″.  Now, you’ll want to cut your lining smaller so that it is nicely hidden.  That means the lining would be cut at 6×6″ or a perhaps 6″ wide by 6 1/4″ long (to allow you an extra bit to tuck under at the top.  You will sew it to the pocket exterior with 1/4″ seams allowance, NOT 5/8″!

Press under 1/4-1/2″ at the top (see photo). Sew the lining to the exterior of the pocket with 1/4″ seams, right sides together, on the sides and bottom ONLY, but SKIP sewing those fiddly curves at the bottom.

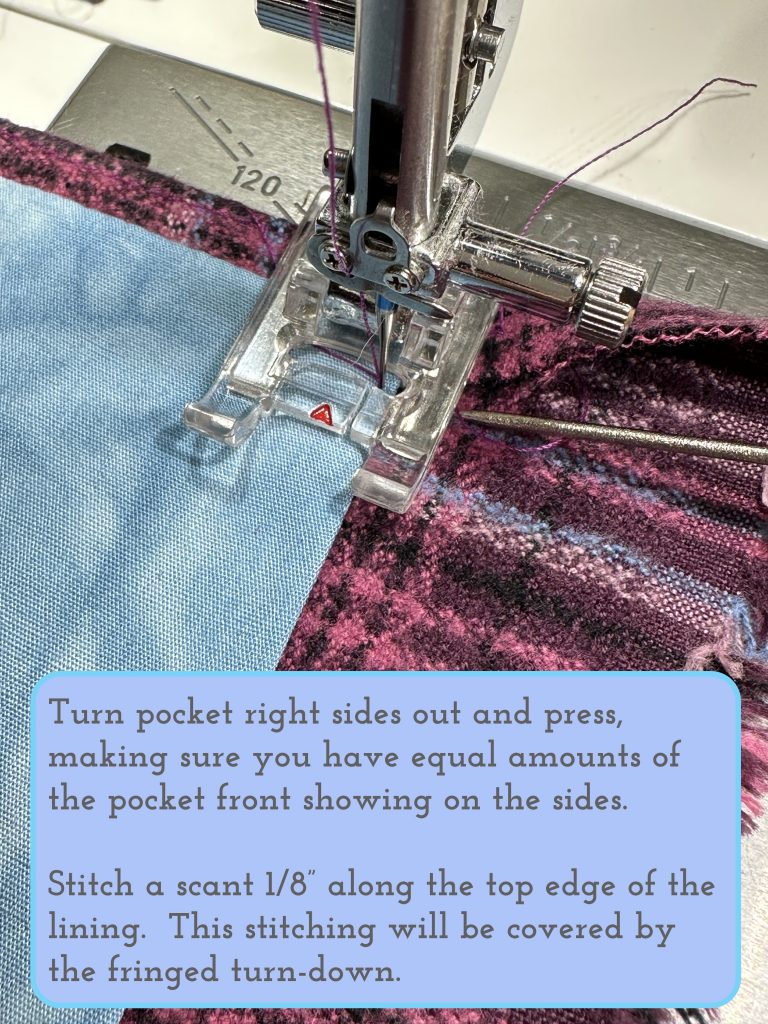
Turn the pocket right sides out and press so that the lining is centered and you see about 3/8″ of the fashion fabric on the edges.

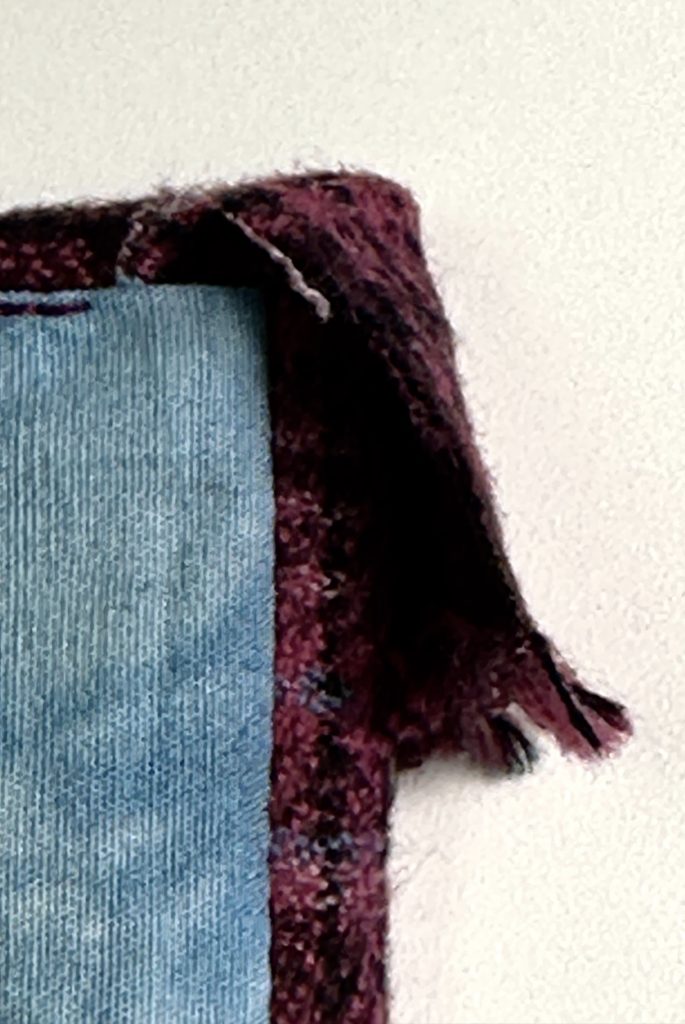
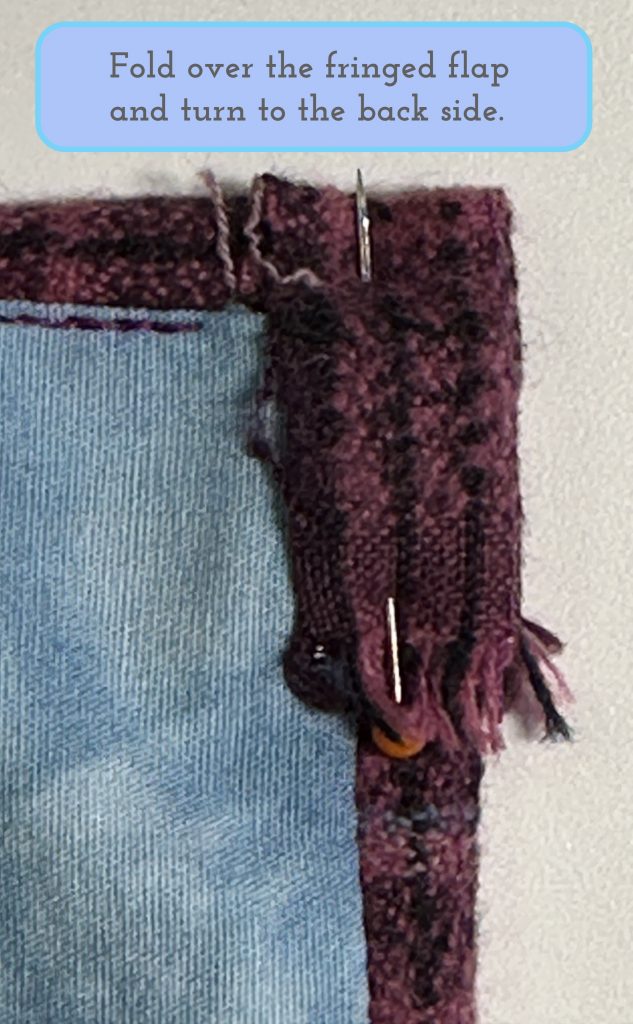
For my fringe-flap, I just tugged it out of the way.  Then I edge-stitched the top (turned under) edge of the lining started about 1/2″ away from the outer edges of the pocket — this allows you some leeway when you deal with hiding that flap. Clarification to caption above:  the turn-down is on the outside and doesn’t cover the lining, but the lining stitching is hidden by / covered by the turned down flap.

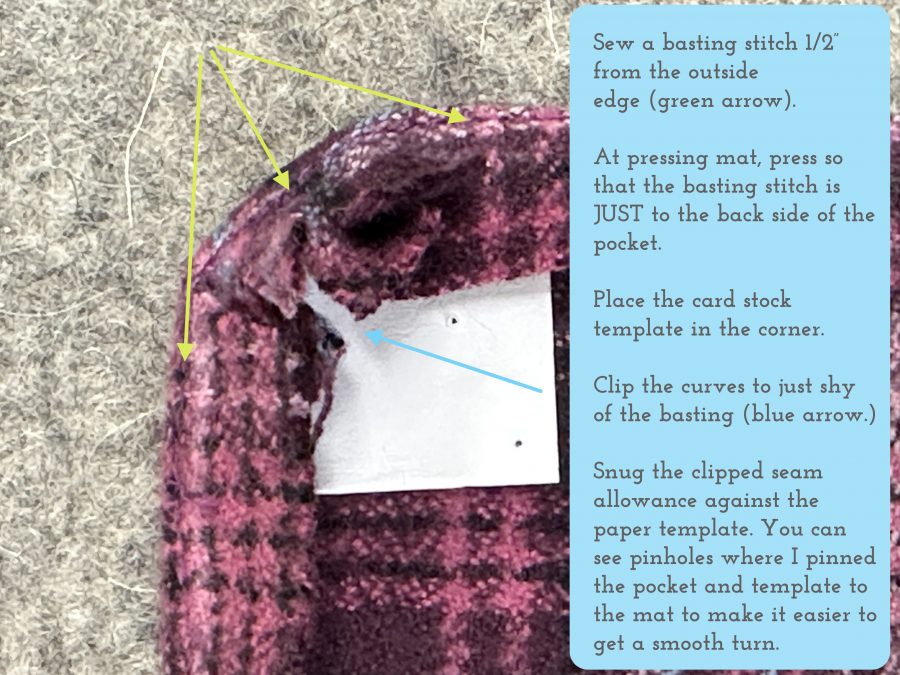
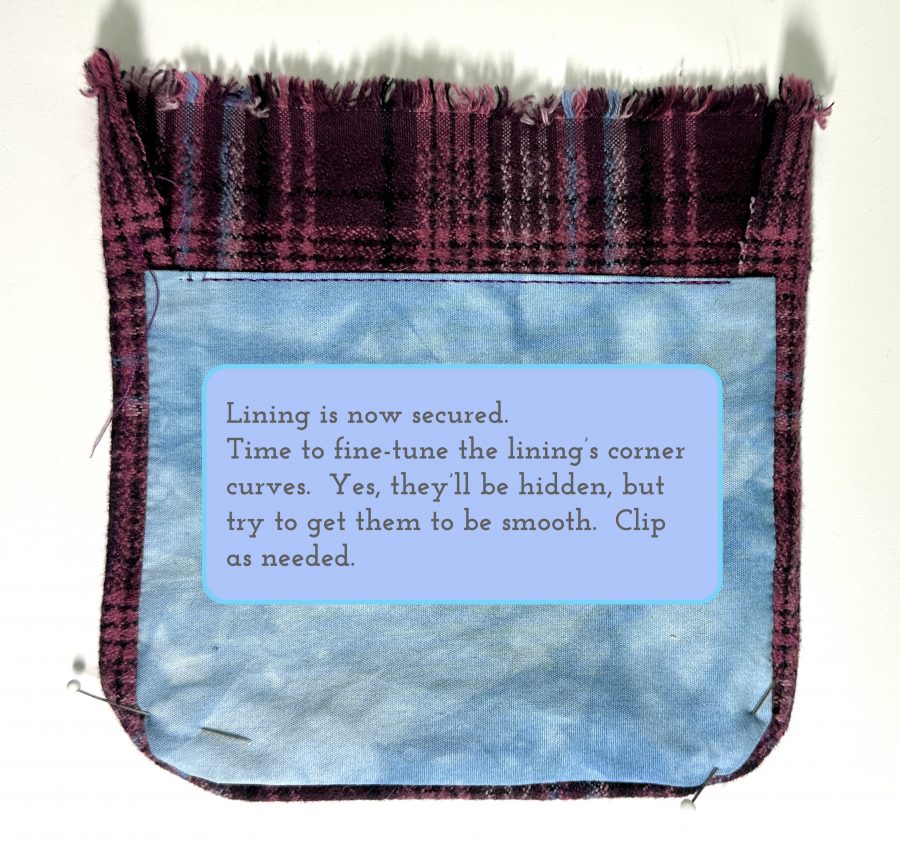
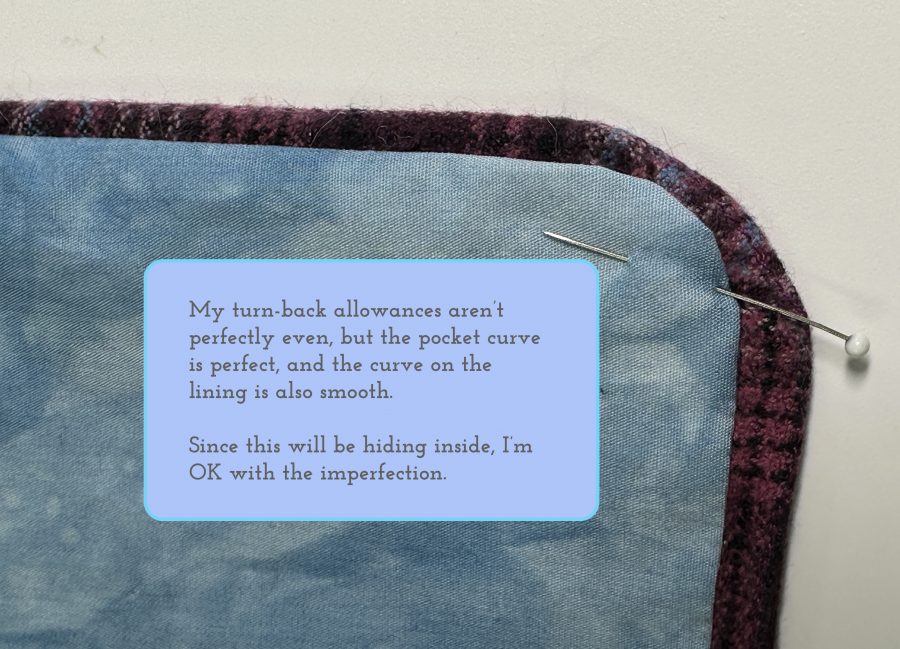
The corners are, honestly, a bit of a nuisance, but you can do it!  Just tuck them inside, clip into the seam allowance as needed to facilitate turning and press the daylights out of them.  I have become a fan of–don’t faint–washable glue stick.  It works and is easier than pins, clips and whatnot.  Just use a toothpick or the tip of your seam ripper to dab some between the seam allowances of the lining and fashion fabric to hold them together.  The glue will wash out in the first laundering!  I prefer glue stick to dots of white glue because it is already sorta dry and doesn’t soak through the fabric or require extra drying time.

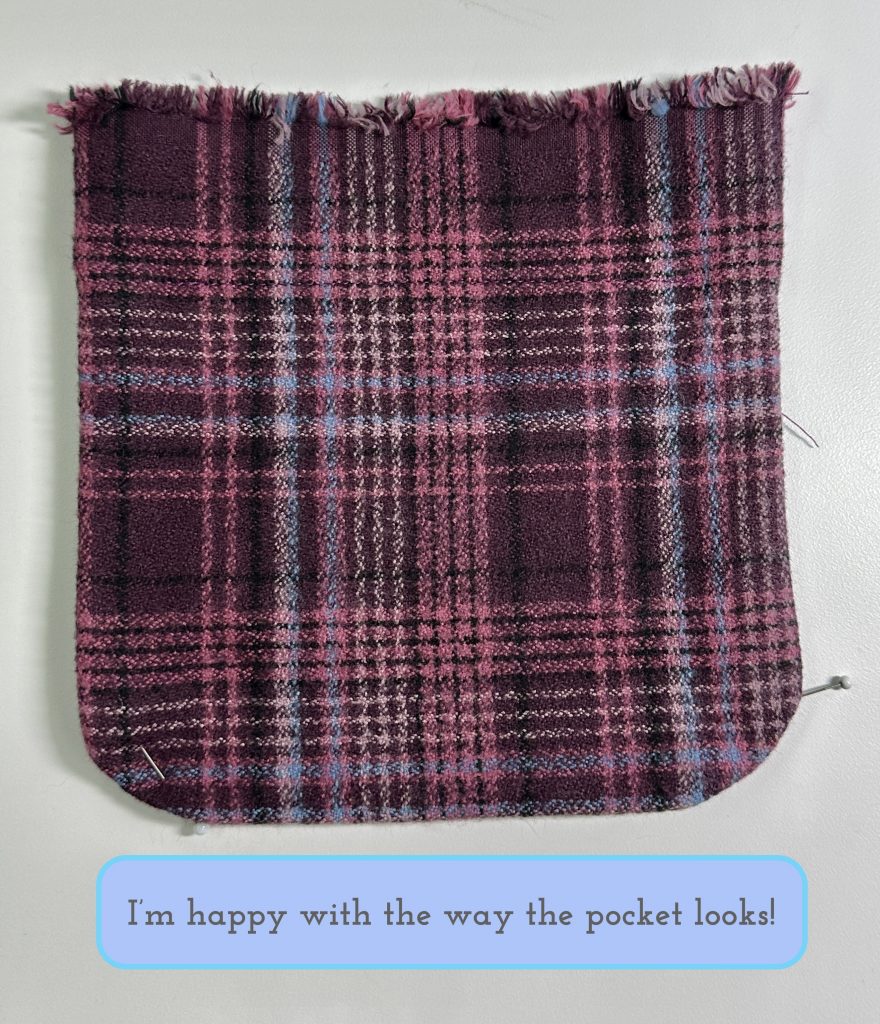
Here’s the lined and pressed pocket from the front side.

Next I needed to deal with that flap detail.

This is another spot where a dab of washable glue stick between each of the layers can help.

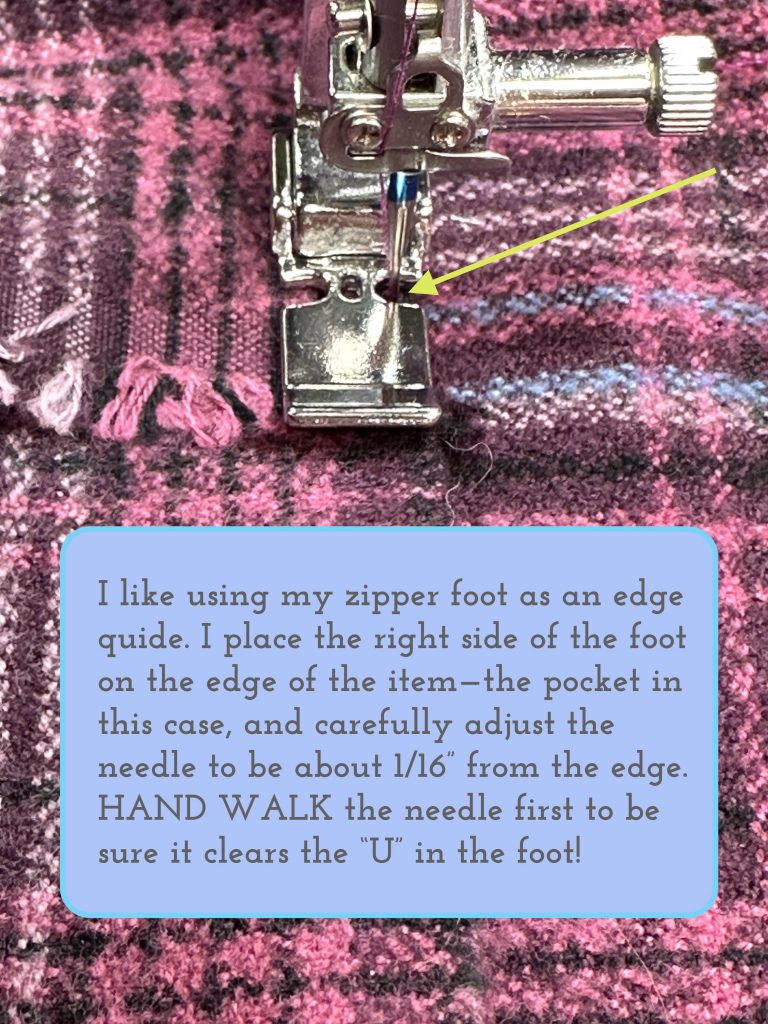
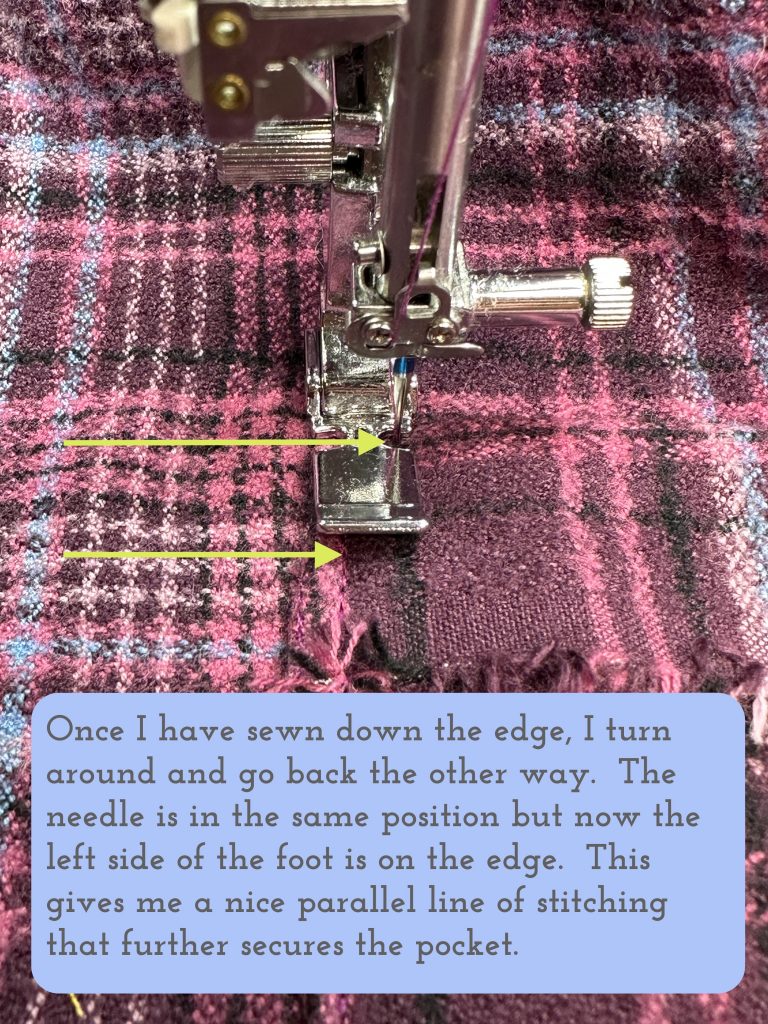
The second line of stitching, above, means that those unstitched rounded corners on the lining are trapped between the two lines of stitching and won’t go anywhere.

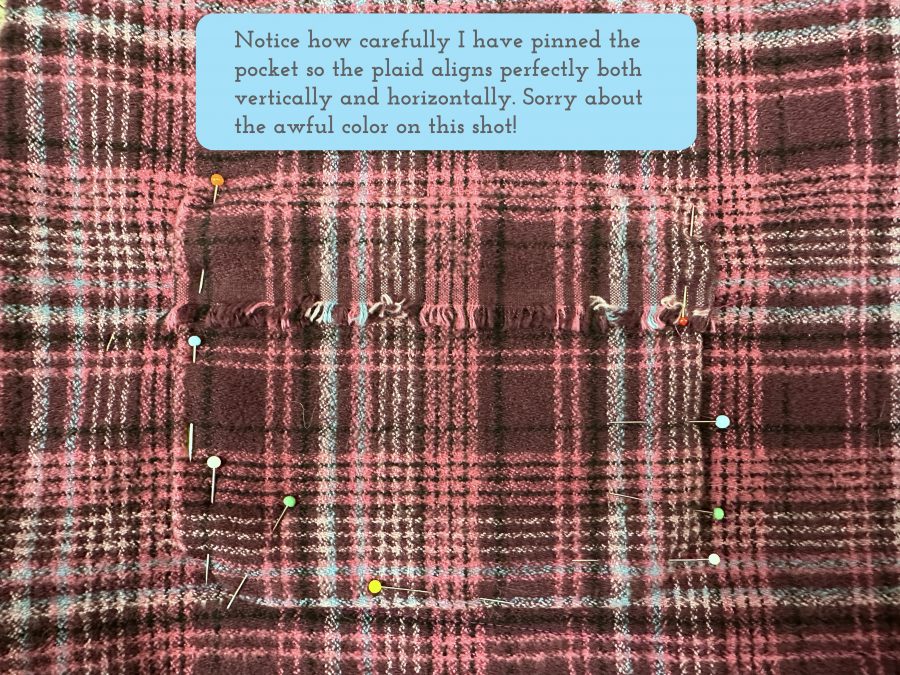
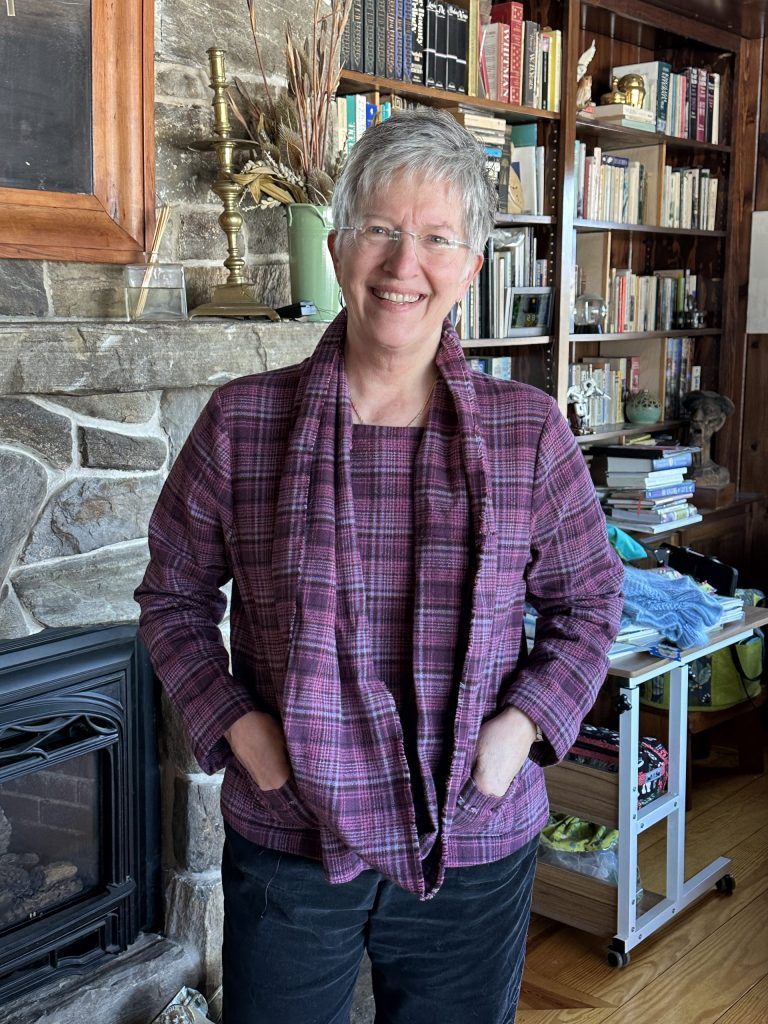
And there we go–pretty lined plaid pockets, perfectly matched, ready to use: kleenex, keys, doggie treats!

The next post will be the last in this series with hem finishing and the easy-peasy scarf!  See you then!

Here are the links to all the posts in this series of lessons, techniques that can be applied to virtually any garment and many home dec projects.   Let me know what you’d like to learn and see here on the blog.  Cheers and thanks, Sarah

Lesson 1:   Choosing a Pattern and Starting Tips

Lesson 2:   Making a Muslin, Fitting and Sleeves

Lesson 3:   Matching Plaids, Cutting out Your Garment Pieces

Lesson 4:  Overcast Seams, just like Serged Seams

Lesson 5:   French Seams

Lesson 6:  Lapped and Flat-felled Seams

Lesson 7:  Hong Kong Finish for Seams

Lesson 8:  Lined Patch Pocket Tutorial

Lesson 9:  Hems and Scarf

Plaid Top Tutorial: Lesson 7-Hong Kong Finish Seams

Friday, March 10th, 2023

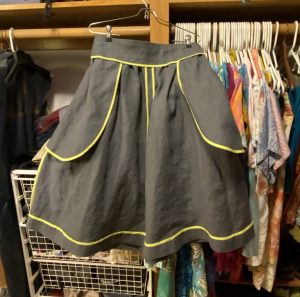
Hong Kong seams are a thing of beauty–a little extra work but a secret delight!  So even though I didn’t use them in this plaid top, I’m including them with all the seam lessons in this series of technique posts.  I did use them on both my Simplicity S8883  top, full blogpost here, and the Brumby Skirt.   I also used this finish on a jacket I made for my daughter-in-law some years ago that I swear I wish she could wear inside out LOL!

That lime green on the shoulder and princess seams is a Hong Kong finish.

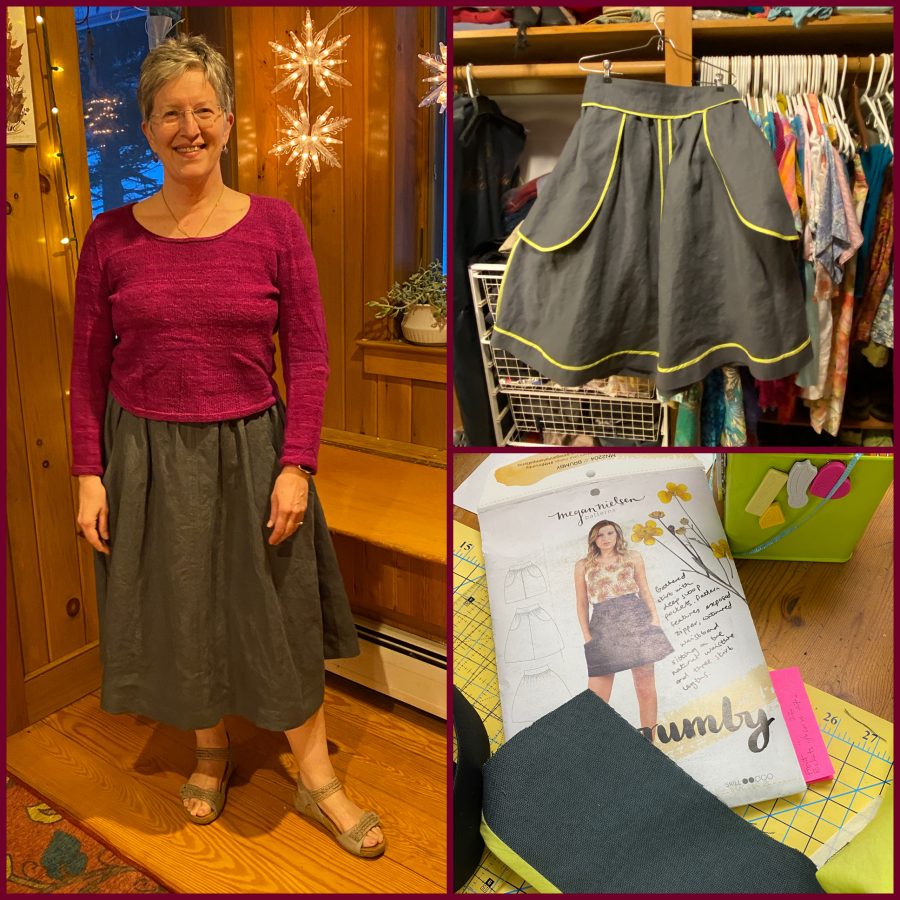
And the Brumby Skirt from Megan Nielsen, inside out! Same lime green (I bought several yards of it, a cotton lawn) for Hong Kong finishes. Such a pretty Pop!

Please note:  I am affiliated with Janome as a Janome Artisan and am compensated.  However, my reviews are honest and I would say what I say whether affiliated or not.  I’ve also chosen to be affiliated with Janome since 2003 (!!!) because their machines are so good and they are so responsive to the interests and needs of their customers.


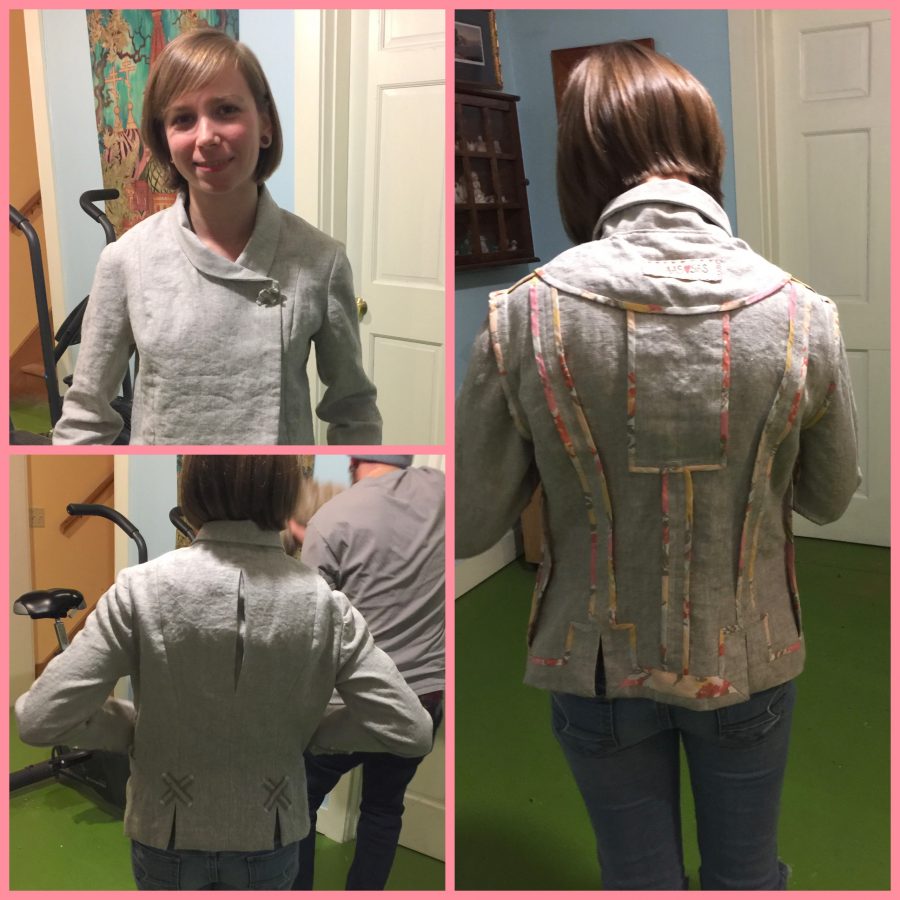
And here is one of my all time favorite in my life insides of a garment, the jacket for Ashley:

Top left:  front.  Bottom left, back.  Right side:  all those beautifully finished seams.  I had gone looking for a lightweight fabric and found the print and thought Oh YES!  This is a heavily modified pattern…changed it from hip length single breasted to double breasted jacket, Peter Pan collar changed to roll collar, added vents at the bottom rear, a box pleat for movement / ease in the center back…you get the picture.

But aren’t these seams pretty?????   So here is how you do it.  This process is VERY similar to putting a binding on a quilt for those of you who know how to do that, except that the back side–the one between the seam allowance and the body of the garment, is a raw edge and is not turned under.  This minimizes bulk. Because it is cut on the bias it doesn’t pose a fraying problem!

    1. We will assume a 5/8″ seam allowance.

    2. To cover 1/4″ on the side of the seam allowance that you see, you will cut a strip on the bias that is about 1″ wide.

    3.  Choose a very lightweight fabric that is not bulky.  Cotton lawn is an excellent choice — it is significantly lighter in weight than quilting cottons, handles well, and is soft against the skin.  You can choose to match colors or, as I did, pick something zingy and pretty! You could also use a super soft jersey knit, and decades ago they used to sell nylon tricot (ick!  felt like plastic) in strips for just this purpose. For garments that won’t be laundered you could also use a fine silk. ***Be sure to pre-shrink / pre-wash any fabric just as you did with your main garment fabric.  You don’t want it to shrink after you’ve completed the garment and have it distort things.

4. Sew the bias to the seam allowance with a 1/4″ seam allowance.  Be careful not to stretch the bias strip.  Trim the ends even with the end of the seam.  If part of the seam will be covered by a hem, and therefore enclosed, you only need to extend the finish to the point where the bottom 1/4 – 1/2 inch will be covered.

5. Press the bias away from the seam.

6. Gently fold the bias around the seam allowance so it snugs up against the raw edge.  Pin or glue-stick in place.

7. Stitch in the ditch with a thread to match the fashion fabric to secure the finish.  If you have cut your strips at 1″, about a scant 1/4″ will extend from the ditch-stitching towards the seam.  You can leave it or trim it down to 1/8″.

8. Press, and stand back and enjoy the beauty.

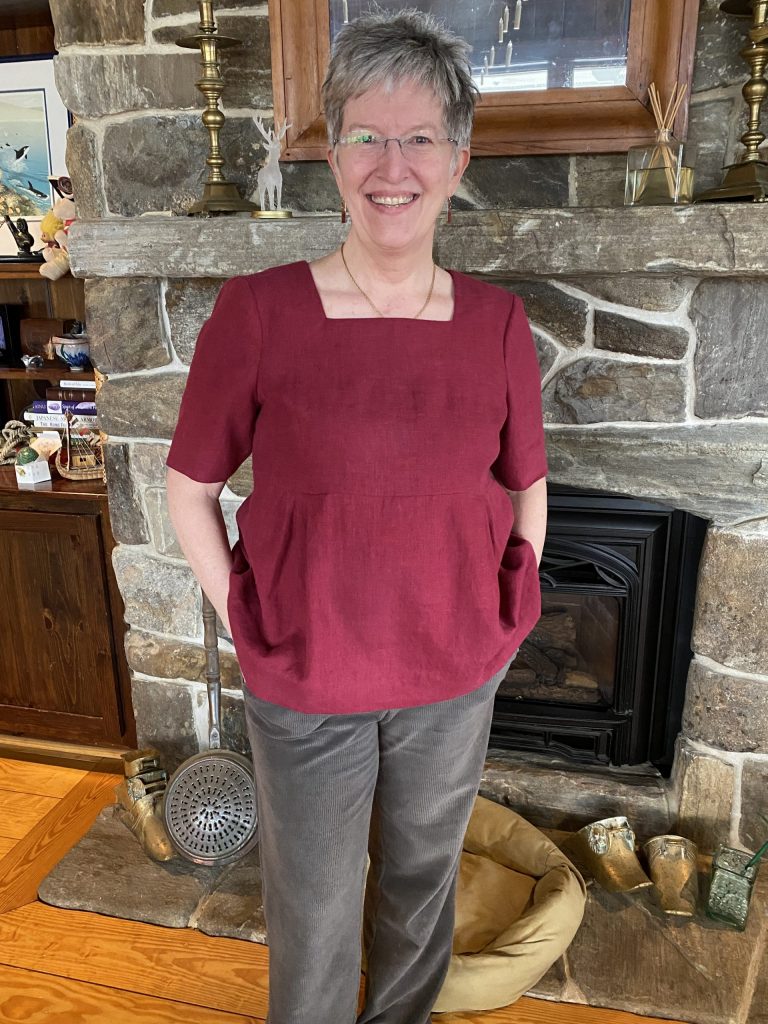
The first lesson / project for Garment Maker’s Question Time is a shift dress (with or without a waistline seam), something that I would Never, EVER wear.  And I already knew how to do an invisible zipper.  So I bought a pattern for a fitted dress with a waist seam, center back zip and very short sleeves.  I did the muslin / toile (the fitting garment where you figure out your needed alterations) as a dress, then totally hacked the dress into a square (not rounded) neck, longer sleeves, moved the waistline up to empire height, eliminated the center back seam since I could get into the top without a zip because of my modifications, and converted gathers into pleats.  I LOVE this linen (from Fabrics-Store.com linens, I used the IL-19 Softened in Beet) and found the perfect Kaffe Fassett shot cotton plaid (heavier than lawn but lighter than quilting cotton) to be the Hong Kong Finishes.  I like it so much I may use the leftover linen and find some more of the plaid and make a tank with the plaid visible!

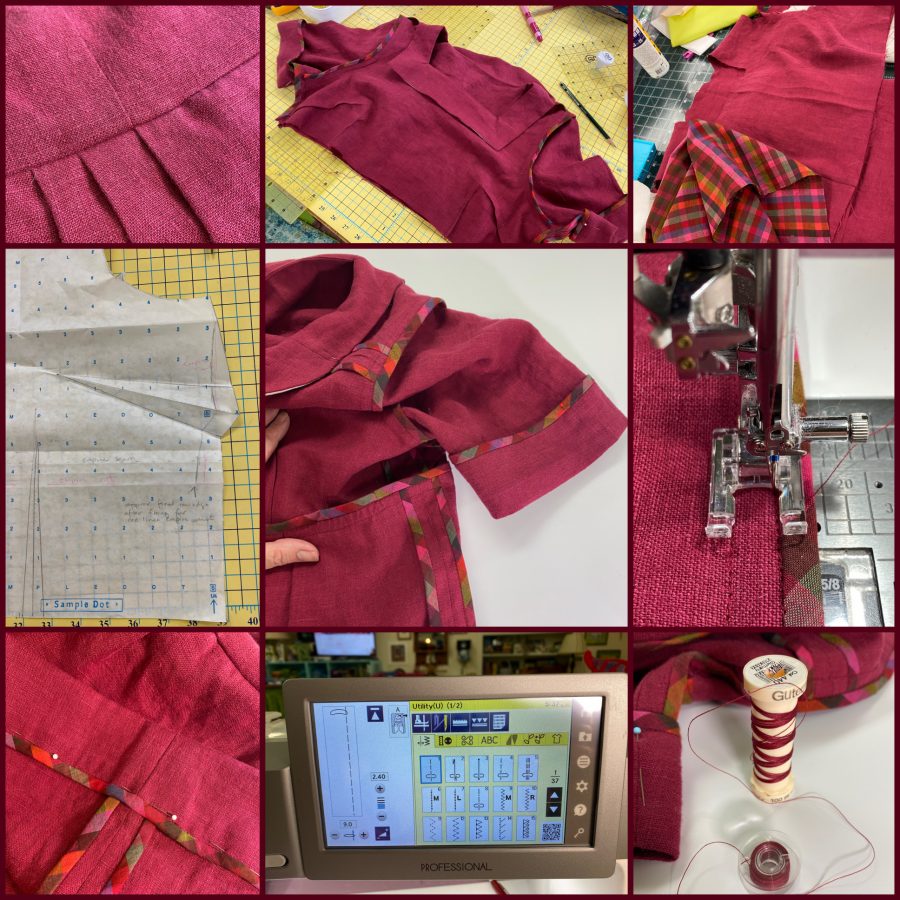
Here’s a collage of the construction process.  Apparently I posted about this on social media (circa February 2021) but never did blog about it! oooops.  I am sure I also put it in my newsletter–if you’d like to receive the monthly newsletter, sign up at the bottom of every page or in the right sidebar on my blog!

Here’s another collage that shows the Brumby skirt (I SO want to make one in denim like the pattern, but at a length suitable to my age and legs!), the inside and the pattern cover.  AND, just this week I bought the denim–100 percent cotton denim no less.  Now, to finish Eli’s quilt so I can get some garment making done!

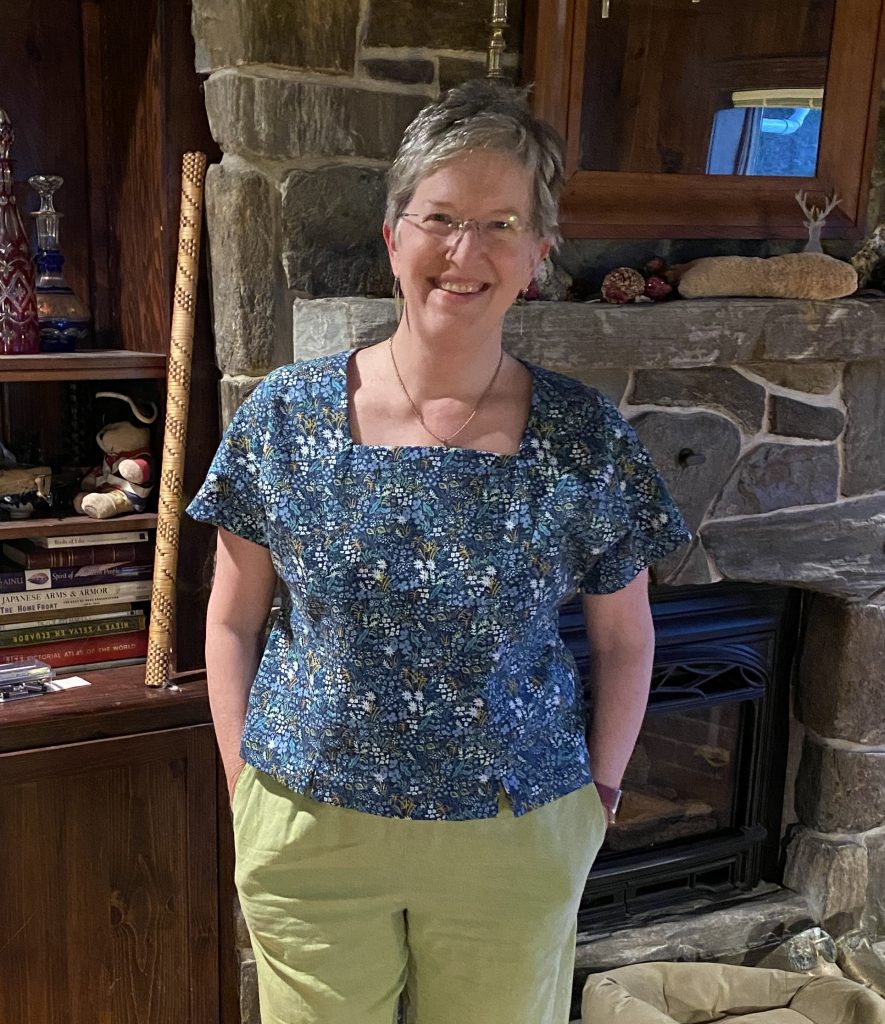
Last but not least, here’s the right side of the Simplicity S8883 top.  You can’t see that it has princess seams–this is one of the patterns that actually has cup sizes built into the pattern—wonderful!  It is made from a Rifle Paper Co. print (a quilting cotton) and I just love wearing it!

So that’s a wrap up and samples of Hong Kong finish.  I think I will do my denim Brumby with this finish…stay tuned!

Here are the links to all the posts in this series of lessons, techniques that can be applied to virtually any garment and many home dec projects.   Let me know what you’d like to learn and see here on the blog.  Cheers and thanks, Sarah

Lesson 1:   Choosing a Pattern and Starting Tips

Lesson 2:   Making a Muslin, Fitting and Sleeves

Lesson 3:   Matching Plaids, Cutting out Your Garment Pieces

Lesson 4:  Overcast Seams, just like Serged Seams

Lesson 5:   French Seams

Lesson 6:  Lapped and Flat-felled Seams

Lesson 7:  Hong Kong Finish for Seams

Lesson 8:  Lined Patch Pocket Tutorial
Lesson 9:  Hems and Scarf

Plaid Top Tutorial: Lesson 6-Lapped and Flat-Felled Seams

Tuesday, March 7th, 2023

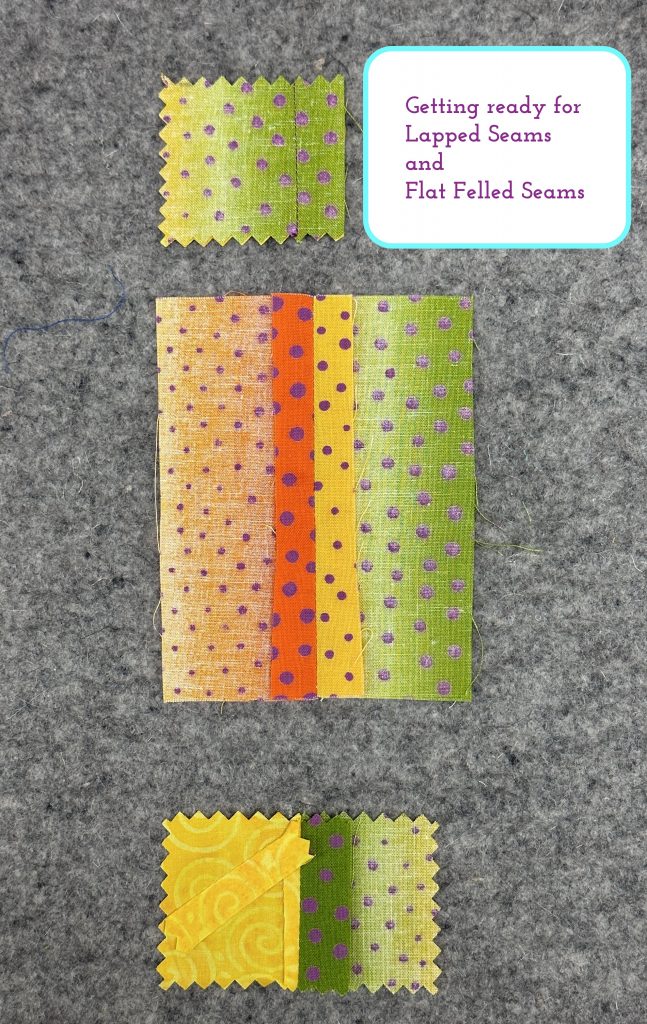
Lapped and flat-felled seams are two sides of the same coin.  Both are found in ready to wear–the lapped seams I see most often in men’s dress shirts.  Flat-felled seams are found on jeans…they’re that heavy, bulky seam!  The double stitching makes it strong, so it is good for seams that endure strain–like tight jeans!  They can also be used decoratively with contrasting and/or heavy topstitching thread. Let’s start with the ….

Please note:  I am affiliated with Janome as a Janome Artisan and am compensated.  However, my reviews are honest and I would say what I say whether affiliated or not.  I’ve also chosen to be affiliated with Janome since 2003 (!!!) because their machines are so good and they are so responsive to the interests and needs of their customers.

Lapped Seam

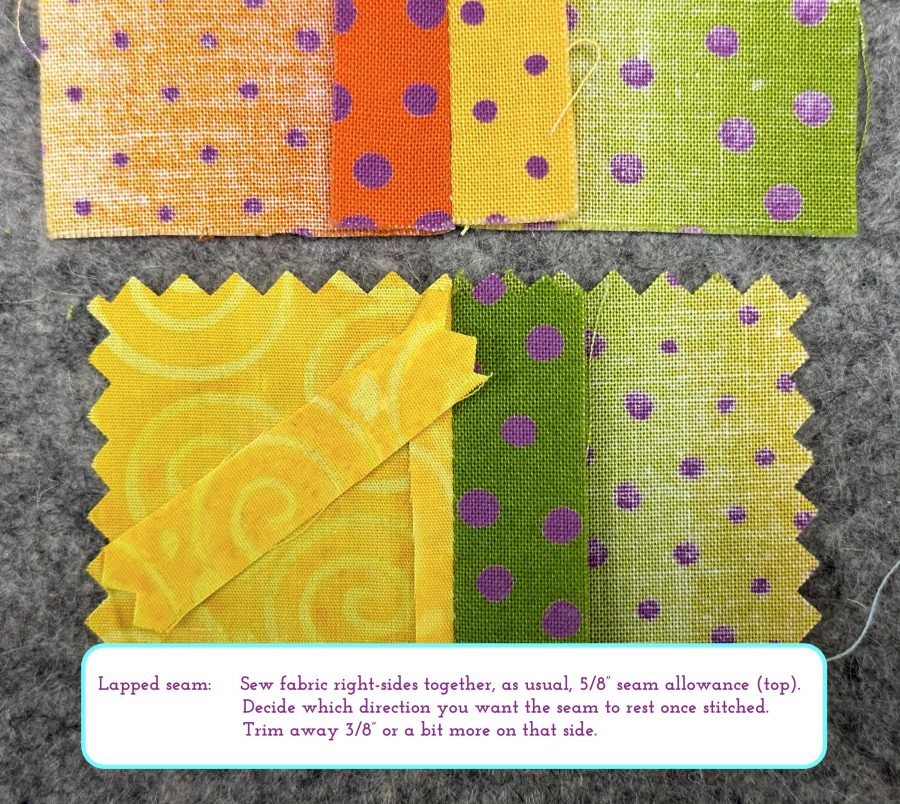
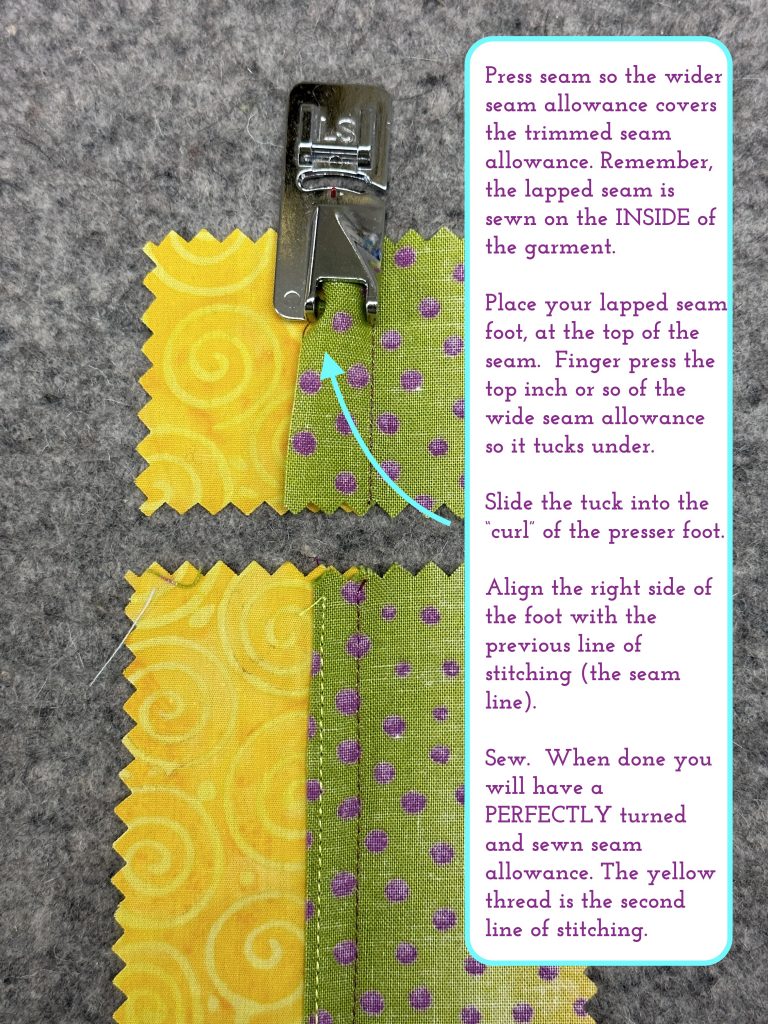
The first step is to sew fabric at the designated seam allowance, right sides together, above.

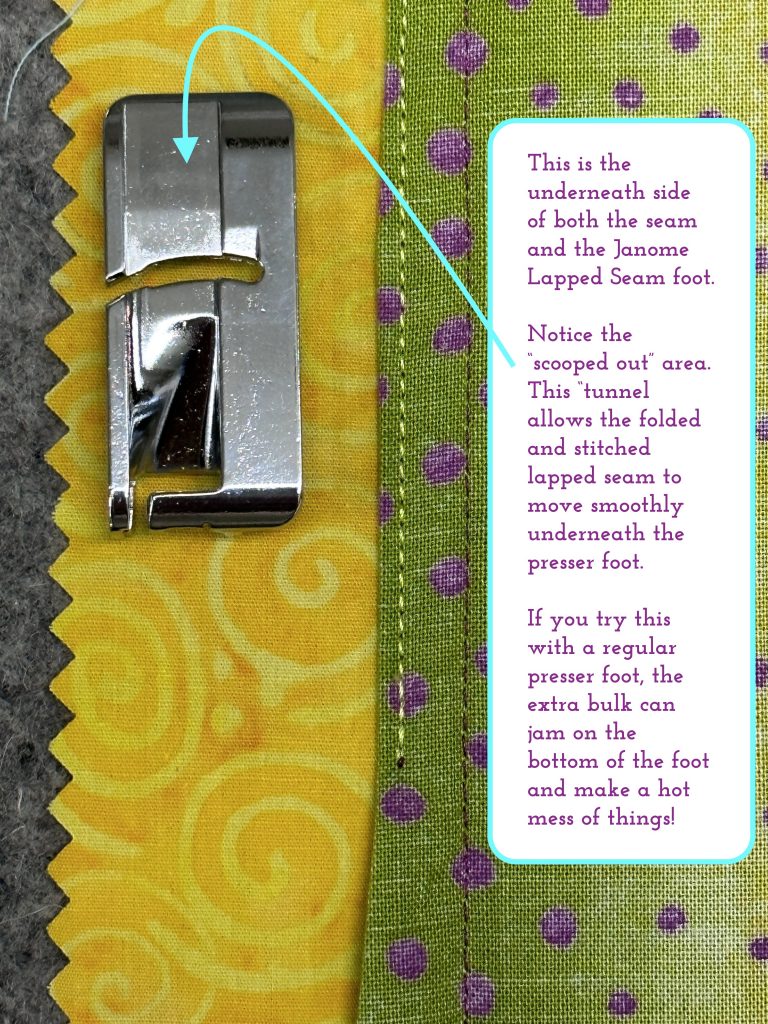
You might wonder why you  need a special foot to do this–you could turn under the seam allowance and, if you are a meticulous person (I am decidedly NO, not matter how hard I try), could sew this neatly.  Well, here’s why:

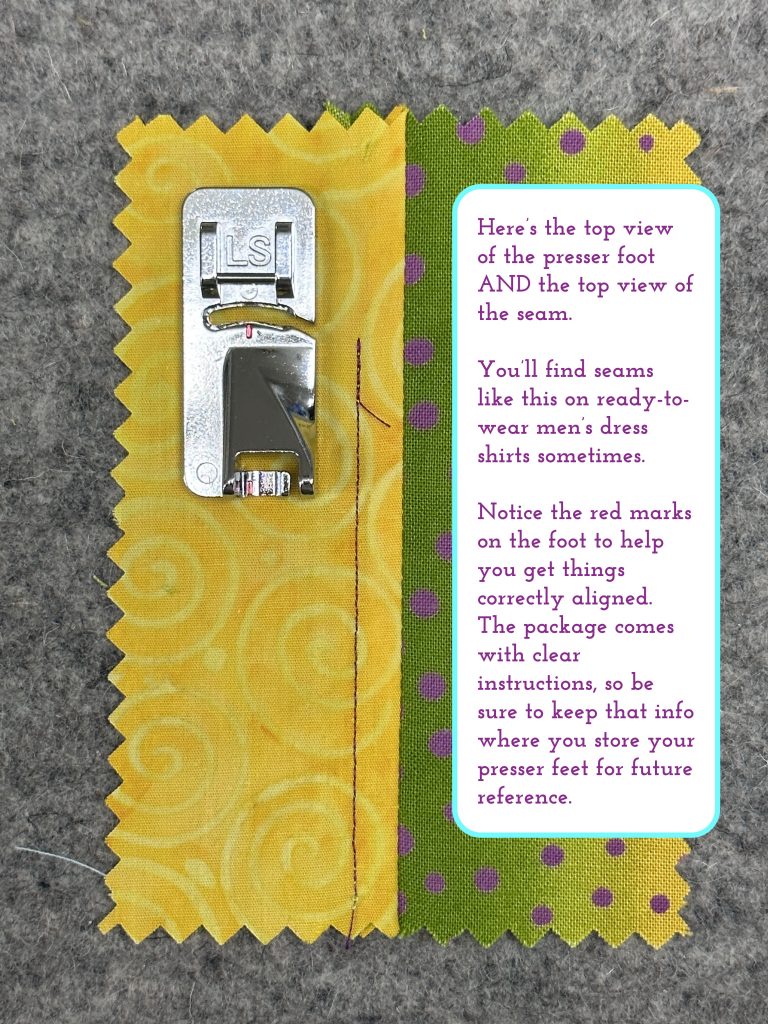
This is what the seam looks like on the outside when finished:

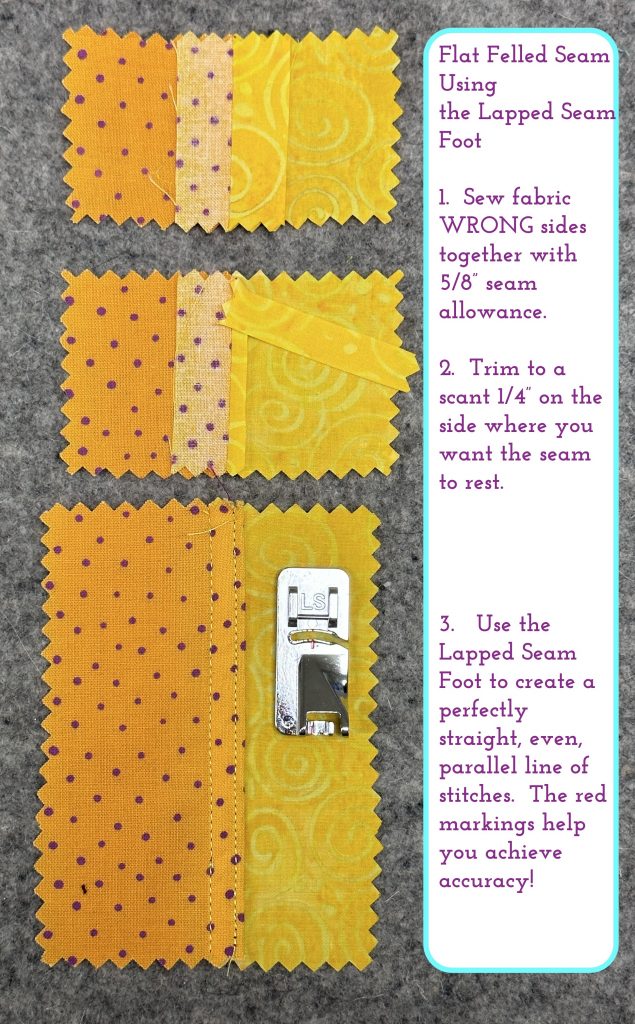
Next up is the Flat-felled Seam which is sewn on the OUTSIDE of the garment.  Both the seam thread and the topstitching thread will show.

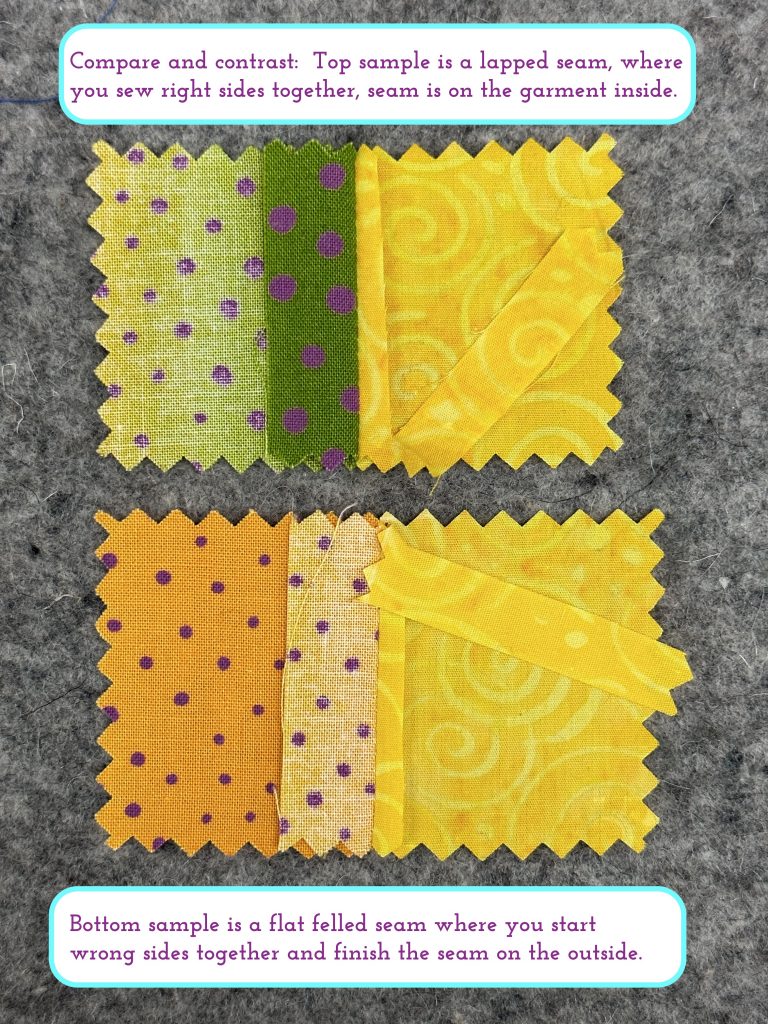
The process is much the same, but you start with the fabric wrong sides together instead of the usual way.

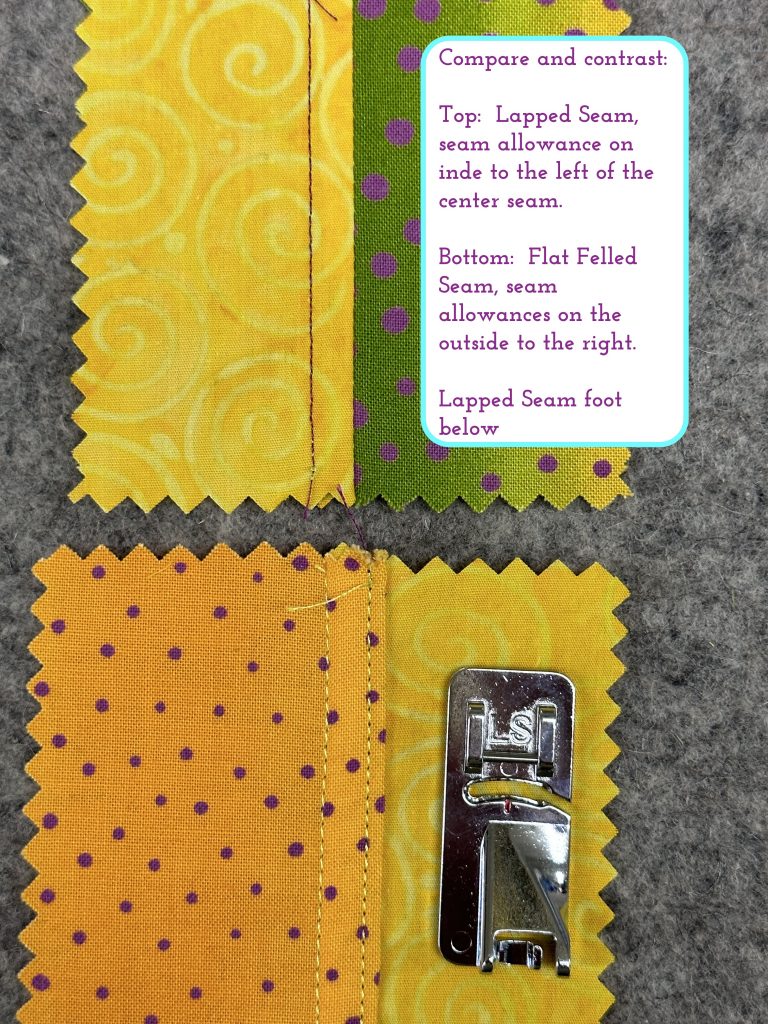
It may help to compare the finished seams:

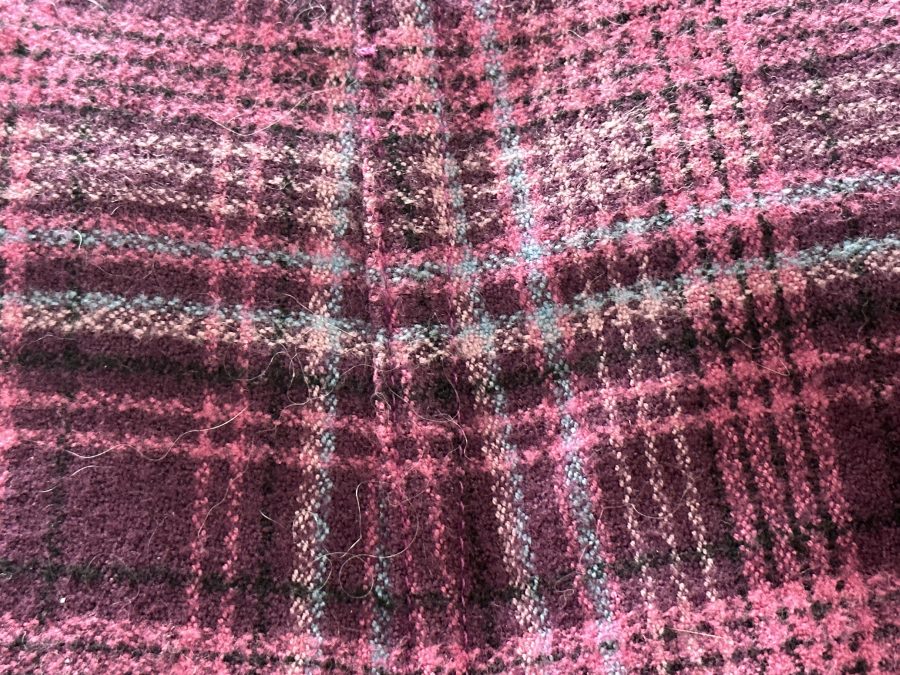
On the Plaid top, I used a flat-felled seam on both the shoulders and side seams, though with the fluff on the flannel and match of the thread, it’s mighty hard to see that in the photo!  Honestly, it blends so well with the matching on the plaid, I had to feel for the bump of the turned seam allowance.  It’s on the outside, which is how I knew.  Gotta say, that’s pretty fine plaid matching to disguise it that well! And sorry about the cat hair…. I swear I will carry it with me to the great beyond some day!


Here are the links to all the posts in this series of lessons, techniques that can be applied to virtually any garment and many home dec projects.   Let me know what you’d like to learn and see here on the blog.  Cheers and thanks, Sarah

Lesson 1:   Choosing a Pattern and Starting Tips

Lesson 2:   Making a Muslin, Fitting and Sleeves

Lesson 3:   Matching Plaids, Cutting out Your Garment Pieces

Lesson 4:  Overcast Seams, just like Serged Seams

Lesson 5:   French Seams

Lesson 6:  Lapped and Flat-felled Seams

Lesson 7:  Hong Kong Finish for Seams

Lesson 8:  Lined Patch Pocket Tutorial
Lesson 9:  Hems and Scarf

Plaid Top Tutorial: Lesson 5-French Seams

Friday, March 3rd, 2023

Please note:  I am affiliated with Janome as a Janome Artisan and am compensated.  However, my reviews are honest and I would say what I say whether affiliated or not.  I’ve also chosen to be affiliated with Janome since 2003 (!!!) because their machines are so good and they are so responsive to the interests and needs of their customers.

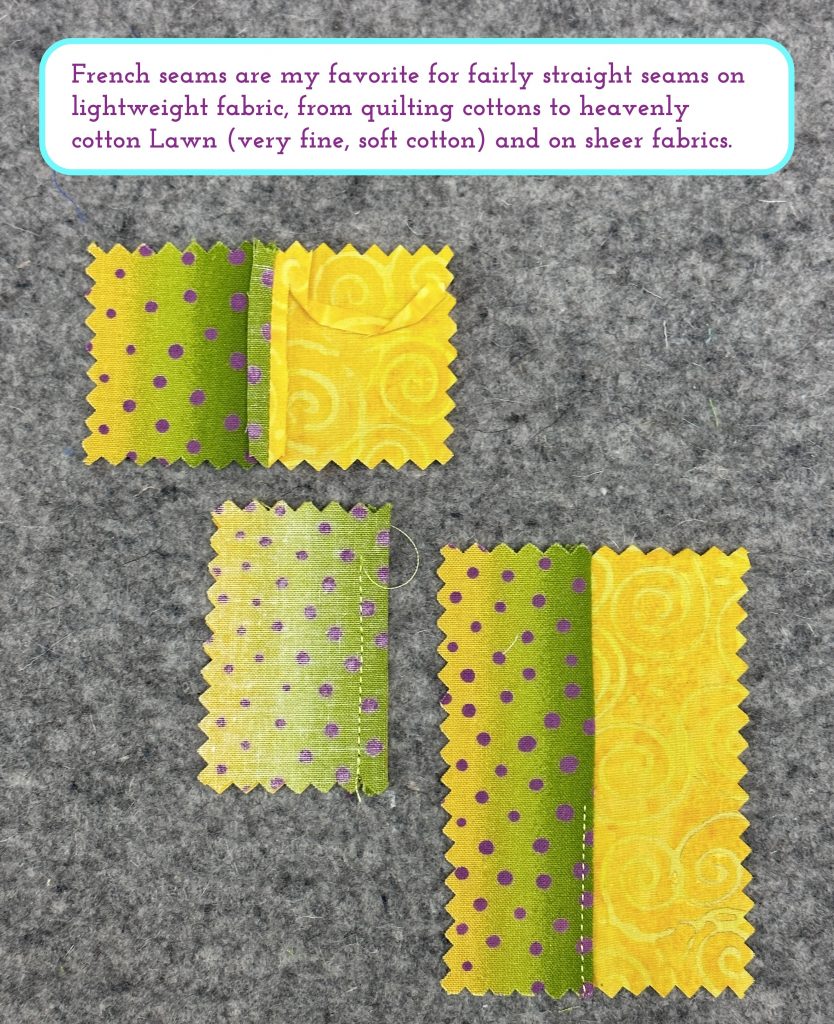
To make a French seam you sew the seam twice.  My example is on a 5/8″ seam which is standard in the US.  Please adjust accordingly for your pattern and practice.

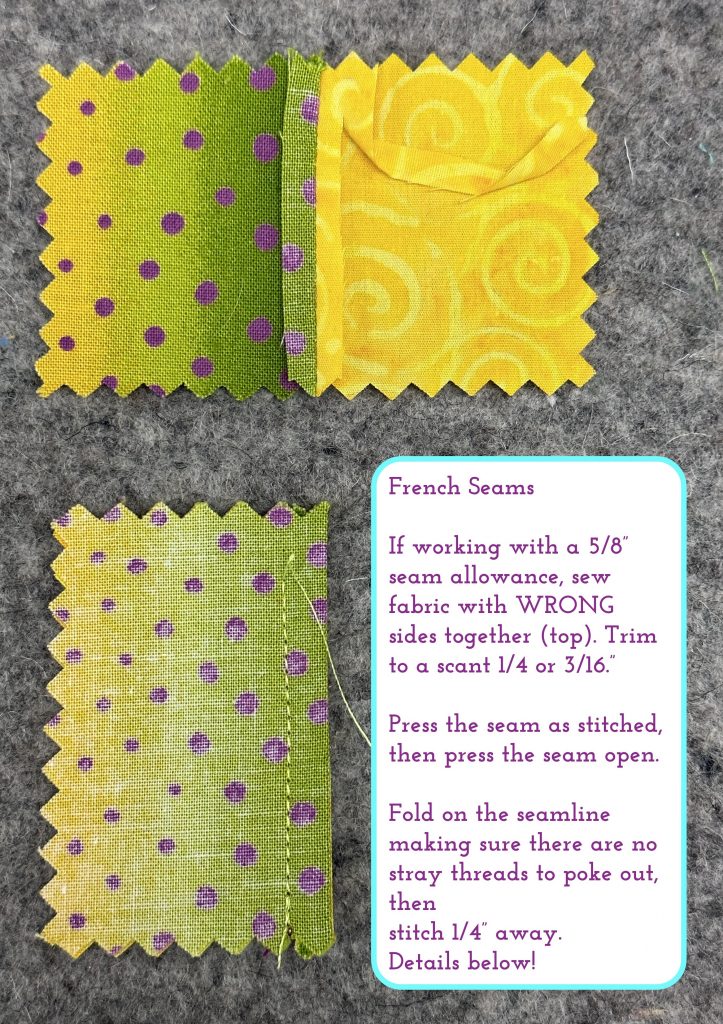
First, sew the seam with the fabric WRONG sides together at 3/8″ wide.  Yes, wrong sides together.

Second, press the seam as stitched.  This will set the seam and sink the threads into the fabric.  Then, open up the garment and press the seam open. This will encourage the fabric to fold perfectly on the seamline and create a crisp “knife-edge”  (this pressing technique is ideal for making knife-edge pillows).  See  the illustrative photos just below and, beneath them, photos at the machine.

Third, trim the seam allowance to 3/16 to 1/8″ and fold on the seamline so that right sides are together.  Be sure to trim any pesky whiskers and threads–they’re obnoxious to try to trim later.  If you are using a particularly ravelly fabric, a little starch or temporary (washable) gluestick daubed on carefully to keep the wanderers tucked inside is a good idea.

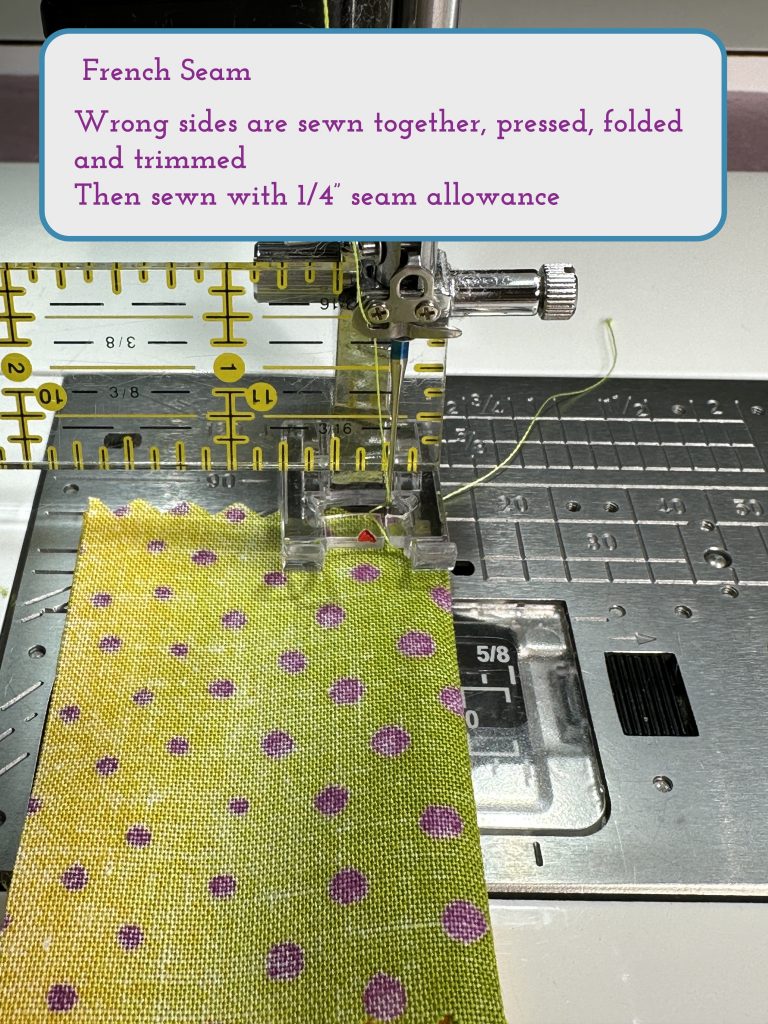
Finally, sew the second seam 1/4″ from the folded edge and give it a final press to neaten things up.

Here I’m using the F clear foot. I can move my needle to the right to achieve a perfect 1/4″ from the edge when the right side of the presser foot is even with the folded seamline. You could also use the quarter-inch piecing foot, but for some reason I get my best results this way. Use what works best for you!

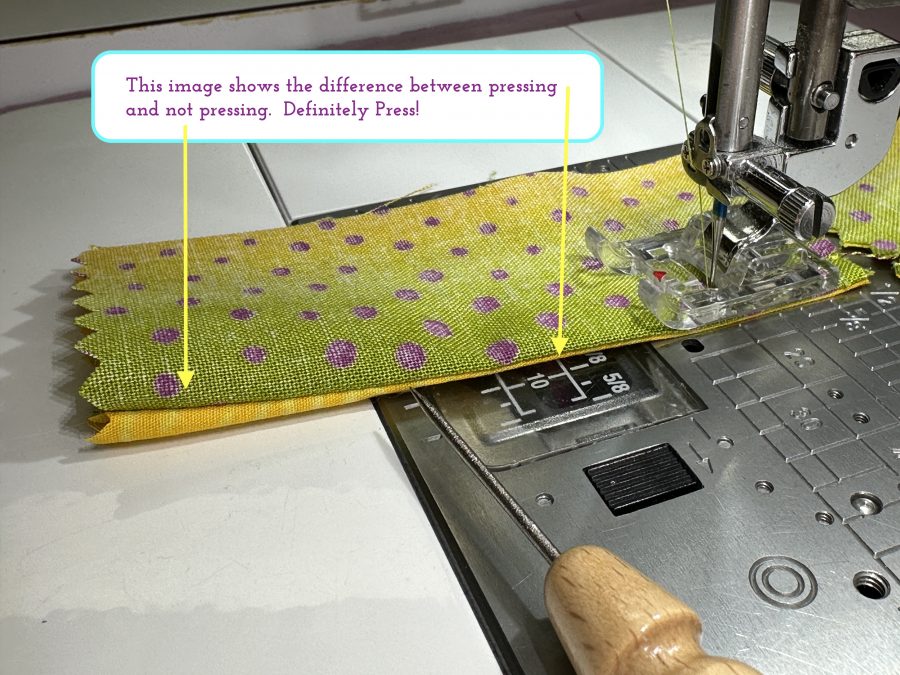
On this sample I deliberately did NOT press the seam open all the way.  Look how nicely the part at the right, under the foot to about halfway), makes a perfect “knife-edge” fold, and how the part of the seam that was not pressed open wants to curl and roll.  It’s worth the short extra bit of time to press your seams open!  Makes like at this stage easier and the end-result nicer!

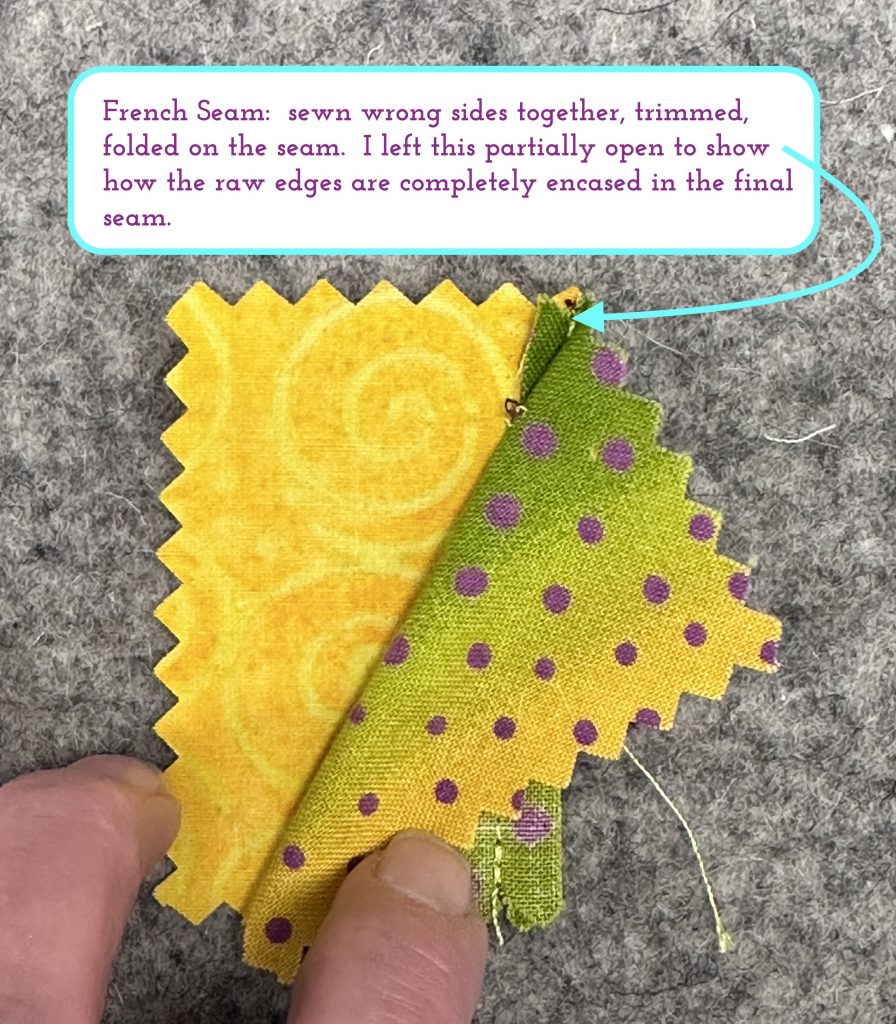
Raw edges are fully enclosed. There are no “thread whiskers” poking out of the finished seam!

Because of the luscious thickness of the flannel, I didn’t use this technique on this top.  But I DID use it on my Anthea Linen BlouseAnthea Blouse in Sky Blue Linen which I blogged about here.  This is a picture of the side seams on 5.3 oz (middle weight) linen in that blouse.

The Anthea Blouse from Anna Allen.

USAGE:  This seam works best on lighter weight fabrics from chiffon to lawn to quilting-weight cottons and sheeting, and light to some mid-weight linens.  It makes a beautiful finish on pillowcases, summer blouses, shirts and dresses, and sheers.

In a garment, the French seam isn’t suitable to really thick or stiff fabrics UNLESS you want to make a point of the bulk.  I have actually used this “inside out” on throw pillows:  Sew wrong sides together, trim, turn, and sew the second seam about 1/2″ away.  This creates a stiff outside edge that adds structure to the pillow and acts like cording!

Next up:  Lapped seams!

Here are the links to all the posts in this series of lessons, techniques that can be applied to virtually any garment and many home dec projects.   Let me know what you’d like to learn and see here on the blog.  Cheers and thanks, Sarah

Lesson 1:   Choosing a Pattern and Starting Tips

Lesson 2:   Making a Muslin, Fitting and Sleeves

Lesson 3:   Matching Plaids, Cutting out Your Garment Pieces

Lesson 4:  Overcast Seams, just like Serged Seams

Lesson 5:   French Seams

Lesson 6:  Lapped and Flat-felled Seams

Lesson 7:  Hong Kong Finish for Seams

Lesson 8:  Lined Patch Pocket Tutorial
Lesson 9:  Hems and Scarf

Plaid Top Tutorial: Lesson 4- Overcast Seams, just like Serged Seams

Tuesday, February 28th, 2023

Nothing beats a beautifully finished garment, one that is so pretty on the inside that you enjoy it every time you put it on.  Though you might be tempted to wear it inside out it’s so pretty, it remains a secret just for you!  Top technique for a beautiful inside is using a seam finish to hide the raw edges.  Not only does it look nice, it also protects the edges of the fabric, prevents fraying, can improve the way the seam functions, and contributes to a garment that will last longer.  After all, you’ve spent money and, more dearly, time creating so enjoy it longer!

Please note:  I am affiliated with Janome as a Janome Artisan and am compensated.  However, my reviews are honest and I would say what I say whether affiliated or not.  I’ve also chosen to be affiliated with Janome since 2003 (!!!) because their machines are so good and they are so responsive to the interests and needs of their customers.

The next several lessons/posts will be about all these seam finishes. We’ll start today with the fastest and simplest, the overcast seam.

There are many ways to finish seams.  Today I’ll review one of four methods and suggest why you might choose one over the other. I’ll do the other finishes in subsequent posts so this doesn’t get too long!

  1. Serged or overcast edges
  2. French seams
  3. Flat-felled or lapped seams
  4. Hong Kong finish seams

Overcast:

The first seam finish we’ll talk about is perhaps the most well known because it is fast and is used on the majority of commercially made garments:  serged seams.  These are made with a serger machine, which you might not own.  But if you have even a very basic sewing machine (more than straight-stitch-only), you will likely have at least one utility stitch that is called an overcast stitch.  On my machine, here are some of the choices:

My Janome M7 Continental has a wealth of stitch choices, but even the most basic machines have stitches similar to 13, 14 and 15 (and see next photo for more choices).  I particularly like stitch 15 which has an extra narrow zigzag on the raw edge.  You can see that you can (within a range) adjust length and width. At the top right of the white portion of the screen, the machine tells you which presser foot to use, and the bottom right of the yellow portion has a QR code you can scan with Janome’s exclusive AcuSPARK app (free in the app store for your device) which works with select higher end Janomes.

This screen, the next one in the sequence on my Janome M7, has additional overcast and hem stitches.

If you want help understanding when and how to use a given stitch, open the AcuSpark app and scan the QR code.  It then opens up a screen in the app with all sorts of nifty information on how to use the stitch. Below, I’ve opened the app to the Scan tool and took screen shots of these four overcast or overlock stitches.

There is also a tab to look at various options, on left side of photo below and, on the right, the stitch I like.


And let’s look at what a difference using the correct presser foot makes!  Be sure to watch the video at the end of the post to see this foot in action!

The small sample, lower left, shows using the overcast stitch with the regular presser foot. Messy! The larger sample shows overcasting each side of the seam with the “M” foot,  with the seam pressed open at the top AND overcasting both sides together and pressing to one side on the bottom.

Most machines that offer these stitches also come with (or you can buy separately depending on brand and model); buy one made by the company that made your machine for best results) a foot that has a wire on the right.  This allows the stitch to form properly and not pull or curl the edge; those distorted edges aren’t as comfortable! On the Janome, it is the “M” foot.  Look at the difference between the samples above.

Check the feel of the seam on a scrap.  Adding too much thread can make a seam stiff and uncomfortable.  If you have/can find a lighter weight thread, that finer thread will make the seam softer, as will using a longer stitch length IF your machine allows any adjustments to stitch width and length.  If so, and your fabric ravels a lot, you may choose to use a wider stitch setting to better encase the tendency to ravel and wiggle.

USAGE:  pretty much any seam, especially where seams intersect and you’d end up with a lot of bulk.

When I was doing custom home dec sewing for an interior designer, I also used a serger (but you can use the overcast stitches) to secure each cut piece of fabric before constructing the pillows, duvets, curtains, bedskirts, seat cushions and such. Upholstery fabric is VERY ravelly, and expensive, so I secured the edges immediately after cutting and before assembly to prevent an expensive disaster.

Cons:  not the classiest finish, but fast and functional.

Here’s a video!


On the Plaid top I used serged together seam allowances for both the underarm and sleeve-to-body seams.  This choice is especially useful where the sleeve joins the body because it stiffens the seam just a bit.  When you press the seam towards the sleeve it actually helps support the top of the sleeve itself and helps it to hang well on the body.

Inside of the Plaid top: I used the overcast-both-seam-allowances-together method.

Another nice touch is to edgestitch the seam.  Last summer I asked Philippa Naylor in GMQT (see previous post for additional discussion of GMQT) about how best to handle a side seam with a curved bit under the arm to the extended part for the sleeves.  The top is literally two “T” shaped pieces of fabric with a neck facing and turned up hems (see photo from the back, below). Any curved seam will tend to pull at the curve.  She suggested finishing the seam with an overlock (I used my Janome AirThread2000D serger, but the overcast stitch would do exactly the same), then pressing to the back of the garment and edge stitching.  So I did…worked perfectly (and surprisingly well to me) and kept the curve under the arm from wanting to “wonk” on me.

Here’s the finished blouse.

As you can see, this is the simplest of all shapes. The fabric is Nani Iro double gauze, a lightweight cotton that is two layers woven together.

And this is Philippa’s brilliant solution to controlling the tendency of the seam to ripple and buckle at the curve. Worked a charm!  And in case you’re wanting that link to sign up for the Garment Makers Question Time classes with Philippa Naylor, here it is.

And a tiny PS:  back in the days when dinosaurs walked the earth and my age was in single digits, home ec classes suggested using pinking shears to finish a seam.  It would look like this.  Problem is that with use and washing, it frays.  So here’s a pic, but really, don’t! You put too much effort and money into not doing your best work!

     Left, seam as stitched, and pressed open.  Bleah.  It’s gonna ravel!  Just don’t. See you next time!

Here are the links to all the posts in this series of lessons, techniques that can be applied to virtually any garment and many home dec projects.   Let me know what you’d like to learn and see here on the blog.  Cheers and thanks, Sarah

Lesson 1:   Choosing a Pattern and Starting Tips

Lesson 2:   Making a Muslin, Fitting and Sleeves

Lesson 3:   Matching Plaids, Cutting out Your Garment Pieces

Lesson 4:  Overcast Seams, just like Serged Seams

Lesson 5:   French Seams

Lesson 6:  Lapped and Flat-felled Seams

Lesson 7:  Hong Kong Finish for Seams

Lesson 8:  Lined Patch Pocket Tutorial
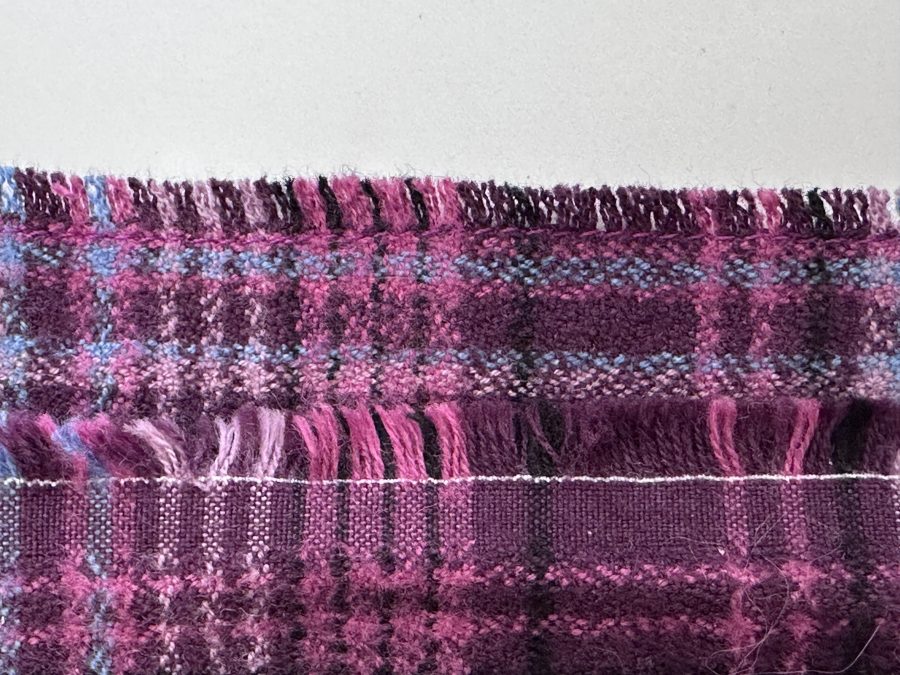
Lesson 9:  Hems and Scarf