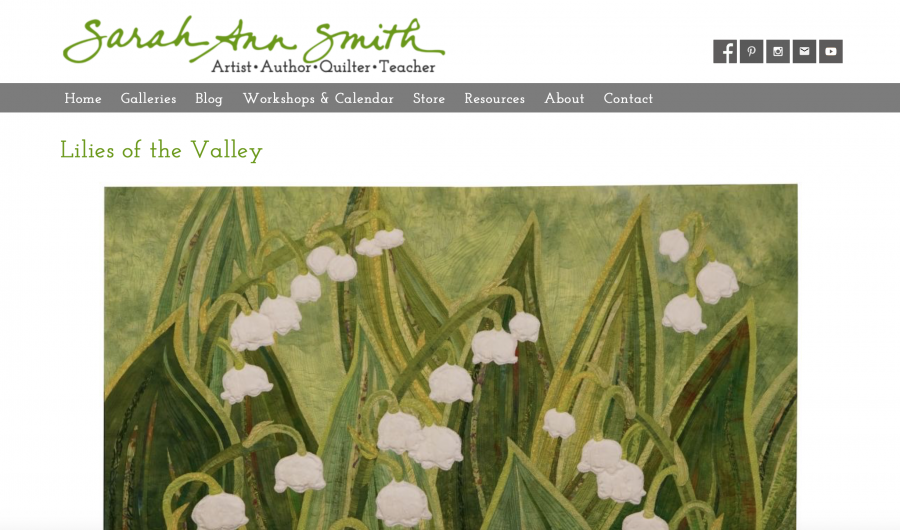
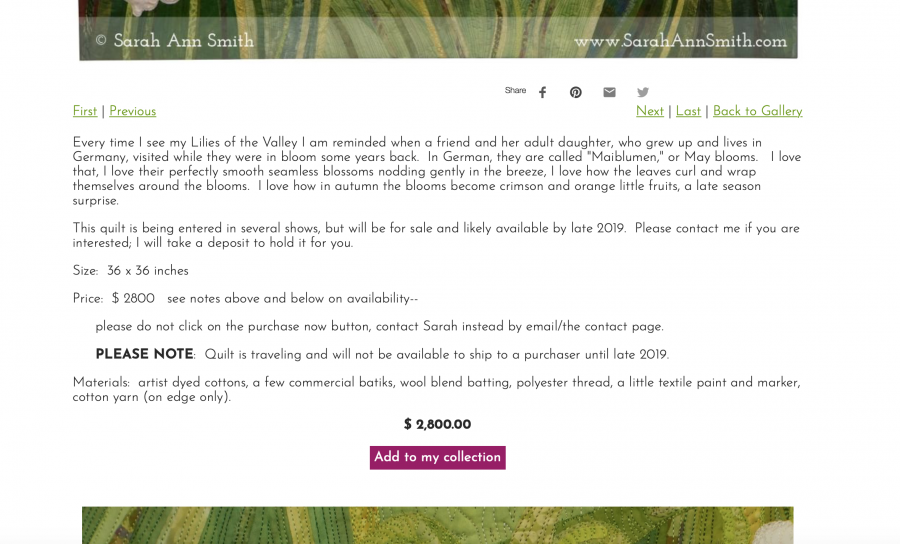
I’m over the moon to announce my new three-day workshop, Exploring Paint on Cloth, debuting August 5-7, 2020, at ProChemical and Dye in Fall River, Massachusetts. Signups start TODAY! We will explore ProSilk and Fabric paint (ink-like consistency), ProFAB Transparent Textile Paint and ProFAB Opaque Textile Paint. I’ll include a wide range of techniques from blendy to bold. You’ll learn which paints to use when, how to adapt paints to do what you want, and basically have a whole lotta fun, including some fun mixed media play. Click HERE to see more and sign up!
We’ll include both representational and abstract designs in our workshop. You’ll use thermofax screens, stencils, stamps, brushes, squeeze bottles and more.And you’ll get to combine a range of techniques in this piece or one from your own imagination. And we’ll try non-traditional surfaces including interfacing, and creating cloth that looks like it is hand-dyed, and feels like it is hand-dyed it is so supple, but is actually created with paint–in this small art quilt, the sky.
I’m so excited about the possibilities and hope you’ll join me! This week I am actually taking a workshop at ProChem, but if you have questions please do leave a comment and ask–I’ll try to answer as quickly as I can (usually in the evenings). And to make it easy for you, here’s the link to ProChem again, to sign up! I’d love to have you in my class!#sarahannsmithartist #artistauthorquilterteacher #sarahannsmithphotographer #maine #surfacedesign #prochemicalanddye #screenprinting
WOOT! Check an item off the Bucket List!!! I will be on The Quilt Show (TQS) with Ricky Tims and Alex Anderson as of October 6th! The promo video went live last night, and you can see it right here! Members of TQS will be able to see the show starting the 6th, but for non-members, there is ONE week where you will be able to view it for FREE from October 13-20, 2019. Of course I’ll post this again, but here is the link to use–remember, the link won’t work to view the show until the 13th. I share my quilts, my crazy “previous life,” and using paints and other tricks on my art quilts. And to those of you who are new to my website, please use the sign ups in the right sidebar to subscribe to the blog and/or to my newsletter. Thanks and enjoy!
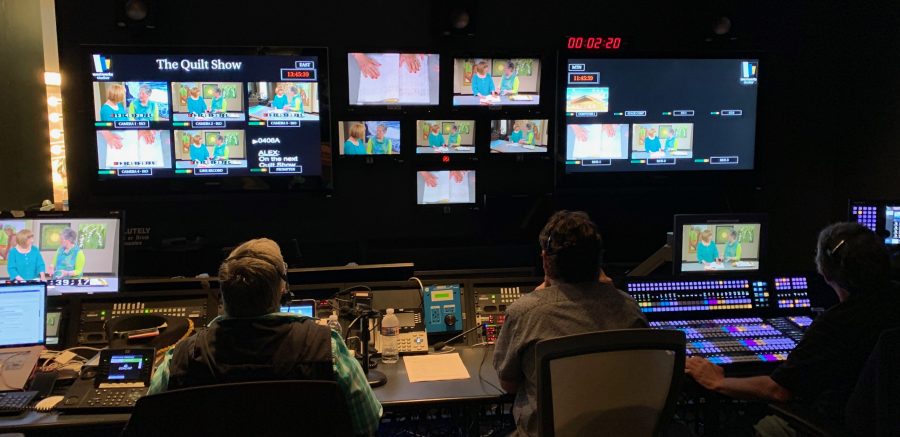
To say that I am delighted is an understatement! Here are some photos from taping in April. My show is #2508, so click this link to take you directly to that show. Remember you do have to be a member of The Quilt Show to view it unless you are watching during the one week it is free to all.
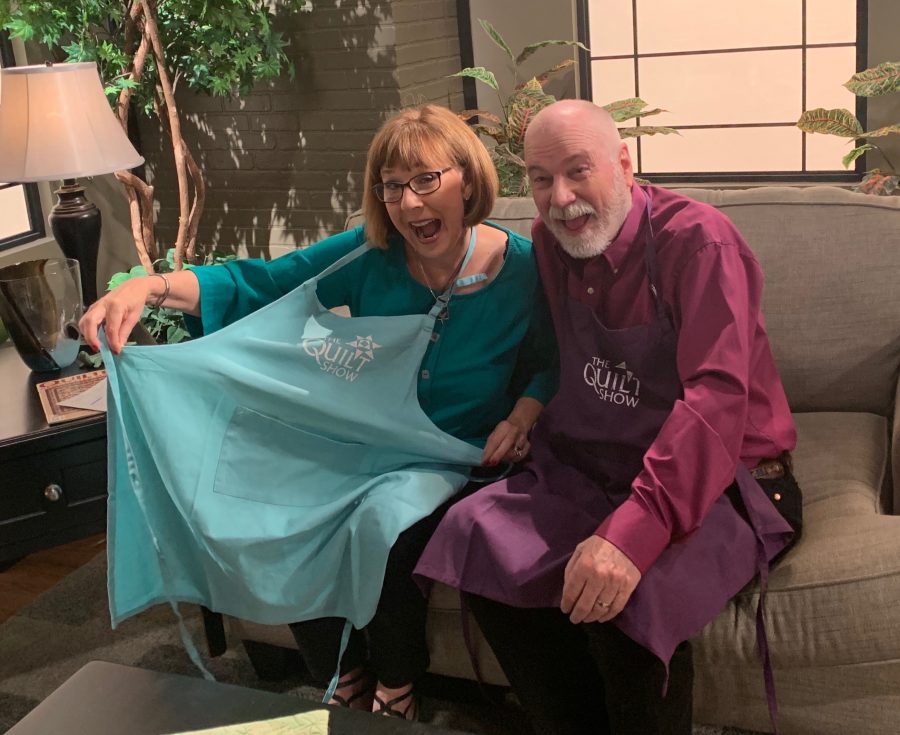
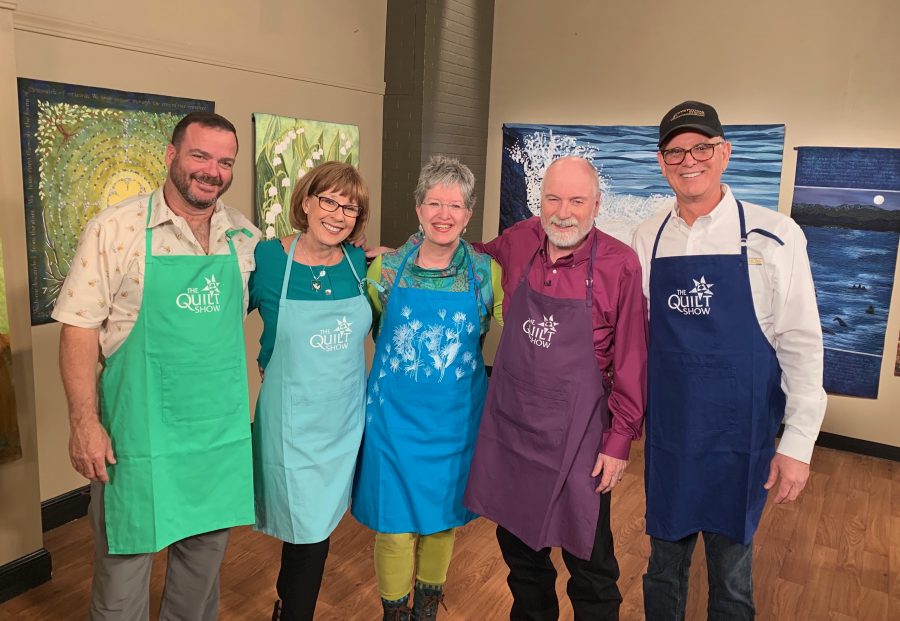
I surprised Ricky and Alex (and Justin and John) with special TQS Logo aprons for use on the set, made with thermofax screens I did up special for them. And yes, I gave them the screens, too! Thanks to Producers Shelly Heesacker and Lilo Bowman for helping me pull off this surprise. Thanks to Adele Merrell for this and the other shots …. they are perfectamundo!On the set with Alex Anderson and Ricky Tims (and Mary Kay’s hands LOL) going over my next segment — this is where I explain how I thread color my work. Seeing the production room was so cool…it was so professional…look at all those displays, about six people working at desks, with headsets to communicate with the crew on the set about positioning lights, cameras and whatnot. And here I am with the four principals, with aprons in their favorite colors. Left to right Justin Schults, Alex Anderson, me, Ricky Tims, and John Anderson.
The Quilt Show likes to say that Alex Anderson and Ricky Tims bring you the friendliest interactive online community for quilters worldwide. Join today to learn, share create, connect and watch Alex and Ricky in brand new episodes of The Quilt Show! As you saw in the promo video, I joined on Day One when TQS launched many years ago. I am so glad to now be a part of the TQS family–THANK YOU!
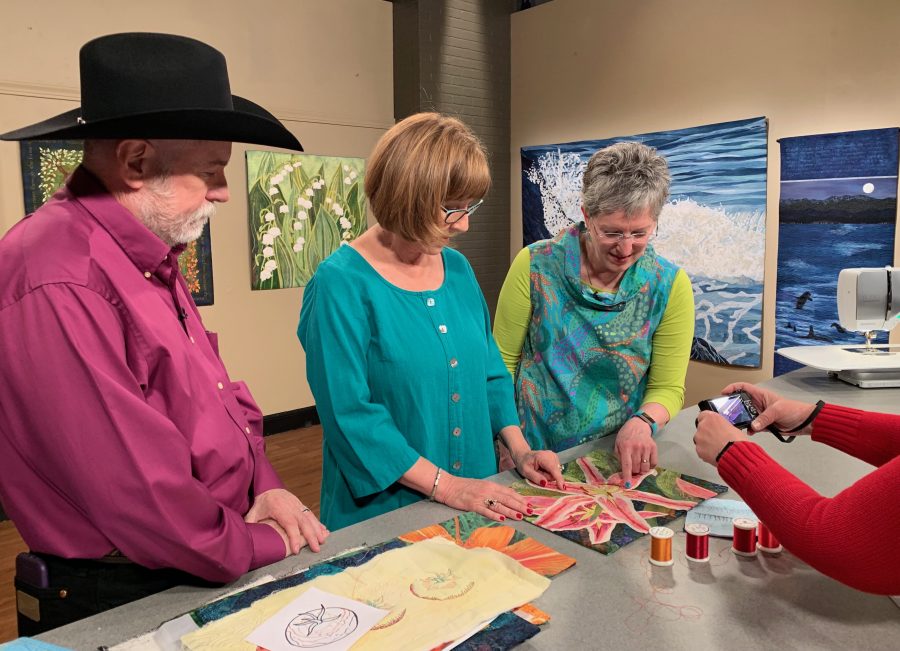
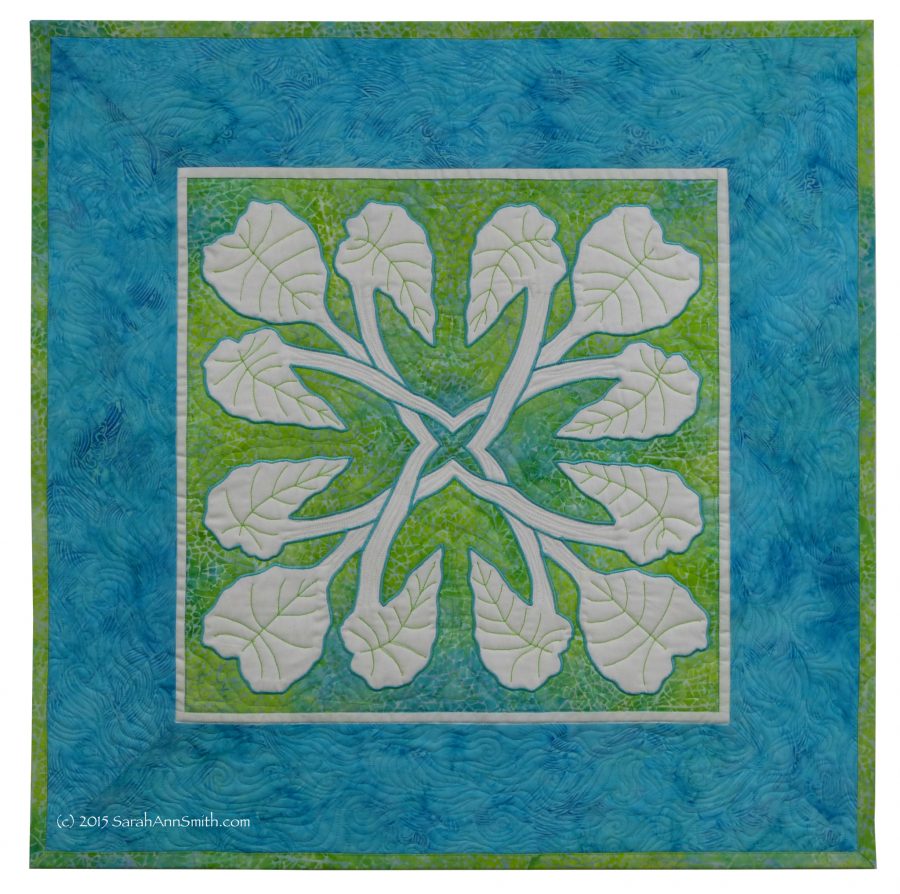
Most of you know me as an art quilter, but did you know I also love Hawaiian Appliqué, especially by machine? Well I’m teaching that very class in Houston on Saturday, and I’d love you to join me. Best of all, you can translate what you learn in the class into traditional, modern and art quilts. A screen shot of the full class description is below. Click HERE to see the class listing and follow the links to sign up!
Just one of nine blocks in my Nourish the Body, Nourish the Soul quilt. You get the entire pattern in class and learn my own techniques–that I’ve not seen anyone else teach–to make a beautiful piece. This is actually a 26″ square pillow sham! This is the full quilt, about 72″ square. The blocks can range from 18-20 inches, and you get a 2-for-1 pair with my fusible technique. It’s so much fun to see the wonderful variations students make.We start with a couple little fun practice blocks (6″ finished), then move to the big ones!Hawaiian Cats anyone?Here’s the class listing from the International Quilt Festival class catalog! Sign up here.
Those of you who have surfed into my blog over the past two weeks or so will have noticed a completely new look to my site. Thanks to Derry Thompson of GloDerWorks and inspiration from several top art quilters with great sites, I think Derry and I have come up with a gorgeous new site–my first complete makeover since creating the site in 2004. I am responsible for (guilty!) the visuals, and Derry has done all the brilliant work behind the scenes to bring my vision for my site to life.
I still have a LOT of work on my end: thanks to the vast changes in the internet since 2004, I pretty much need to re-do ALL of my photos for larger size and crisper photos. Thankfully, I have a better camera, a tripod, lighting, and better skills at both photos and Photoshop so the image looks most like the real quilt. But I didn’t want to wait for months before sharing the “New Look” with all of you. Stay tuned as I update one gallery at a time.
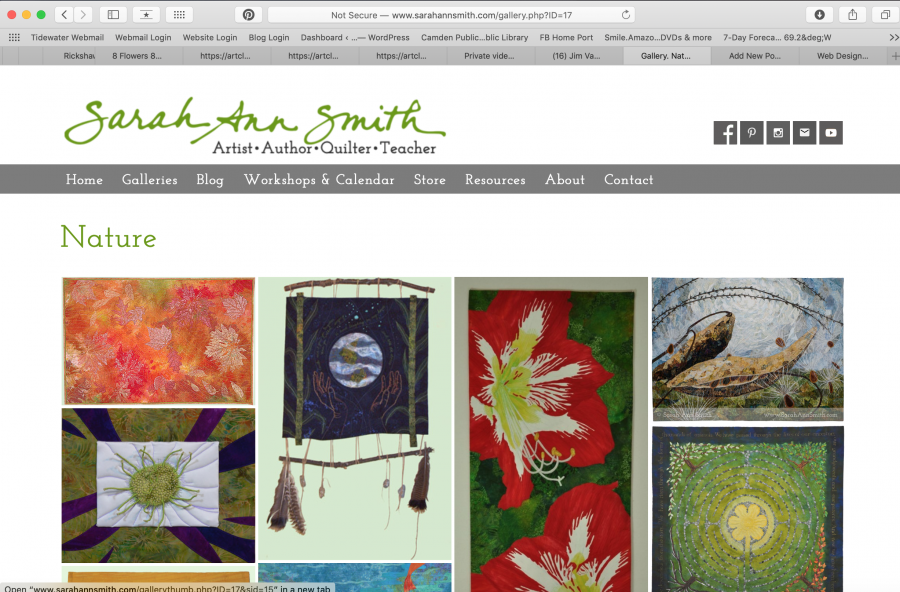
Here is the Nature Gallery: just click on an image. That will open a filmstrip that allows you to scroll through larger images. One more click will then take you to details about each artwork.
Some of my favorite new things:
The clean look
The colors (I gave Derry a specific palette of colors)
The font (Josefin Slab and Josefin Sans)–now updating all handouts etc, too!
The multiple ways to navigate the images: gallery, filmstrip, arrows on the sides
The FOLLOW social media buttons (square) at top right
The SHARE social media buttons (rounded)
The BIG IMAGES!
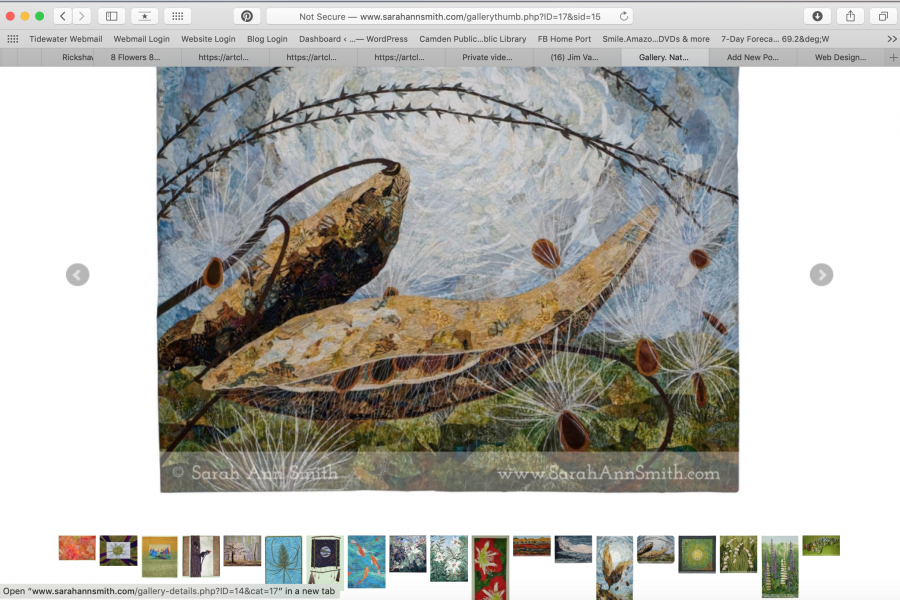
This is the filmstrip view–thumbnails at a glance (love the way Derry made them top justified–makes it so neat and nice!), click on the image you want or use the arrow to scroll in either direction.
My inspiration came from many sites:
Jane Dunnewold‘s clean look to her site is a breath of fresh air. I love the font, but decided to go my own route. My green is similar to hers…one that I use in much of my art
Hollis Chatelain’s Gallery layout is wonderful, not to mention that she has been an inspiration to me for nigh on to two decades now.
Sue Benner’s crisp, clean site with crisp, clean color makes my heart go thumpety thump. I love the photos of her on her About page, down on the floor with the iron (been there, do that). I thought about an entire page for my Instagram feed, as on her Connect page, but opted for just the most recent IG image at the footer of everything but the blog.
Deidre Adams way of watermarking consistently on her images–more PhotoShop work for me but worth it!
And many thanks to Holly Knott for creating the SVG file for my signature, which is used in the header as well as on labeling (my paint kits for example). Someday I will learn Illustrator and InDesign, but Holly’s prices are so reasonable and she was so fast (same afternoon!) it would’ve been crazy not to use her skills. Holly has a brilliant page about photographing your quilts, Shoot That Quilt, and also designs websites.
Look at the detail you can see! Scroll down to see the info (see image below)And lower down on the individual artwork page
Endless thanks to the long hard work Derry put in creating this site so that it is JUST PERFECT, beautiful, and works well. I am pretty much an “I do it all myself” business….except I made a smart decision in 2003: to go with Gloria Hansen and Derry Thompson to design and host my site. I have learned so much since 2003, a lot from these two. I never have to worry if a glitch happens, Derry fixes it. I actually scold him for answering late at night and on weekends: dude, you need to take some time off! Hoisting a pint to you!
Thanks for looking and reading this far….I hope you enjoy the new site!
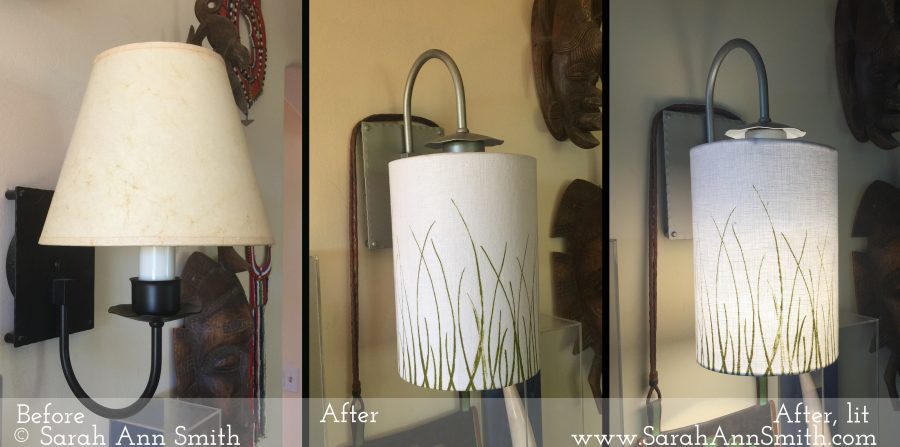
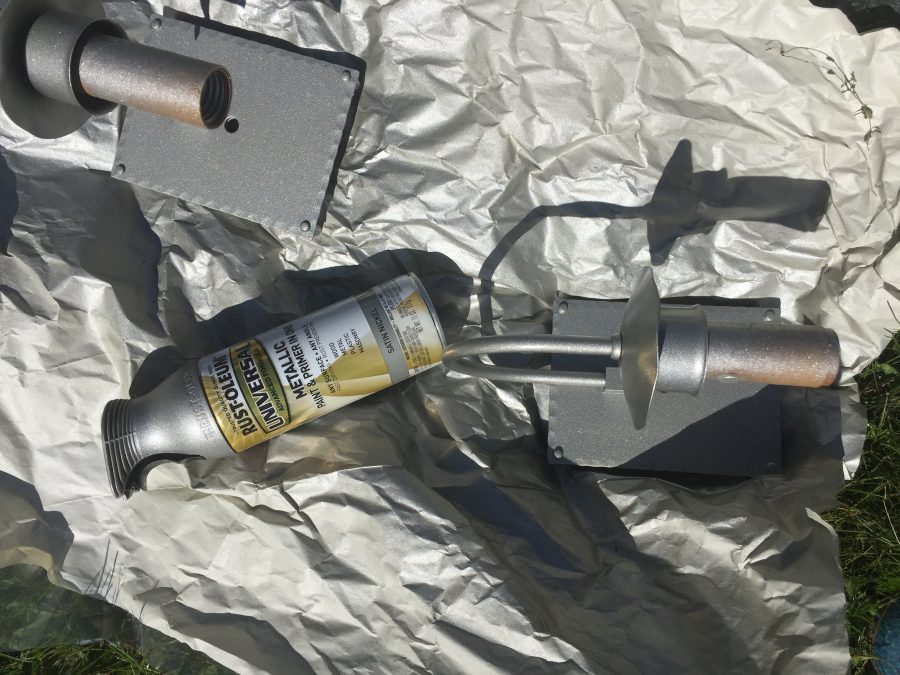
From old to fabulous! Look what a little spray paint, thermofax screens and textile paint, linen and ingenuity can do! Yes, those are the SAME fixtures!
The sconces in our house have made me crazy for years. The shades were made to fit on the old rounded incandescent bulbs…the ones you can’t find any more. The wires didn’t fit well on any of the smaller bulbs that suited the size of the shades and the fixtures–they were always tilting and crooked. And the “old West” look was SO not me! It was Candy Glendenning of Candied Fabrics who got me on the right track. Last year, Candy posted some lamps and shades she made using her wonderful indigo shibori fabric and blogged about them here and here. So I plotted and thought about it. I knew I wanted white, green paint mixed to my favorite shade, my own thermofax screens, and NOT black.
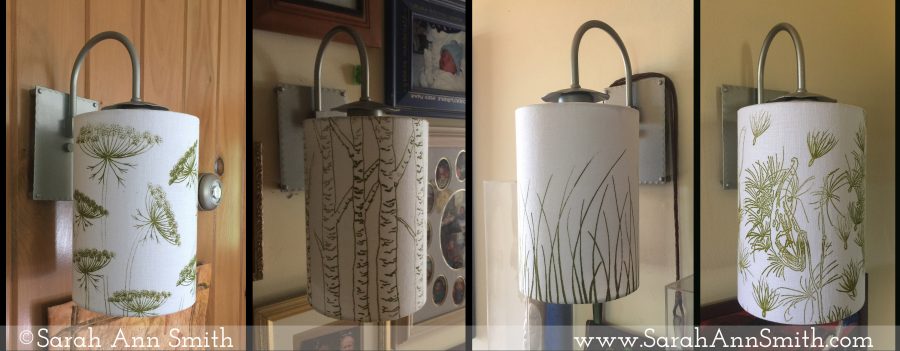
Here are the final shades, then I’ll share the process:
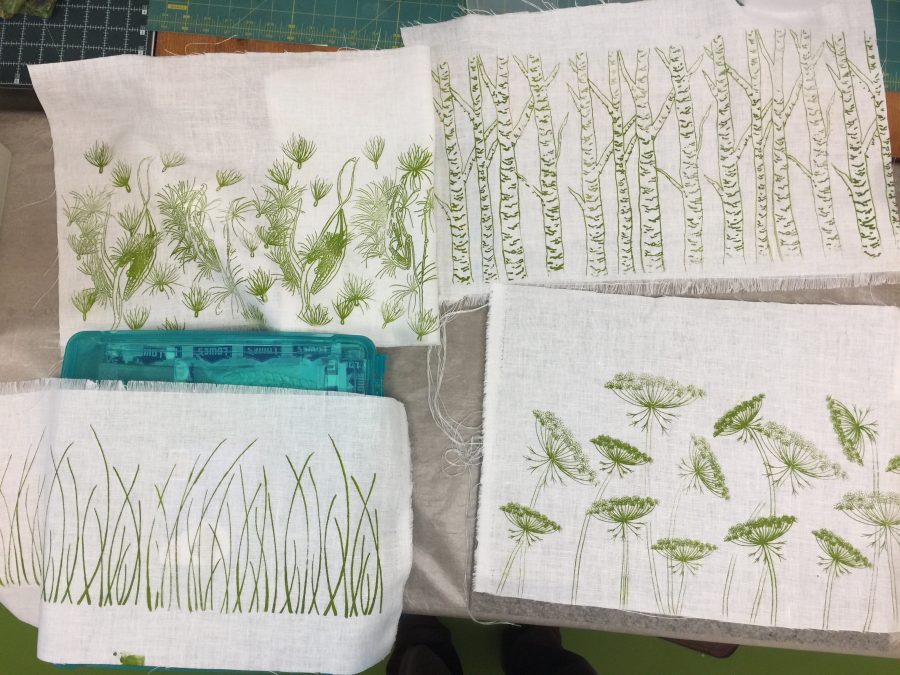
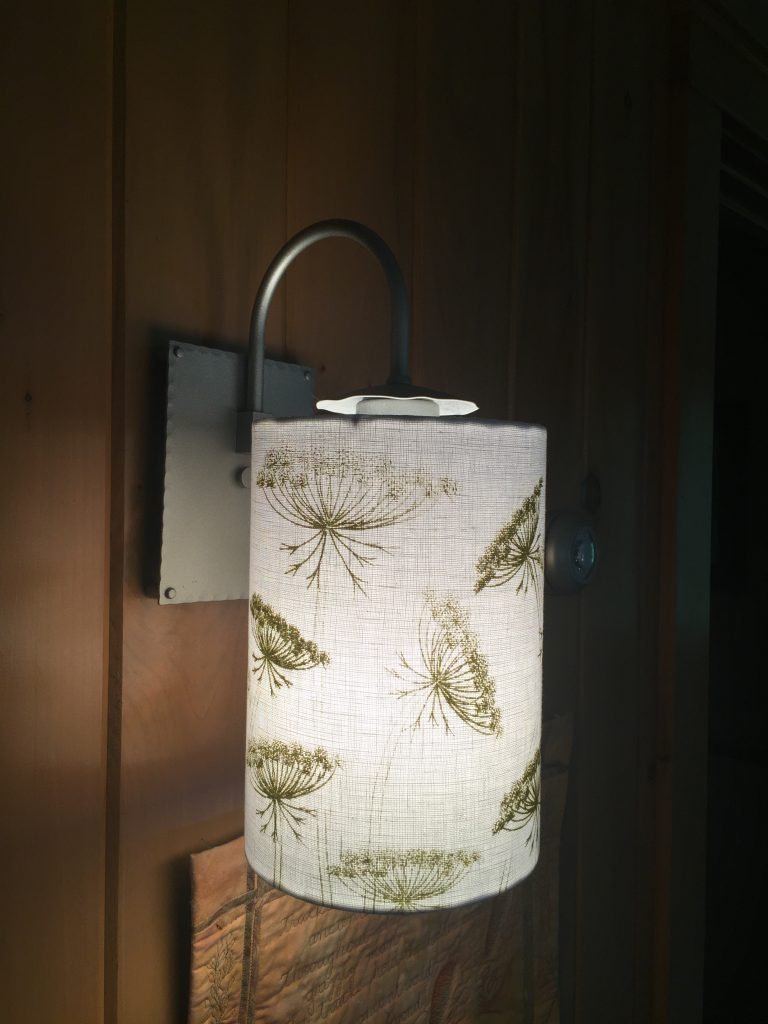
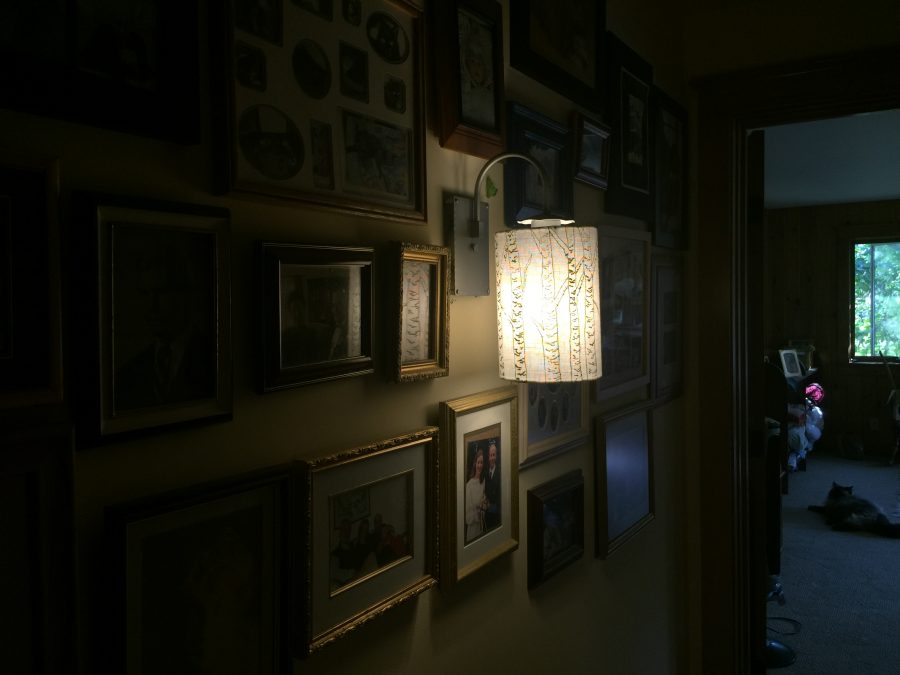
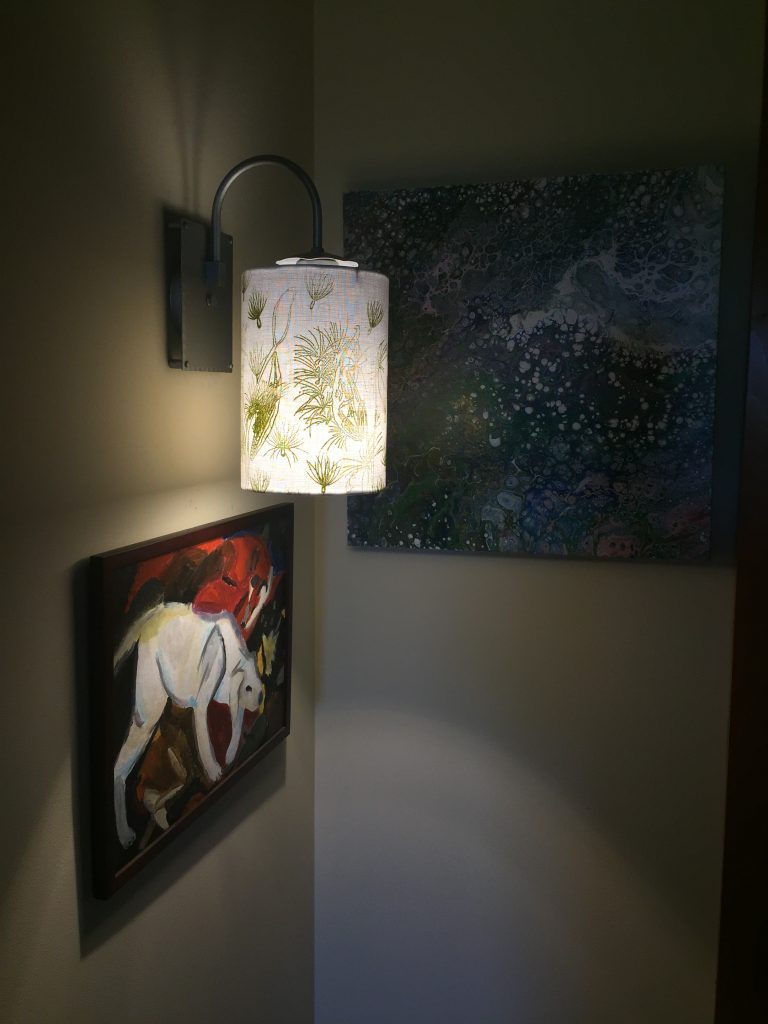
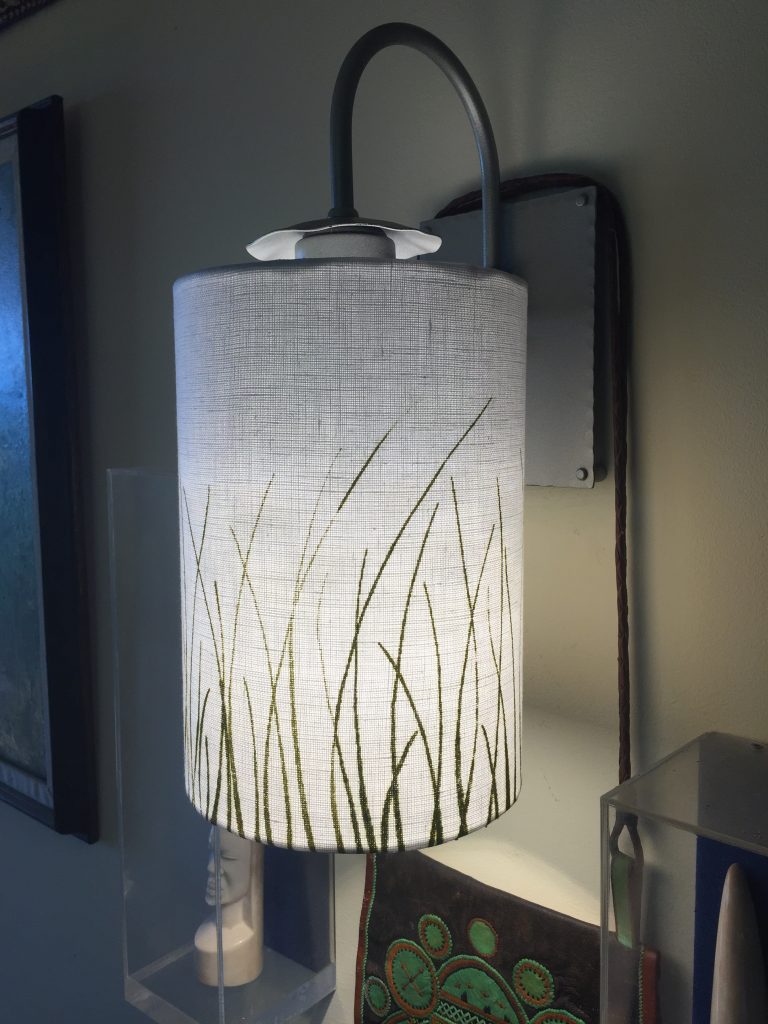
Left to right: Queen Anne’s Lace, Birches, Grasses, and Milkweed
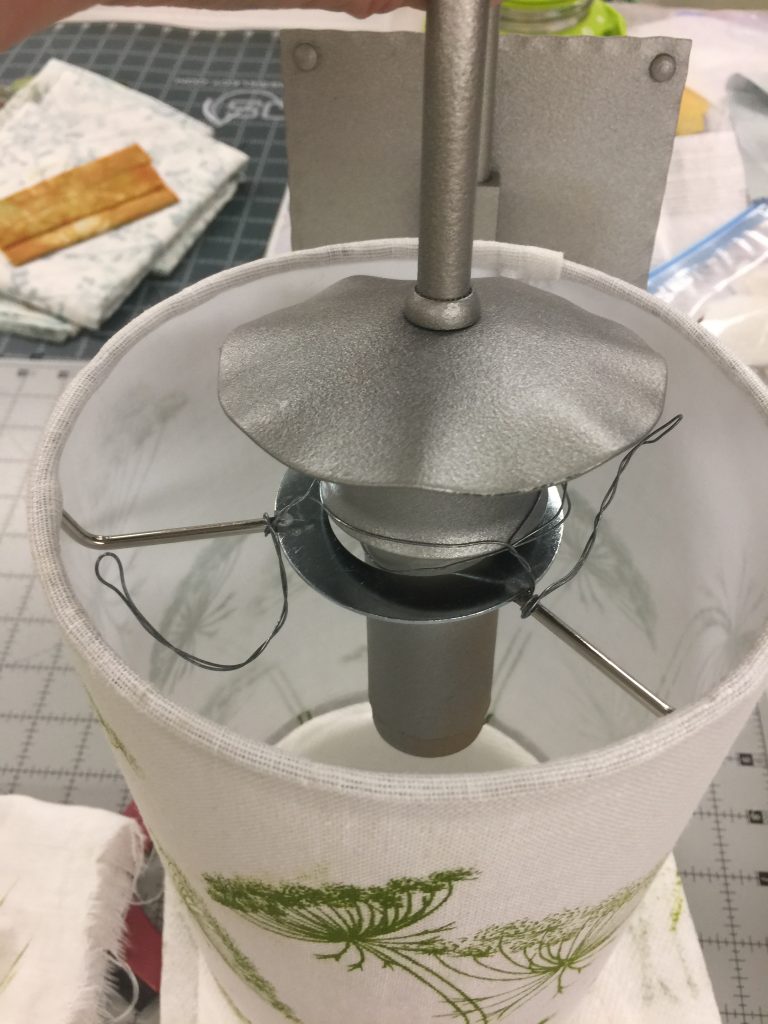
First thing I needed to do was see if I could spray paint the fixtures. Before we moved into the house, one had been damaged and removed (but kept in the basement). I bought some Rustoleum in Satin Nickel and it worked! I didn’t even have to sand!
I was delighted at how good the fixtures looked as Not Black. Once they were on the ground, I also realized I could turn the fixtures upside down and that fluted frill on the bottom looked sort of like a Japanese temple roof line. Sort of. But at least better than as a candle holder!
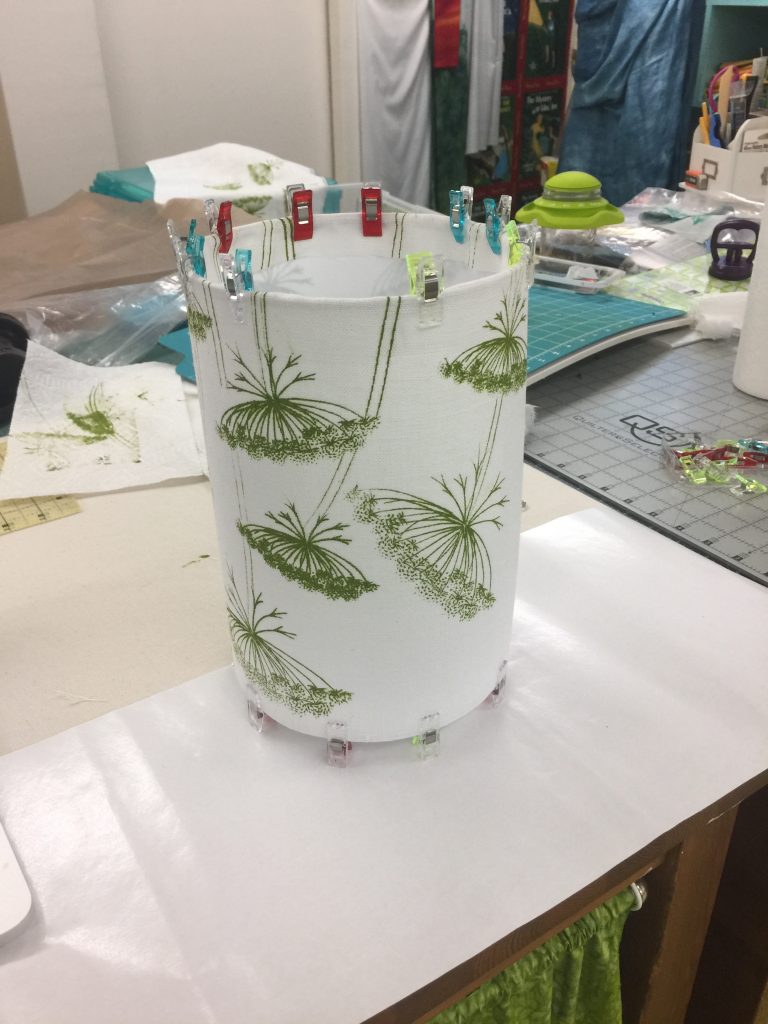
I had planned on using a cotton-linen blend for the shades, but when I went to Fiddlehead Artisan Supply (quilt and art shop to die for and only a half hour away!) they were temporarily out of the blend, so I bought some coarser weave pure linen to try. Then I started searching out stuff to make new shades, starting with Candy’s source, I Like That Lamp website. I ordered the styrene–the rigid stuff to which you adhere the fabric–and glue from that site, but her rings only go down to 8″, and I wanted a 6″ for my sconces in the hallways. I found some 6″ size here, on Etsy.
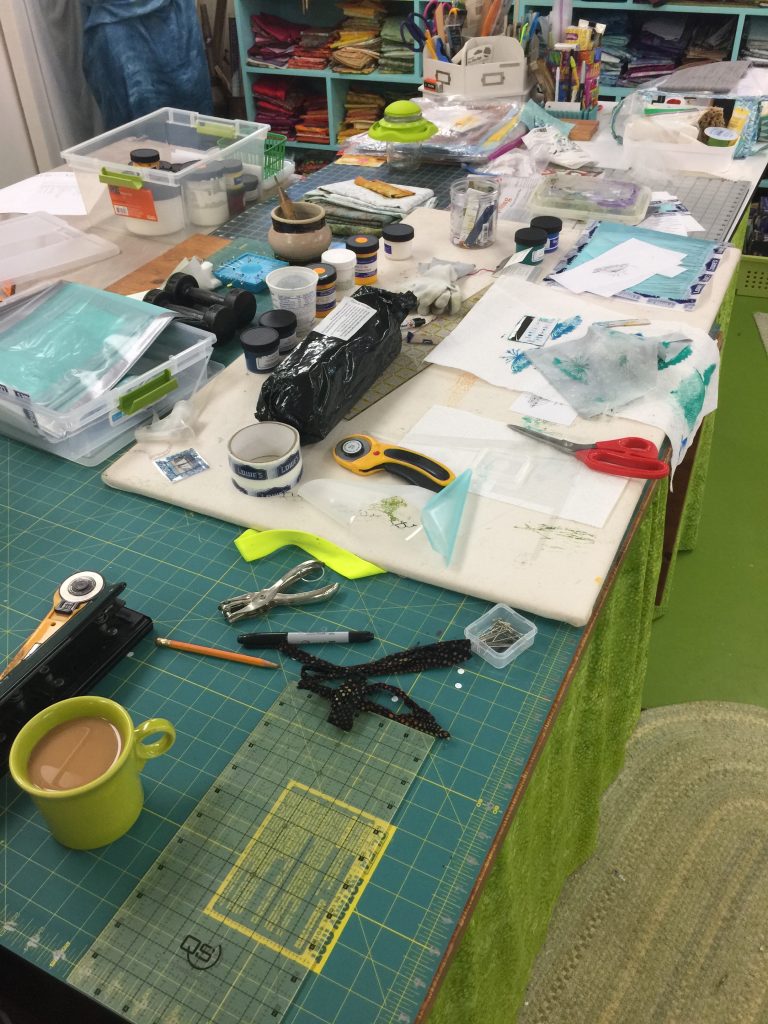
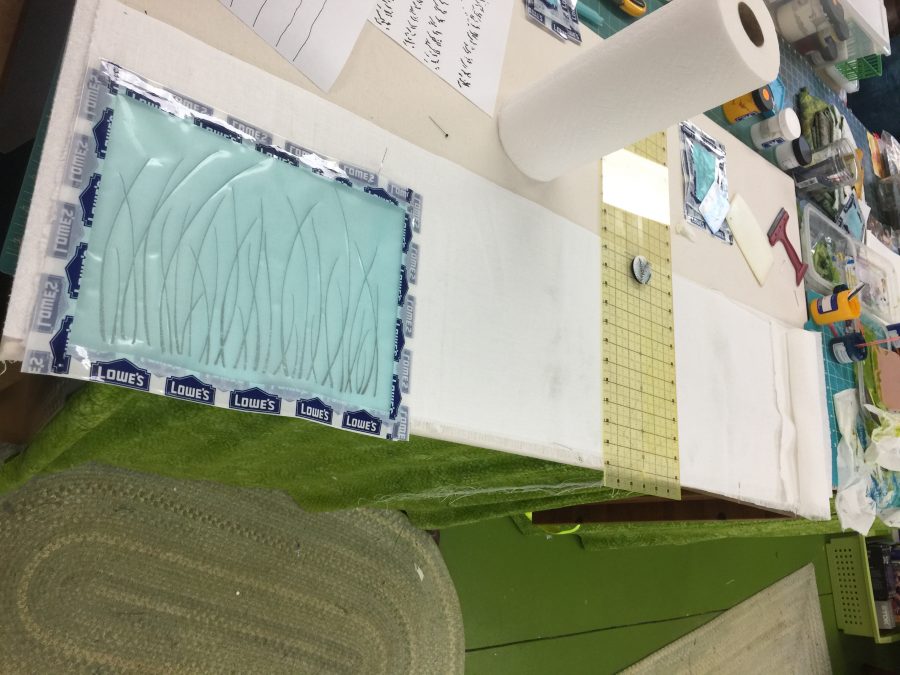
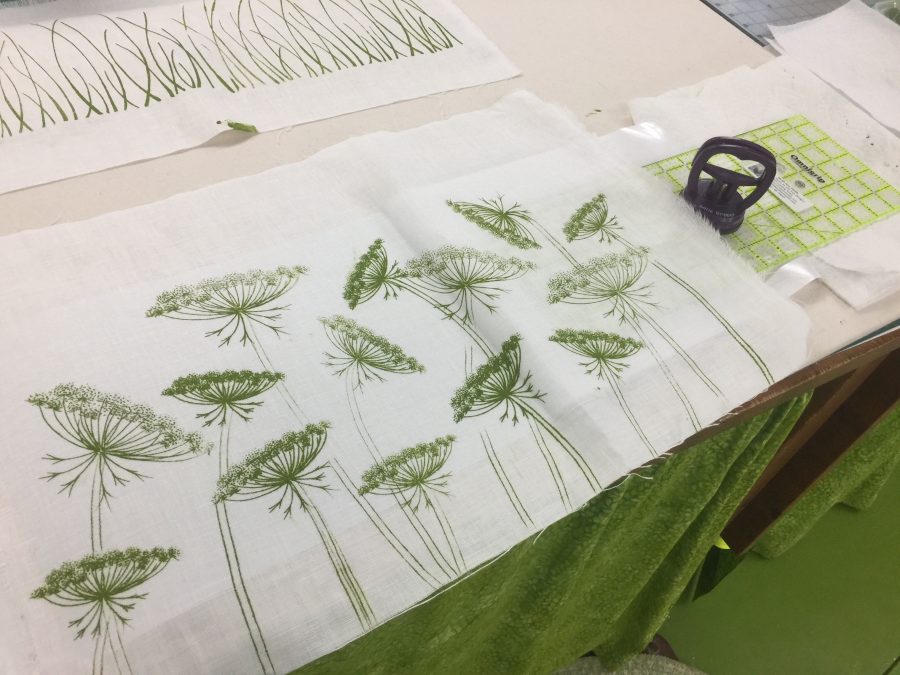
Next, I needed to see how the linen would print. Using my existing printing board, the prints were blobby–the surface had too much squish in it for the somewhat more open weave of the linen (as compared to quilting cottons). So I made a new printing board with less padding, and learned that using paper towels under the linen did not affect the quality of the print and prevented less of the ink from soaking in to my new board.
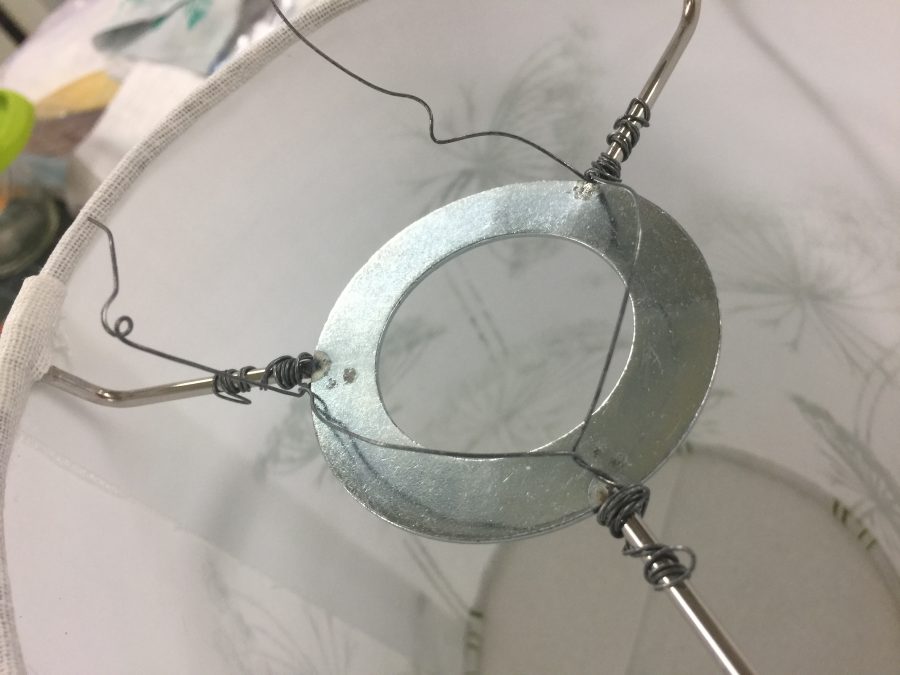
Mess-making in process. I used ProChemical and Dye Opaque and Transparent textile paints. I sell some sets in my store (just scroll down) plus you can buy larger quantities and more colors directly from ProChem. The screen/design for grasses is new and I can tell I will use it often. I cut my linen into lengths from selvage to selvage, then marked how long I needed with a pin. If I goofed, I could keep printing and avoid an oops spot. The Milkweed thermofax screens used in the upper left piece I had already made, but the others are new. All are drawn, not a manipulated photo (which is another process I use). So far I am only selling the milkweed screens (here), but if anyone is interested in the others let me know.At least in my universe, printing always involves an oops and some “letting it go”, but I did end up re-doing the grasses because I had printed them too high on the strip–the bottom of the blades of grass needed to be at the bottom edge of the lamp. I also made some real mistakes on the Queen Anne’s lace, so re-did them, too. But I will use the not-bad parts of those for something else!I Like That Lamp website has some excellent tutorials. Instead of using binder clips, I used Wonder Clips the same way and they worked beautifully. I did have some fuss and bother getting the glue to hold as I wrapped the edges around the wire rings, probably because the glue oozed out between the weave. However, once set, you’d never know. They look well done if I do say so myself.Because my fixtures are OLD, and I didn’t want to have them as candles with the ring sliding down around the tube to rest on the metal, I needed to get creative with how I would suspend the shades. Wire!It’s not the prettiest solution, but it works. And it doesn’t show, best of all. Because the wire fitter is recessed down below the top of the shade, the wires that hold the shade to the fixture are hidden (unless you are really, really tall). Those tails were wrapped around the spider-legs of the ring. The Queen Anne’s Lace is in our bedroom.The birch trees are in the back part of the hallway, in the “Rogue’s Gallery” (aka family photo wall) The milkweed is in the front portion of the hallway, with Eli’s middle school art project underneath and a pour painting by my friend Deidre Murphy on the right.The simplest is perhaps my favorite and is the sconce we see from the living room, the waving grasses. When we first moved into the house there were shrubs that grew up and blocked the view out the windows at the far end–not great. But in the afternoon light they cast lovely shadows on that wall, which inspired me to make this shade.
Some good news: in August 2020 I will be teaching a 3-day surface design workshop at ProChemical and Dye in Fall River, Mass. (about an hour or 90 minutes south of Boston, minutes from Rhode Island) and we will cover the thermofax and paint technique.
The whole thing worked SO WELL that I am thinking I would like to make a set of seasonal shades for the floor lamp in the living room…one for Christmas/Winter, another for Spring, Summer and Autumn. I need to do some patterning as this lamp looks best with an angled shade, not a drum shade, and they are harder to make. I need to learn if I can do it with standard 44″ wide fabric given the flare on the shade. Stay tuned for more house fix-ups! Hope you’ve enjoyed this detour from the usual art quilts and family life.